Create Workflow
This guide shows you how to create workflows in AI/Run CodeMie using the Visual Workflow Editor—the easiest and fastest way to build automated processes.
Prerequisites
Before creating a workflow, ensure you have:
- A clear understanding of the workflow's purpose and desired outcome
- Assistants configured for the tasks your workflow will perform
- Any required integrations set up (Jira, Confluence, Git, etc.)
Creating a New Workflow
-
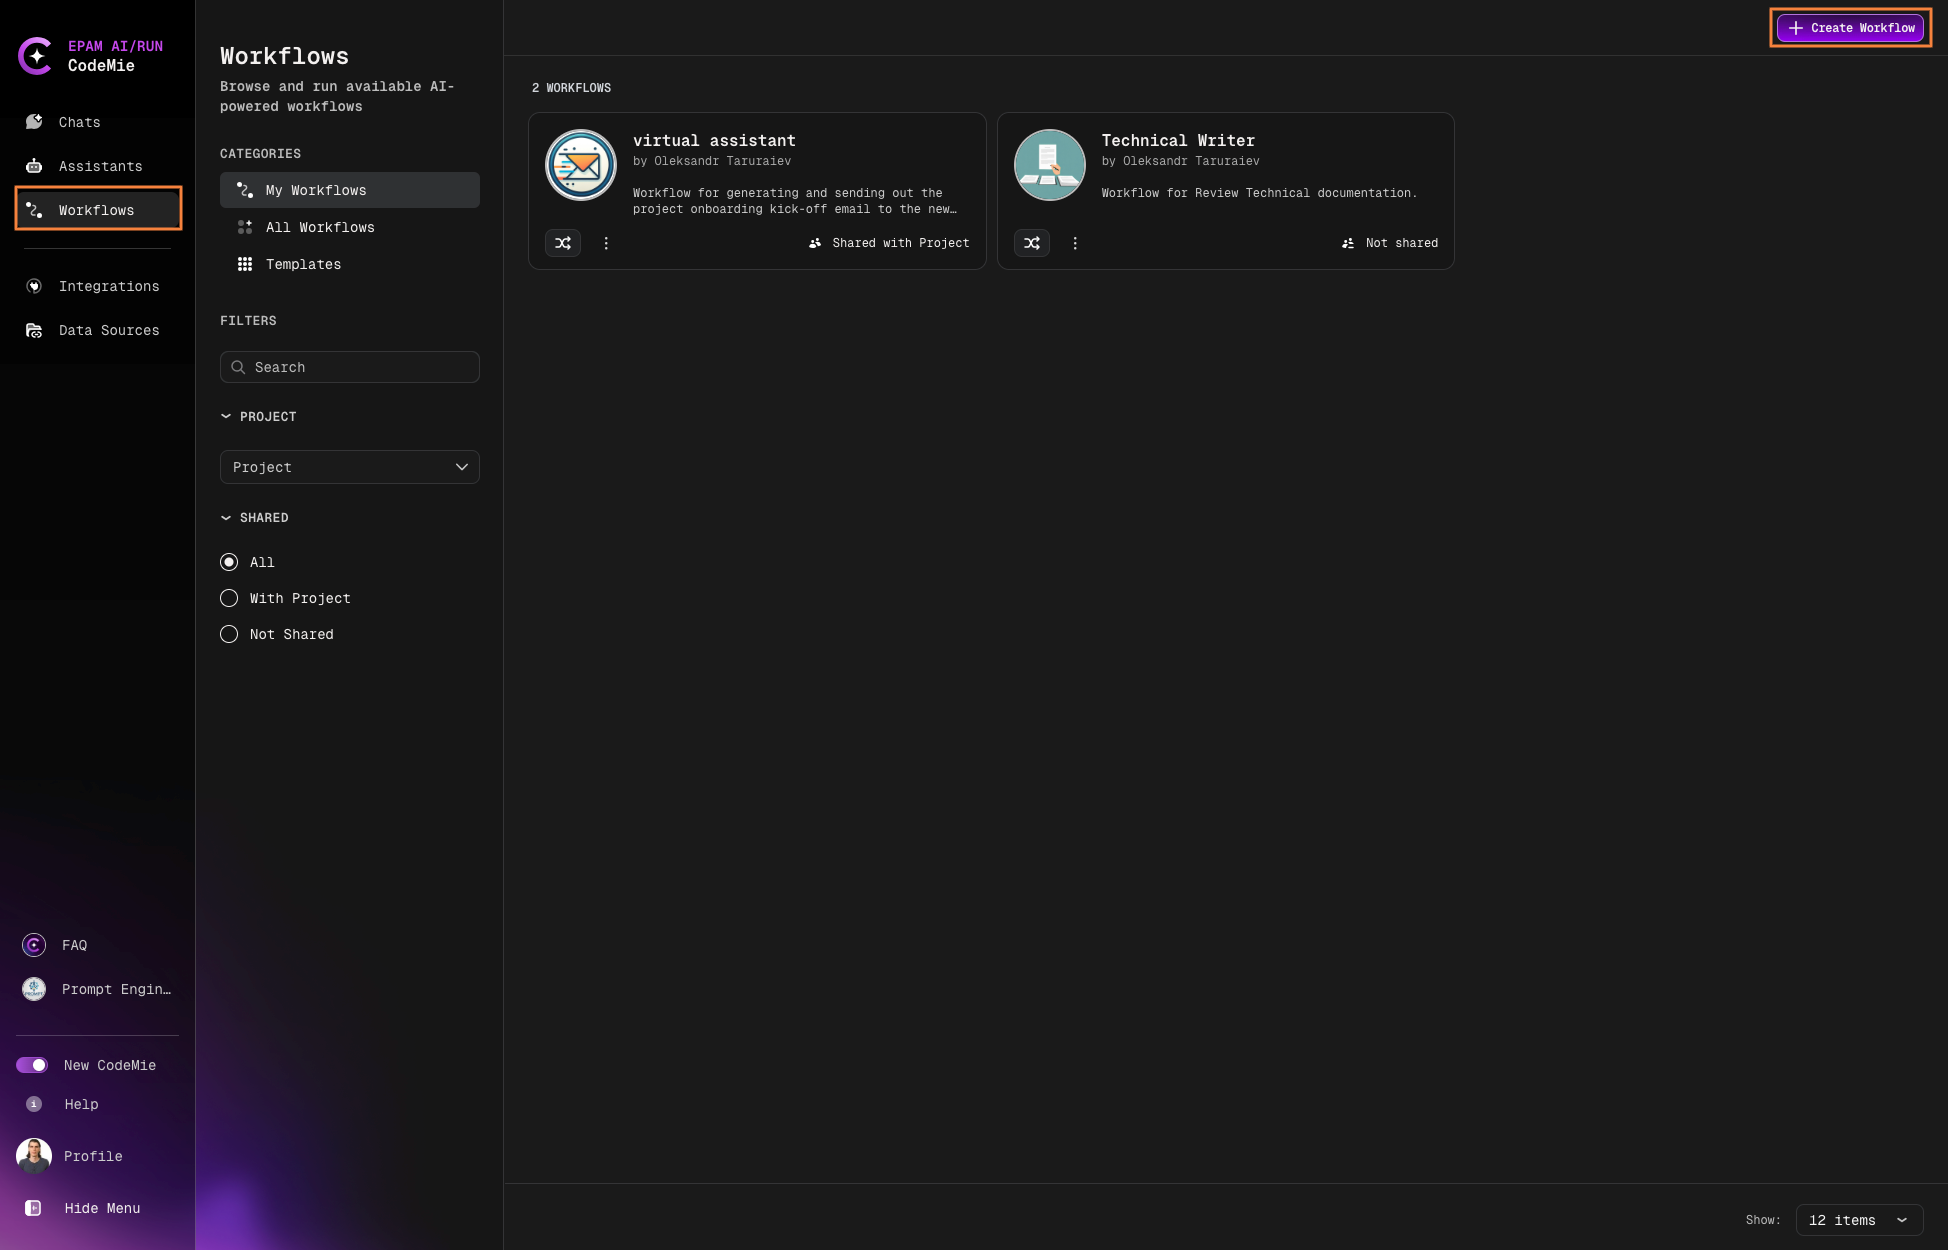
Go to the Workflows section in the left sidebar
-
Click + Create Workflow:
Building Workflows with the Visual Editor
The Visual Workflow Editor is a drag-and-drop interface that makes building workflows intuitive and visual. Instead of writing YAML code, you design workflows graphically.
Watch this video walkthrough of the Visual Workflow Editor to see all features in action.
Visual Editor Interface
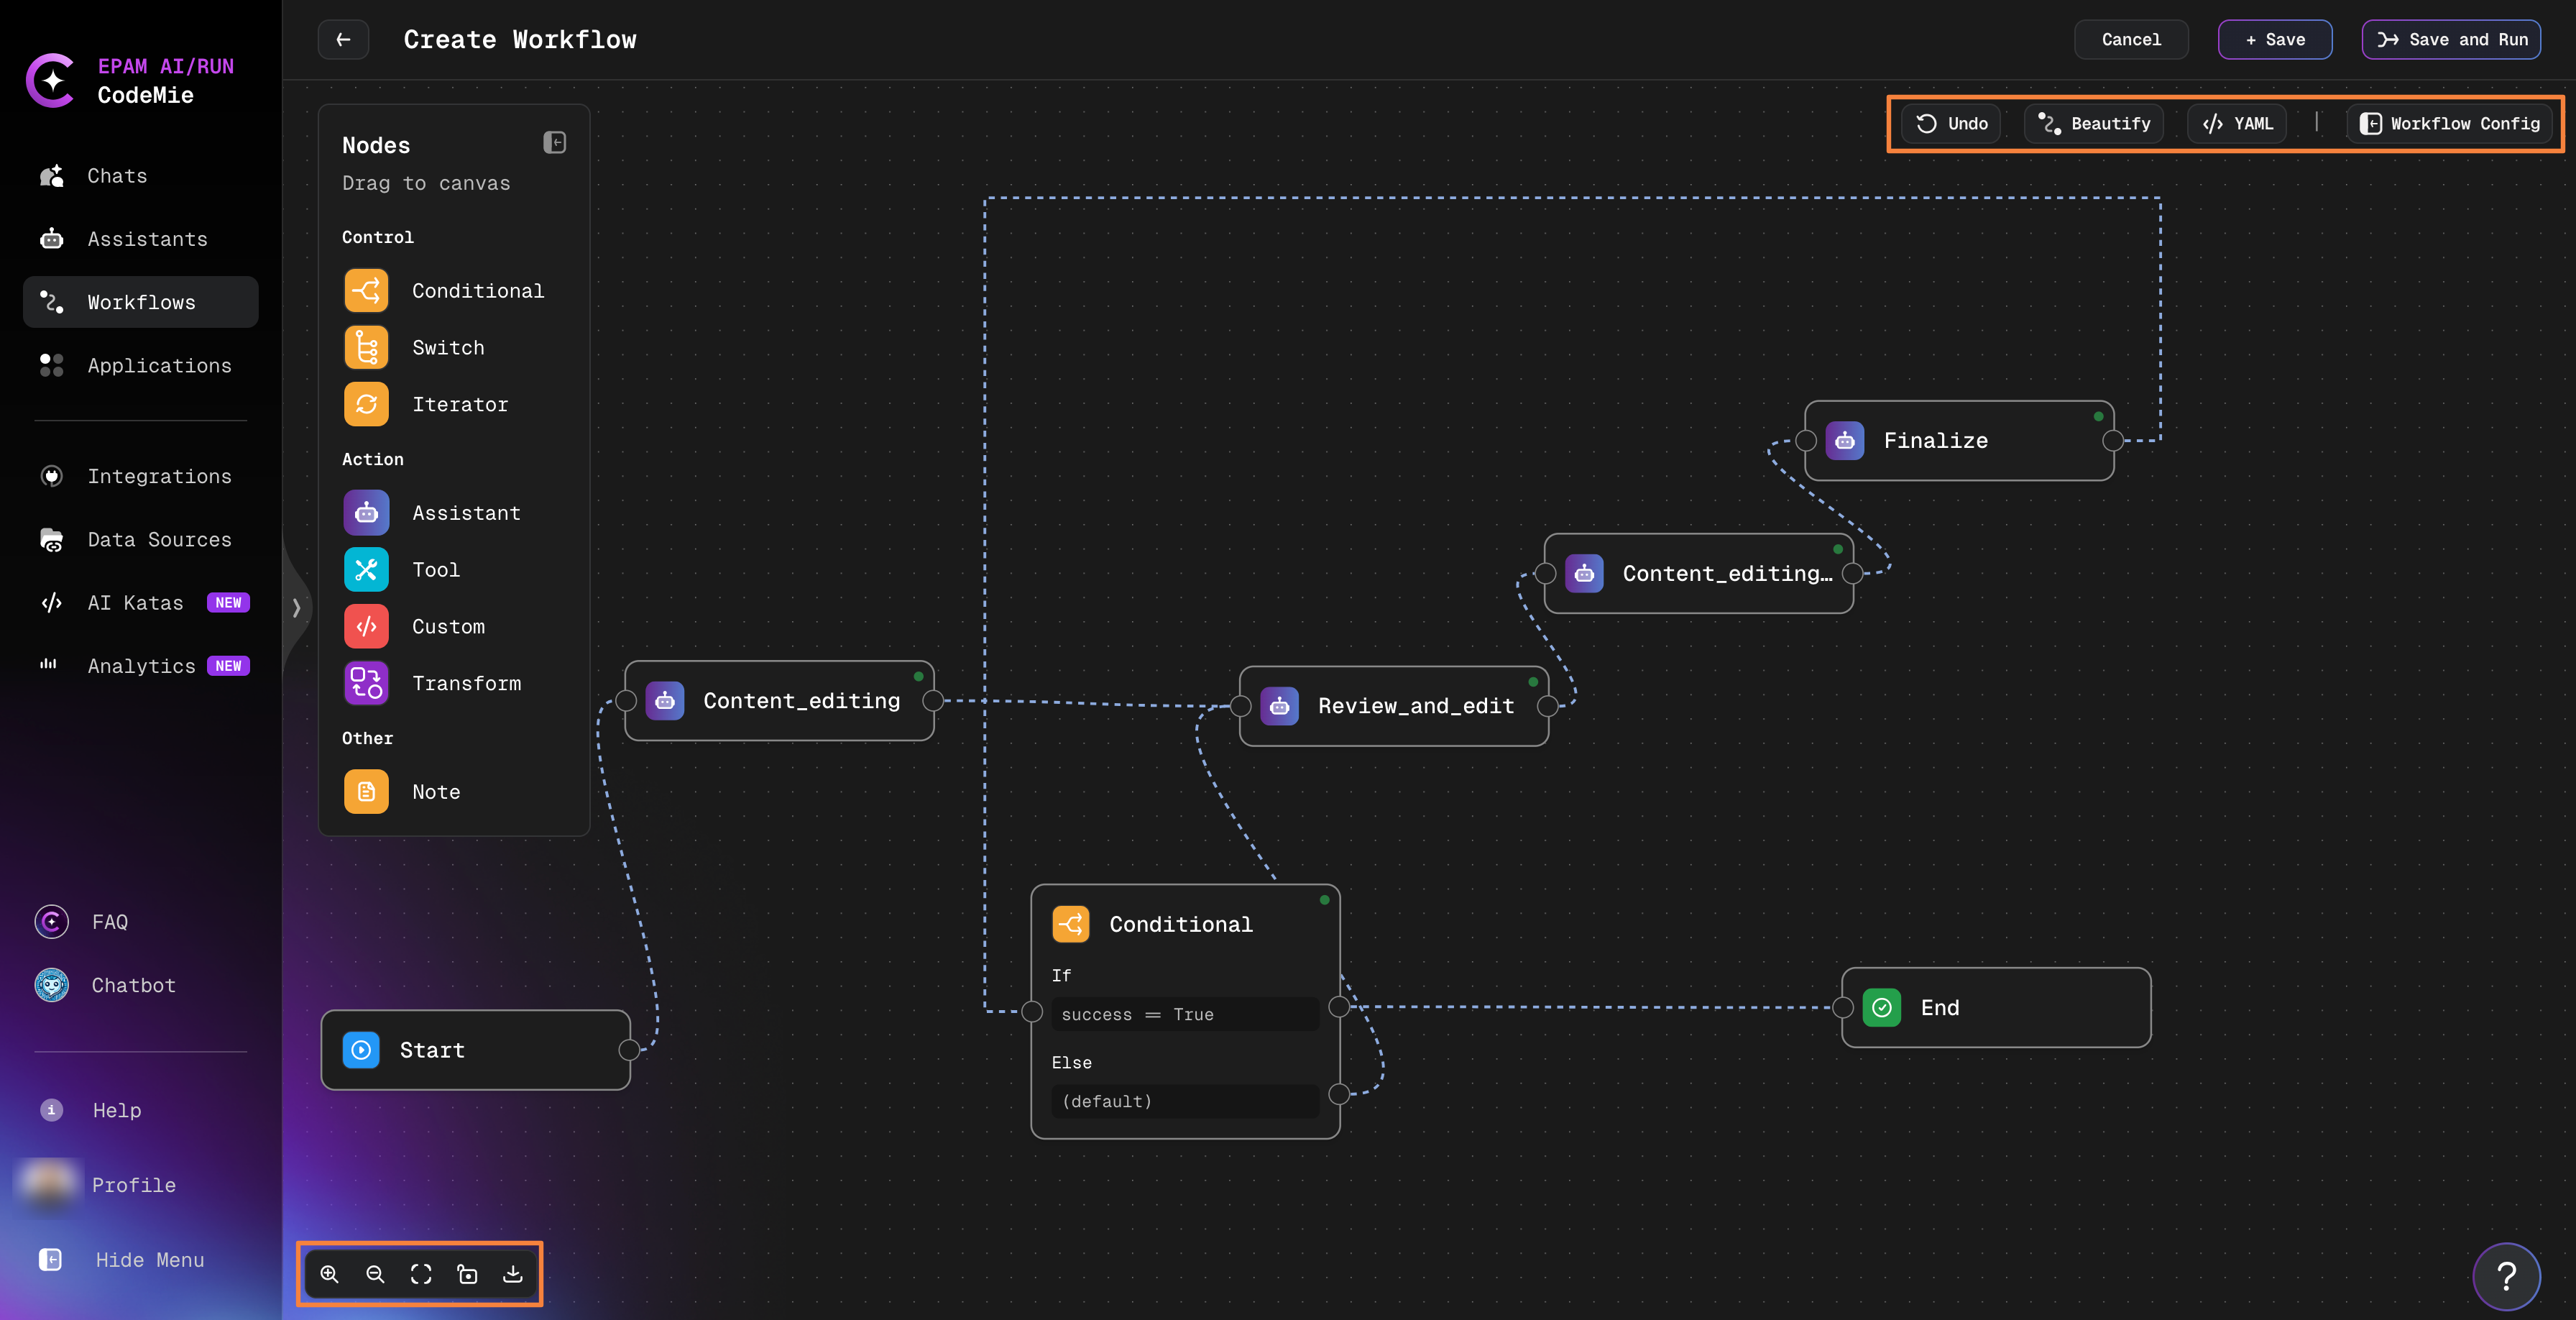
The Visual Workflow Editor consists of three main areas that help you design and manage workflows efficiently.
Left Sidebar: Nodes Palette
The left sidebar contains all available node types organized by category:
Control Nodes:
- Conditional: Branching logic with if/else conditions
- Switch: Multi-path routing based on values
- Iterator: Loop through collections of data
Action Nodes:
- Assistant: AI-powered processing with assistants
- Tool: External system integrations (Jira, Confluence, etc.)
- Custom: Execute custom code or scripts
- Transform: Transform data structures between states
Other:
- Note: Add documentation and comments to your workflow
To add a node, simply click on it in the sidebar or drag-and-drop it directly onto the canvas.
Bottom Left: View Controls
Visual controls for managing your workflow view:
- Zoom In/Out: Adjust the canvas zoom level
- Fit View: Automatically fit the entire workflow in the viewport
- Lock/Unlock: Lock the canvas to prevent accidental changes
- Download Schema: Export the workflow schema as an image
Upper Right: Workflow Actions & Configuration
This section provides essential tools for managing your workflow:
Action Buttons:
- Cancel: Discard changes and exit without saving
- Save: Save the current workflow configuration
- Save & Run: Save and immediately execute the workflow
Workflow Tools:
- Load Example: Load a pre-built example workflow as a starting point
- Beautify: Automatically organize and align nodes for better visual layout
- Undo: Revert to the previous state (appears after making changes)
- YAML: Switch to YAML editor to view or edit the configuration code
- Workflow Config: Access Basic and Advanced configuration settings
Workflow Configuration Menu
Click the Workflow Config button to access configuration options:
Basic Tab:
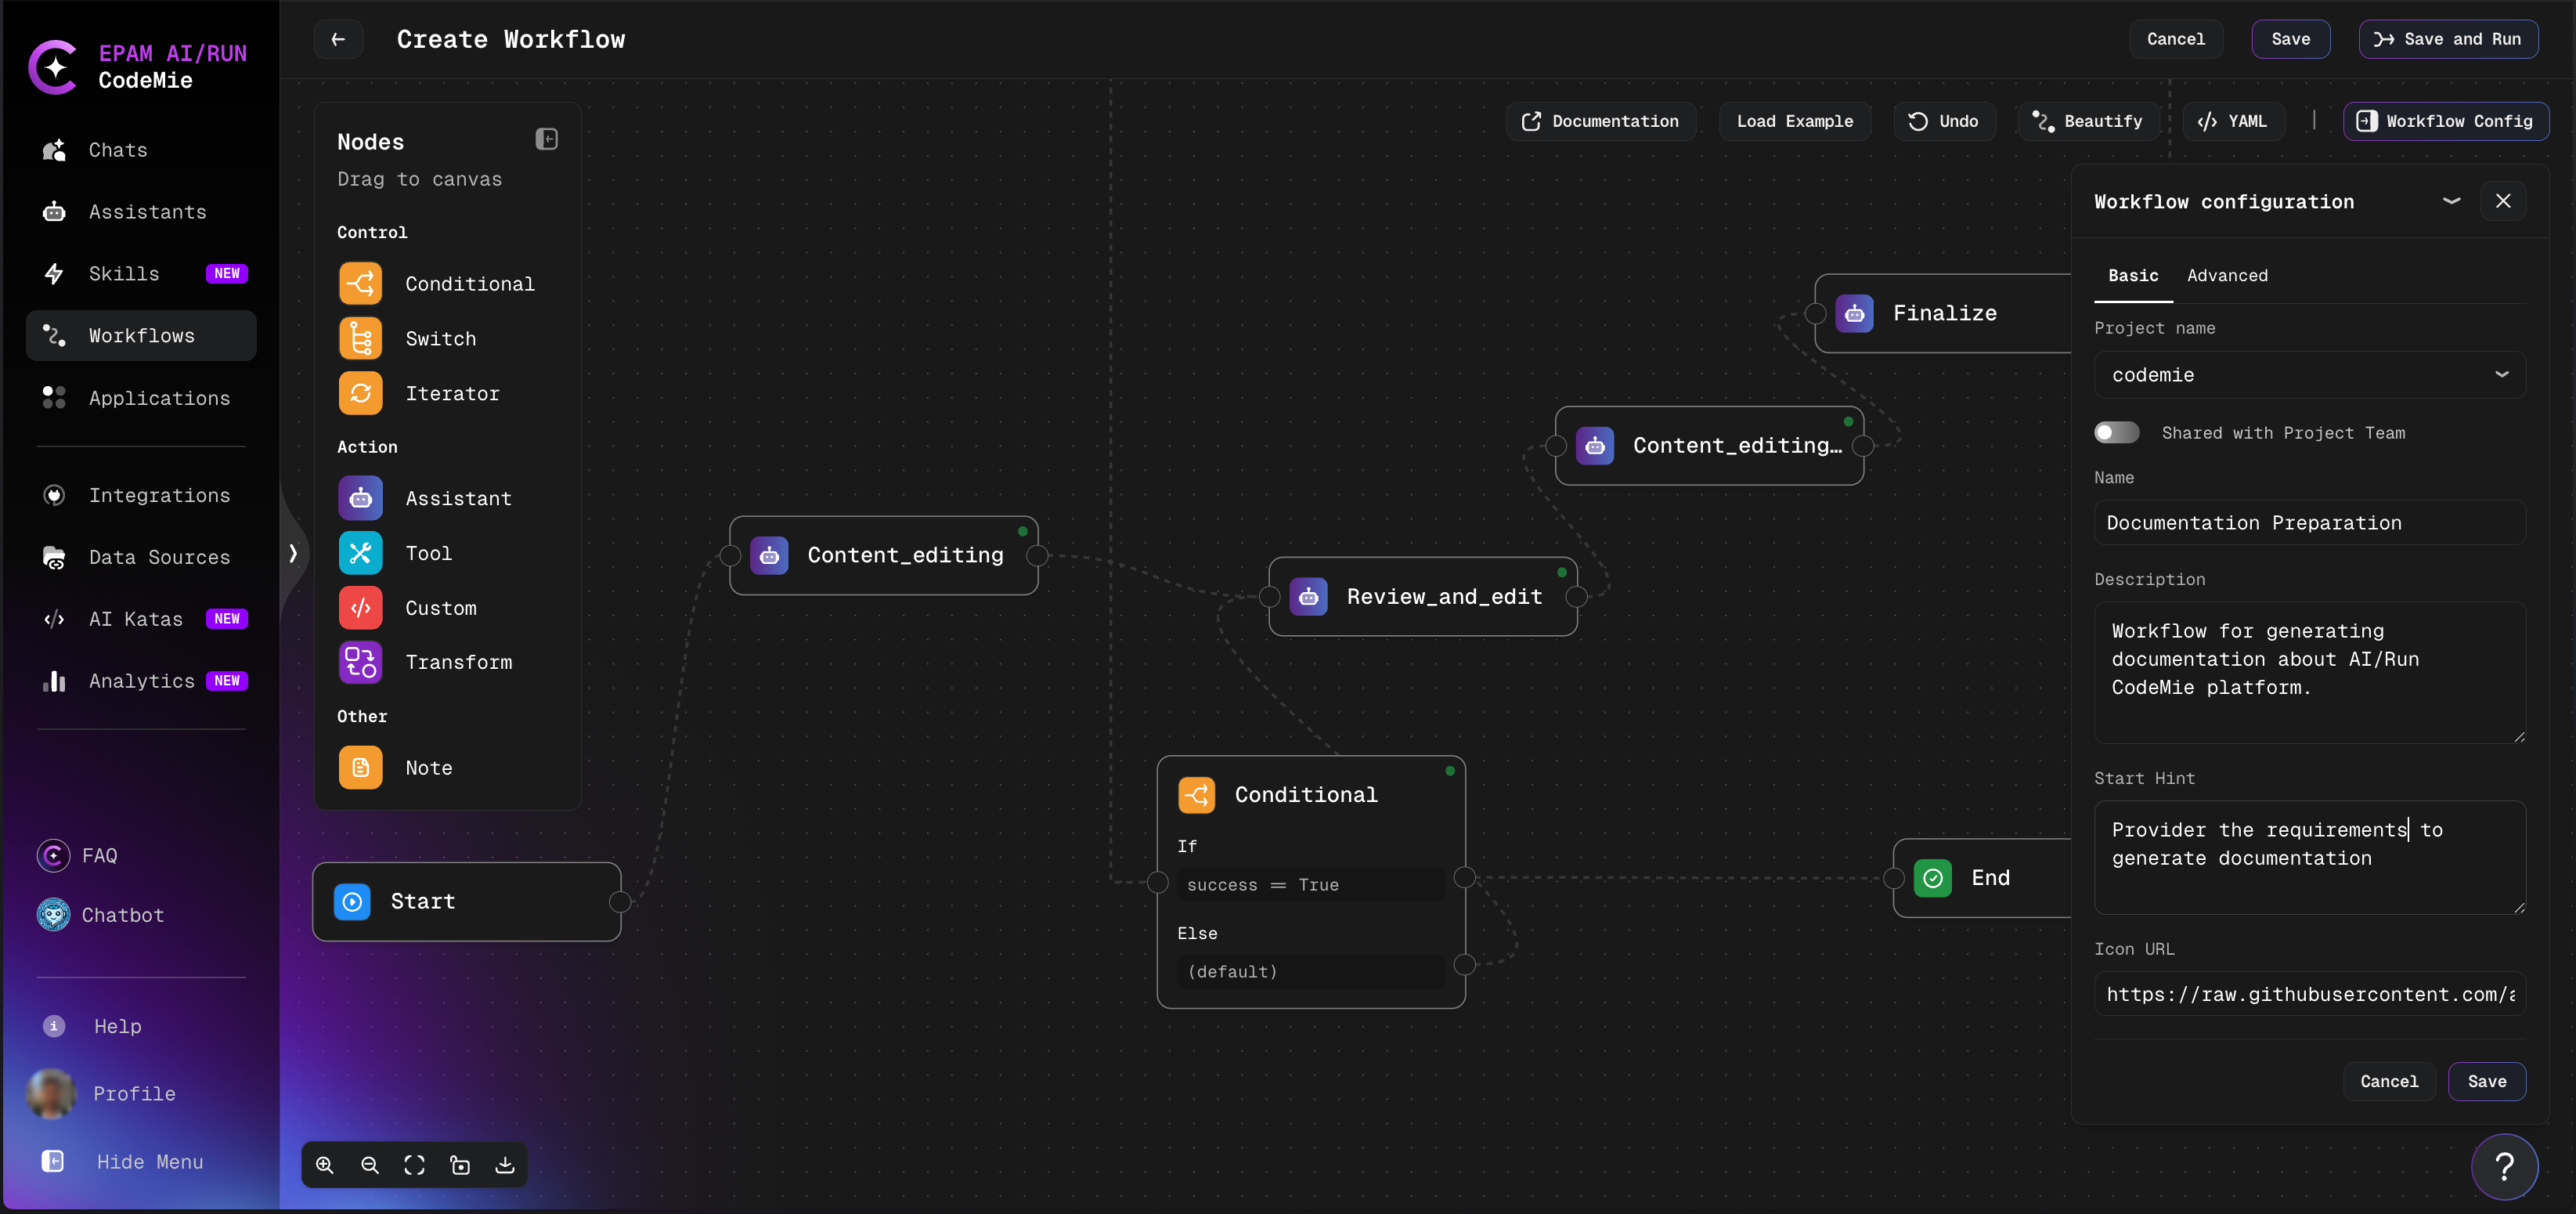
Configure essential workflow settings:
- Project name: Select the project where you want to add the workflow
- Shared with Project: Enable to make your workflow visible to your project team
- Name* (Required): Unique identifier for your workflow
- Description: Brief explanation of the workflow's purpose and features
- Start Hint: Custom text displayed below the prompt input field when users start a workflow execution.
- Icon URL: Link to an image (.png or .svg) for the workflow avatar
Fields marked with an asterisk (*) are required and must be filled in before saving the workflow.
Advanced Tab:
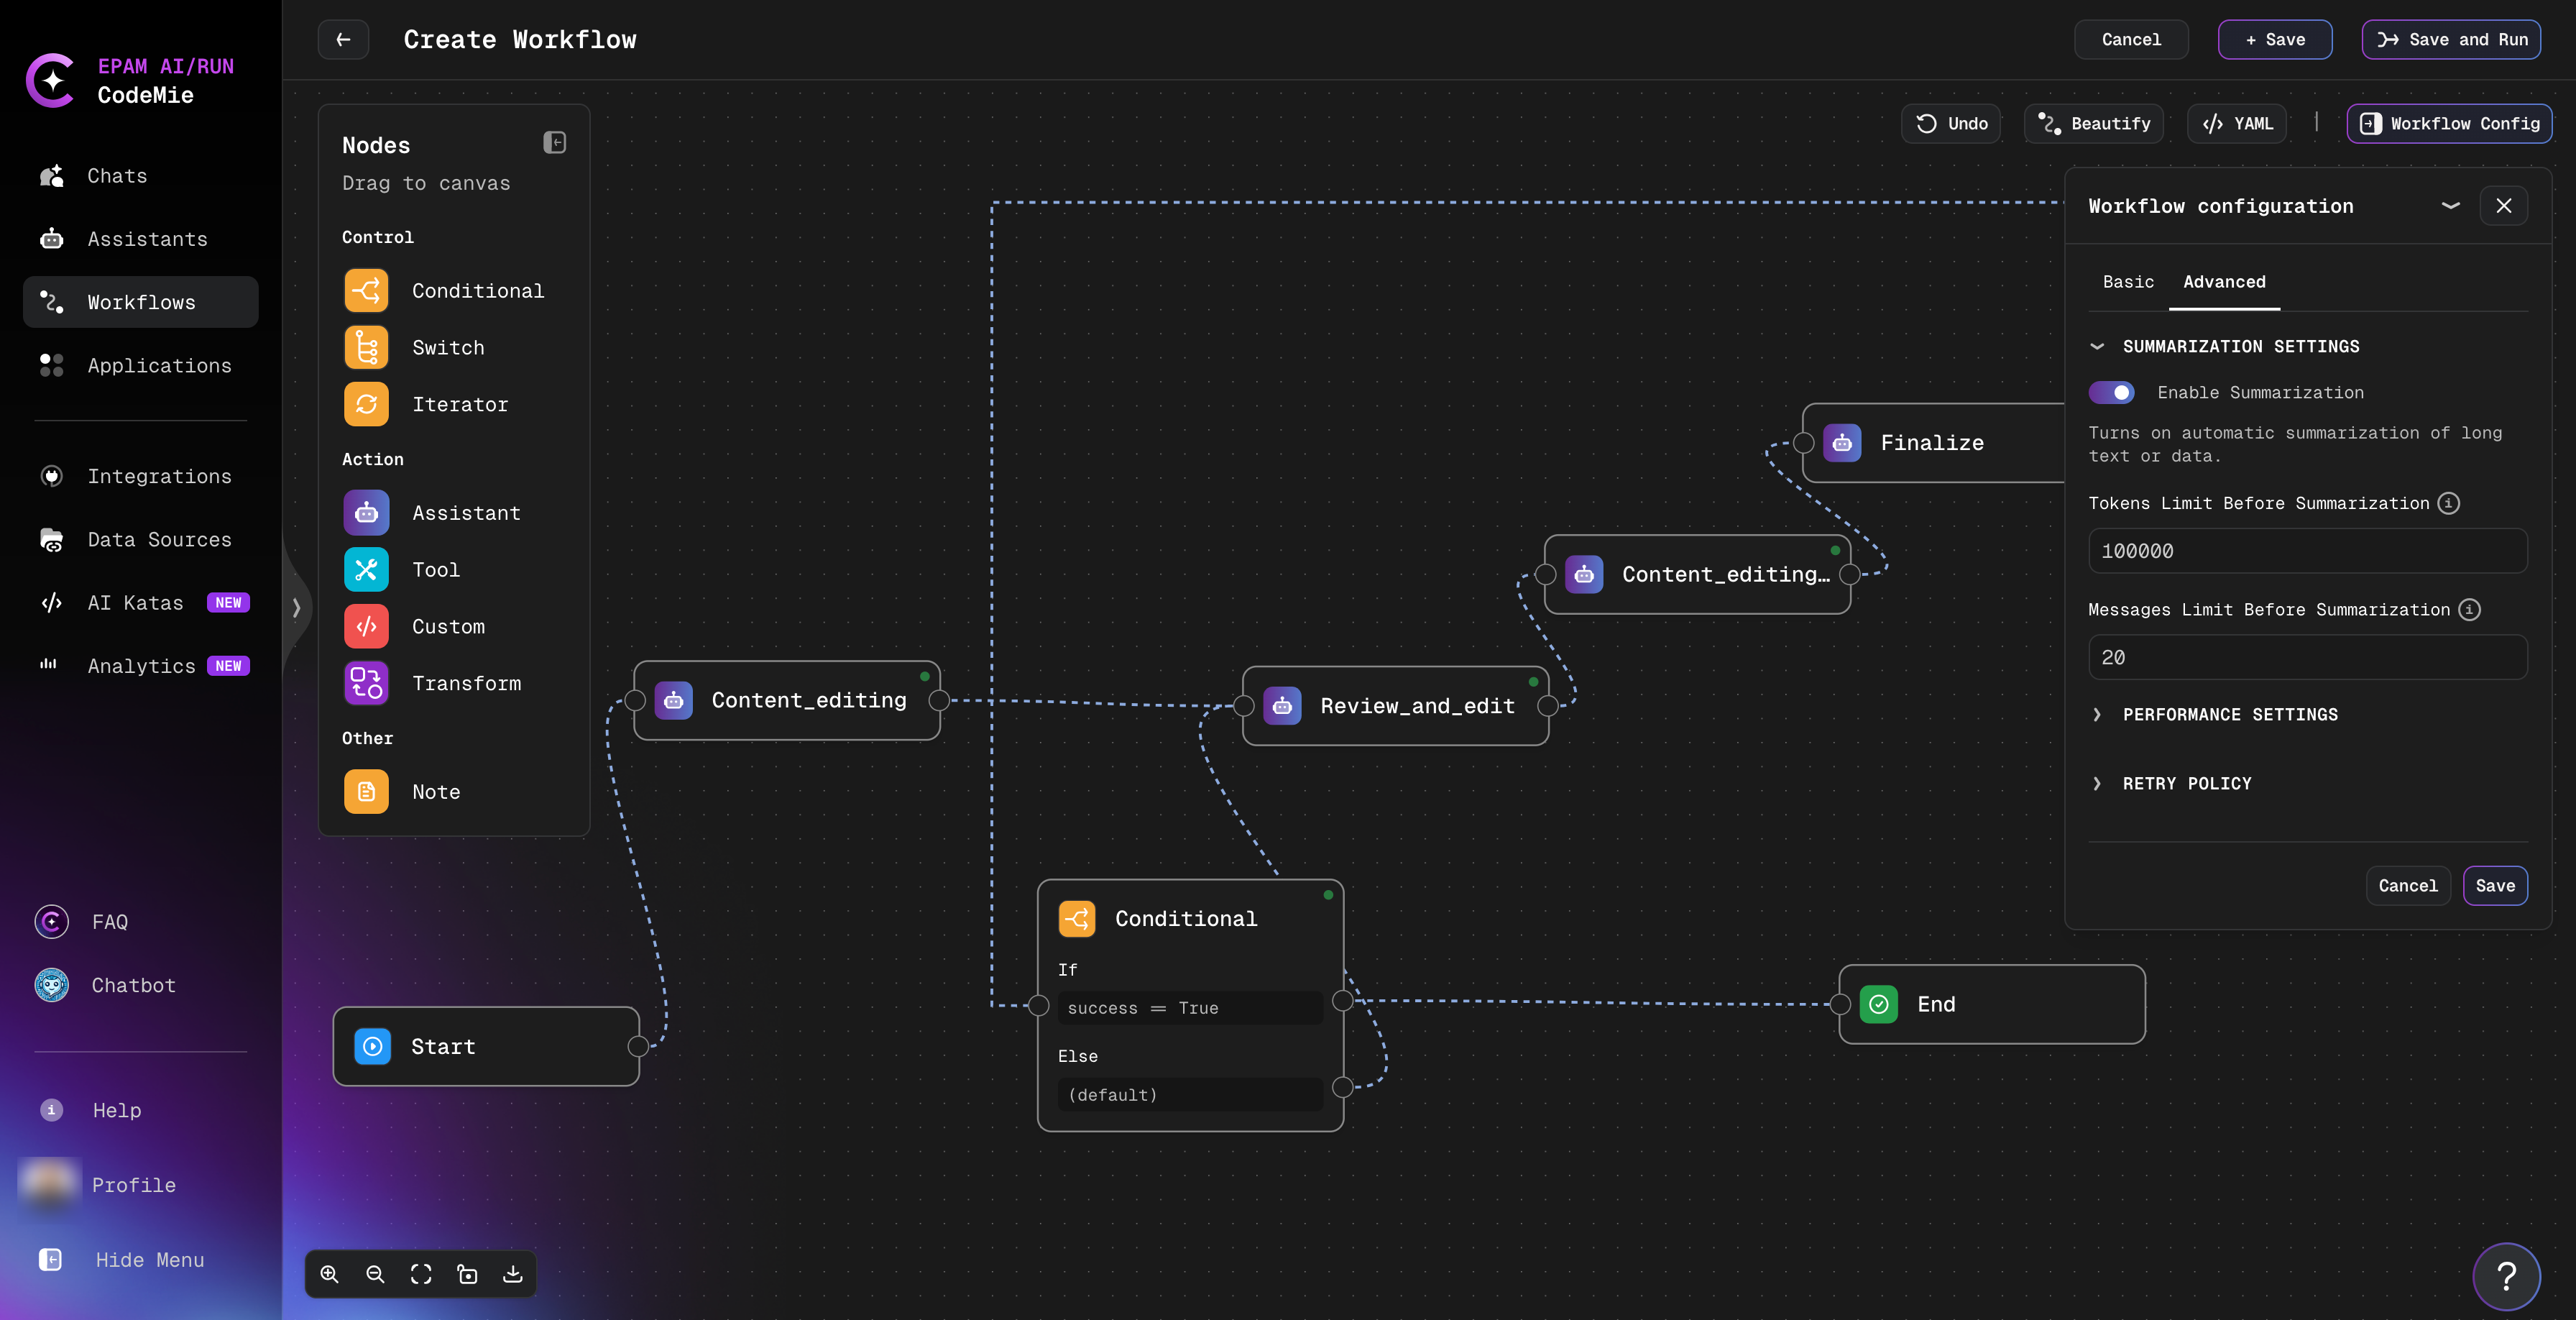
- Summarization Settings: Token and message limits for automatic summarization
- Performance Settings: Parallel task execution and recursion depth limits
- Retry Policy: Configure retry attempts and backoff strategy for failed operations
Changes made in the Visual Editor are automatically reflected in the YAML configuration, and vice versa. Both views stay synchronized in real-time.
Working with Nodes
Adding and Configuring Nodes
- Add a Node: Click a node type in the sidebar or drag it to the canvas
- Configure the Node: Click the node to open its configuration window
- Set Parameters: Customize the node's behavior (assistant selection, task prompts, conditions, etc.)
- Save Configuration: Click Save to apply your changes
Smart Configuration Validation
The Visual Editor provides intelligent configuration assistance for Tool and Custom nodes. When you configure a node, the editor dynamically displays input fields that match the argument schema and type requirements of the selected tool or custom function. As you fill in the configuration, the editor visually alerts you to any missing required fields or type mismatches, helping you catch errors before execution.
The configuration panel prevents you from saving incomplete or invalid node settings, ensuring that your workflow is ready to run without configuration errors. While the editor generates and updates the YAML configuration automatically in the background, you work primarily with a structured, user-friendly interface that guides you through the setup process. If you need direct control over the configuration, the YAML editor view remains available.
Assistant Integrations and Saving
An assistant node may use tools whose integrations are not pinned by the assistant author. Such integration slots belong to whoever runs the workflow — resolved automatically or selected personally — so the workflow author does not have to own an integration for them.
Saving the workflow therefore succeeds even when those slots are empty for the author. The save response lists the affected tools as a warning, not an error: it is a reminder that these tools will depend on each user's own setup at run time. See Automatic Credentials Lookup for how a slot is resolved, and Assistant Panel on the Executions Page for selecting a personal integration from a workflow.
Duplicating Nodes
Quickly duplicate existing nodes with their configuration:
- Windows/Linux: Select a node and press
Ctrl+D - macOS: Select a node and press
Cmd+D
This creates a copy of the selected node with all its settings, which you can then modify as needed.
Connecting Nodes
Connect nodes by dragging from one node's output to another node's input. The editor validates connections in real-time with visual indicators:
- Green connections: Valid and properly configured
- Red connections: Incomplete or incorrect (needs fixing)
Connection Rules
Follow these rules to maintain logical consistency:
- Start node: Can connect only to action nodes (Assistant, Tool, Custom, Transform)
- Conditional and Switch nodes: Must connect to at least one execution node
- Iterator nodes: Act as containers for child execution nodes
- Action nodes: Can route to any other node type
- End node: Can be connected from any node to mark workflow completion
The system automatically organizes the node layout, validates links, and generates the corresponding YAML configuration in the background.
Deleting Nodes and Connections
Remove nodes or connections through their configuration windows:
- Click on the node or connection
- In the configuration window, click the Delete button
- Confirm the deletion
Assistant State
Uses an AI assistant to process or generate content. Assistant nodes handle reasoning, decision-making, and content generation tasks.
Why use Assistant nodes:
- Clear, understandable steps with AI-powered processing
- Swap or tune assistants independently without changing workflow structure
- Accurate tracking of intermediate logic and outputs via context store
Tool State
Calls external APIs or integrations (Jira, Confluence, GitHub, etc.) for fast, reliable data access.
Why use Tool nodes:
- Fast, reliable, automation-friendly access to external systems and data
- Separates "data gathering" from "reasoning/decision-making" (handled by assistants)
- Secure use of API credentials via
integration_alias
Selecting Tools
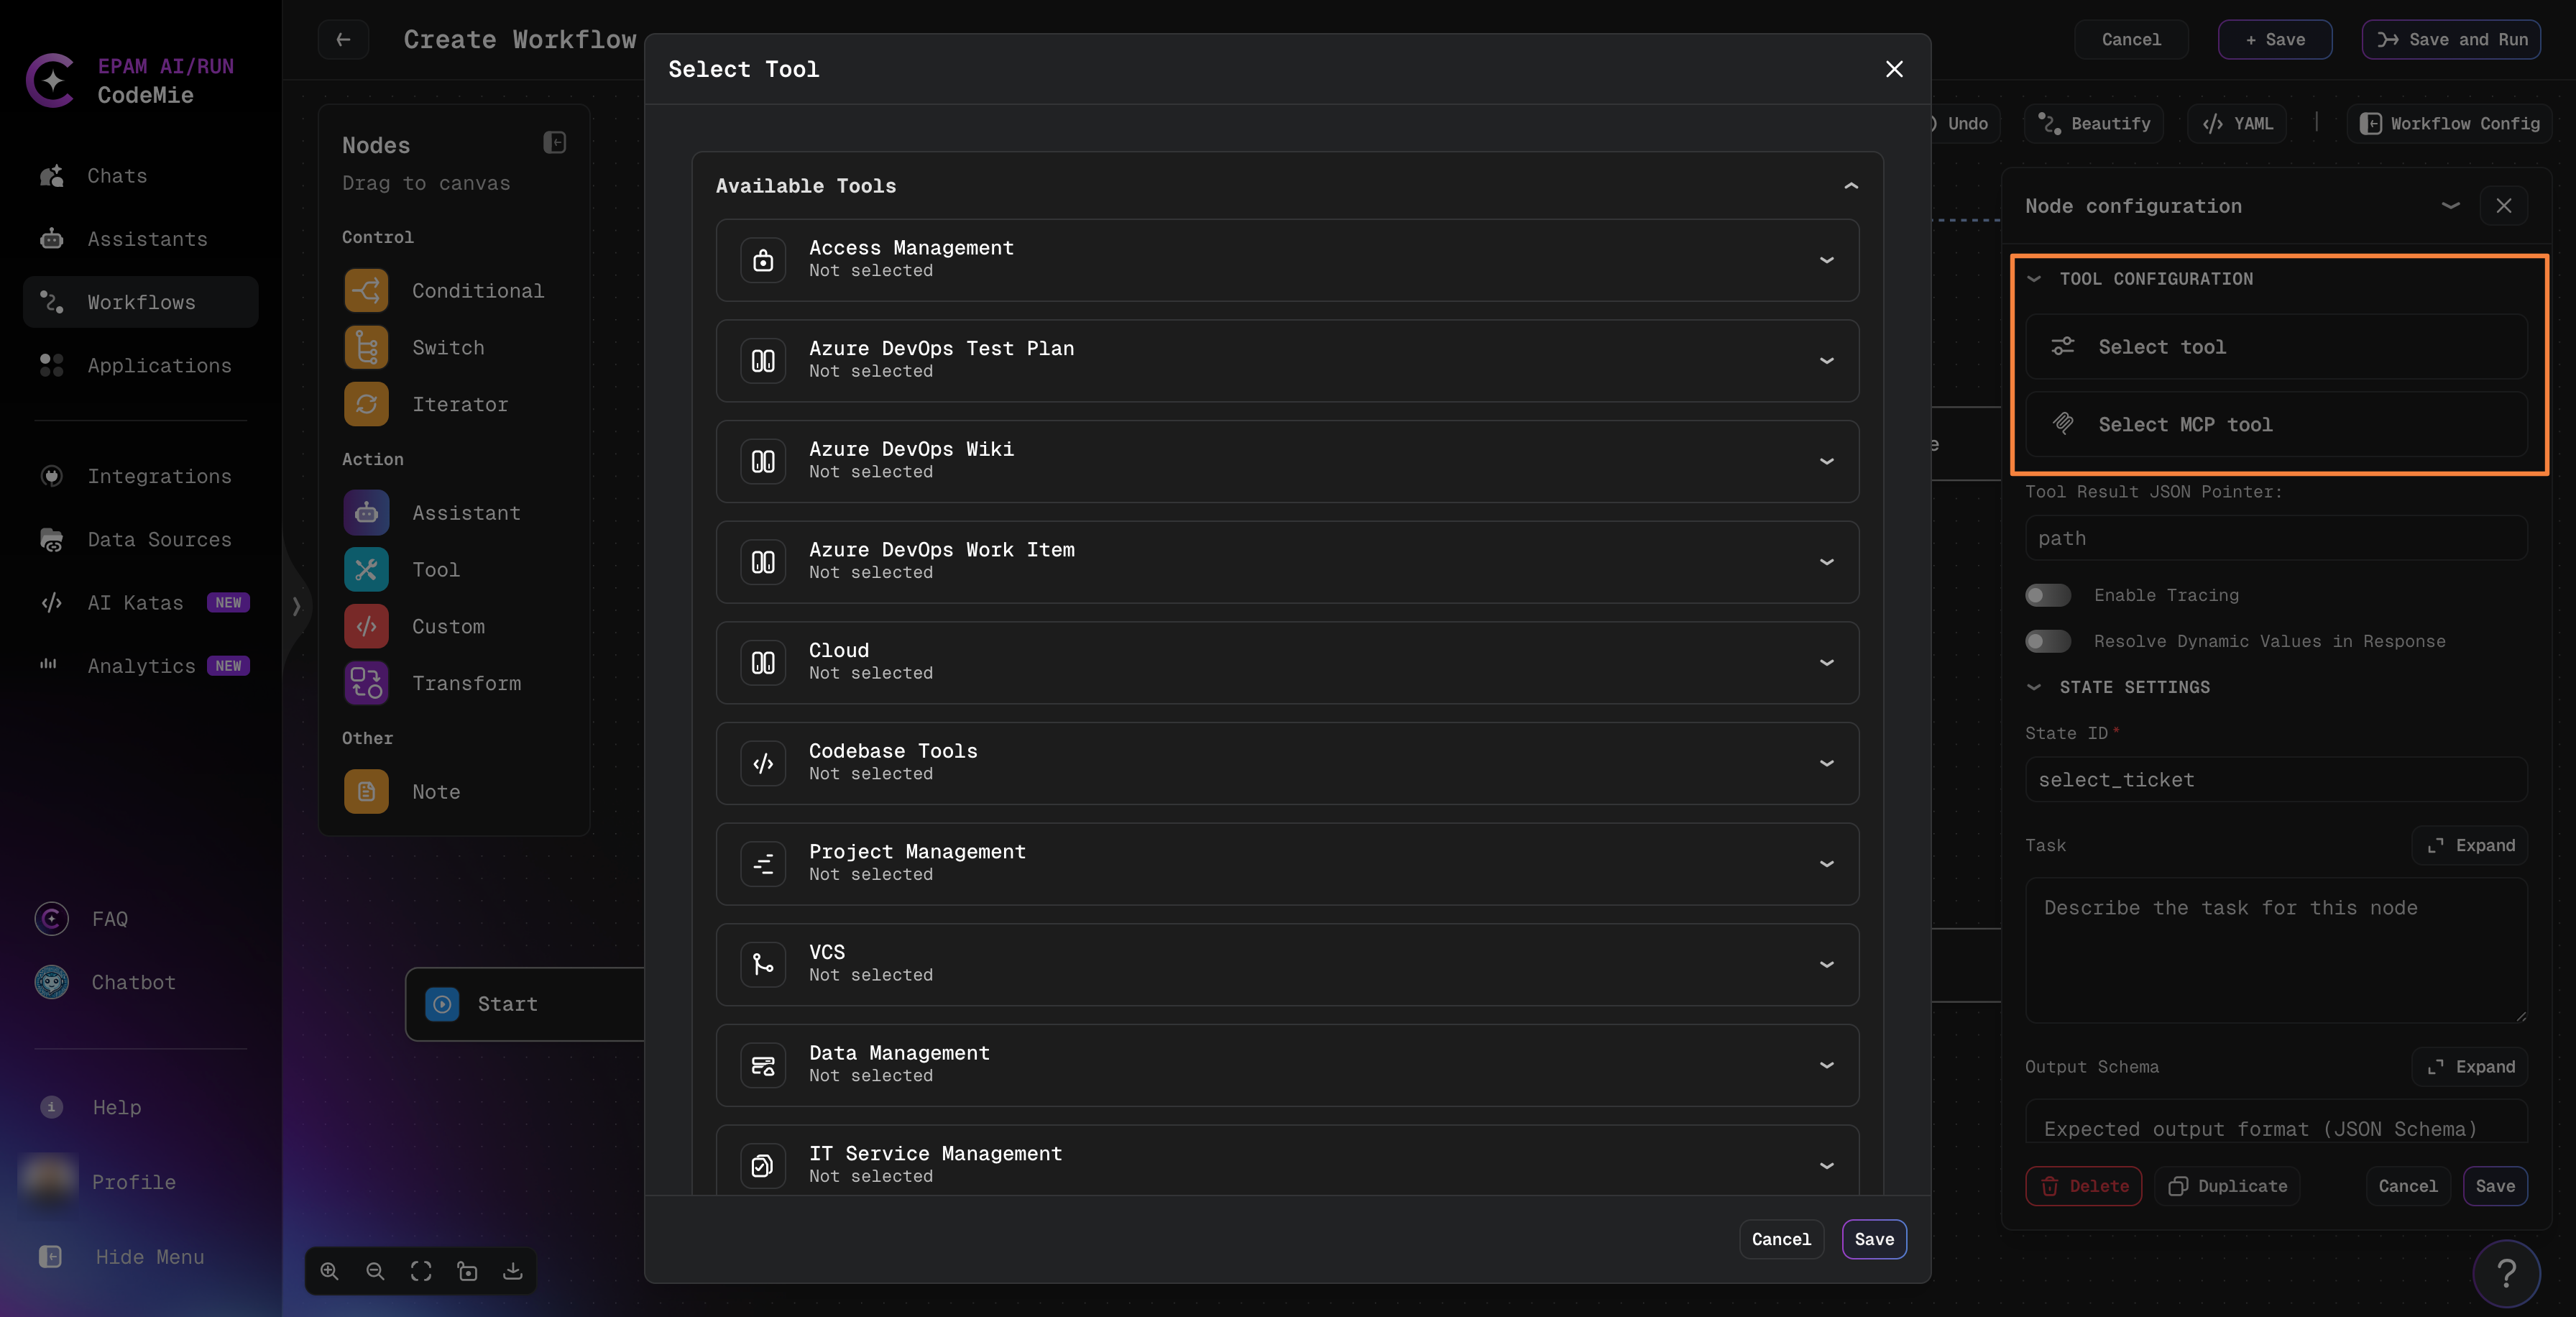
When you add a Tool node to your workflow, the configuration panel displays two selection options:
-
Select Tool - Shows all previously connected integrations organized by category (Access Management, Azure DevOps, Cloud, Codebase Tools, Project Management, VCS, Data Management, IT Service Management). Your connected tools appear in the "Available Tools" list for quick selection.
-
Select MCP Tool - Shows all configured MCP (Model Context Protocol) servers that you've added. MCP servers enable AI agents to access live data sources like file systems, databases, and APIs.
Both connected tools and MCP servers are immediately available in the selection list - no additional configuration needed for already set up integrations.
Custom State
Executes custom code, scripts, or specialized logic for complex data processing.
Why use Custom nodes:
- Highest flexibility for specialized business logic
- Implement algorithms or transformations not available in standard nodes
- Bridge gaps between different systems or data formats
Transform State
Transforms data structures and formats between workflow states using predefined mappings.
Why use Transform nodes:
- Fast, deterministic data manipulation
- Reshape data without AI processing overhead
- Reliable, predictable transformations
Node Type Comparison
| Type | Flexibility | Speed | Best For | Example Use |
|---|---|---|---|---|
| Assistant | High | Medium | Text, analysis, reasoning | Generate summaries |
| Tool | Low | High | API calls, data transfer | Post to Jira |
| Custom | Highest | Varies | Specialized logic/scripts | Data transformation |
| Transform | Medium | High | Data structure manipulation | Format conversion |
Complete Workflow Example
Here's a real-world workflow that demonstrates multiple patterns working together:
This workflow shows:
- Linear Flow: Start → Extract pages → Generate story
- Iteration: Loops through all extracted pages using an Iterator
- Processing: Each story is categorized
- Conditional Branching: Based on
be_foundcondition, routes to different Jira creation paths - Parallel Paths: Backend (Be) and Frontend (Fe) story creation
- Convergence: Both paths lead to End state
This pattern is common for:
- Processing collections of data (pages, tickets, documents)
- Classifying items and routing them appropriately
- Creating tasks in project management systems based on analysis
- Multi-step approval or validation workflows
Use the Visual Editor to recreate this pattern for your own use cases. The drag-and-drop interface makes it easy to add iteration, conditionals, and multiple execution paths.
Viewing Your Workflow
The Visual Editor provides multiple ways to view and edit your workflow:
Visual workflow view
The main canvas shows your workflow as a connected graph of nodes. Use the view controls to:
- Zoom: Adjust the zoom level to see details or get an overview
- Fit View: Automatically fit the entire workflow in the viewport
- Pan: Drag the canvas to navigate large workflows
YAML configuration view
Click the YAML button to see the generated YAML configuration. This view shows how your visual design translates to code.
If you need direct control over the workflow configuration, you can switch to YAML editing mode:
- Click the YAML button in the upper right corner
- Edit the YAML configuration directly
When editing an existing workflow, use Version History in the YAML header to browse prior versions, compare changes, and restore a previous configuration. See Workflow Version History for details.
The Visual Editor and YAML editor are synchronized. Changes made in one view are automatically reflected in the other.
Switch to YAML editing when you need features like Jinja templating, complex conditional expressions, or when you want to copy/paste configuration blocks. For most workflow creation tasks, the Visual Editor is faster and easier.
For detailed YAML configuration syntax and features, see the Workflow YAML Configuration Guide.
Editor layout keys in the YAML
Alongside the execution configuration, the Visual Editor stores the canvas layout in the same YAML document:
meta_states— a top-level list holding each node's position, size, and editor node type, plus the decision nodes (switch,conditional) that the editor draws as separate boxesnext.meta_next_state_id— links a transition to the decision node that represents it on the canvas
These keys are read only by the editor. The execution engine ignores them, and they have no effect on how a workflow runs.
When a workflow is modified through the API, the SDK, the CLI, or an IaC pipeline, the existing
meta_states block must be carried through unchanged. Dropping it discards the arrangement
someone laid out by hand.
Writing a workflow from scratch without meta_states is safe — the editor lays the graph out
automatically the first time it opens, then saves the resulting positions.
Saving and Running Workflows
Save Options
- Save: Save the workflow configuration without executing
- Save & Run: Save and immediately execute the workflow to test it
- Cancel: Discard all changes and exit
Testing Your Workflow
After creating your workflow:
- Click Save & Run to test immediately
- Enter required input parameters in the execution dialog
- Monitor the execution progress
- Review the results and debug if needed
- Iterate and improve based on test results
Accessing Your Workflows
After saving, your workflow appears in:
- My Workflows: Shows workflows you created
- All Workflows: Shows all workflows available to you (including shared ones)
Click the Start Execution button on any workflow card to run it.
Best Practices
Start Simple
Begin with 2-3 nodes and test thoroughly before adding complexity. Use the Load Example feature to see a working workflow as a starting point.
Use Descriptive Names
Name nodes and workflows clearly:
- ✅
fetch-jira-tickets,analyze-requirements,generate-report - ❌
node1,step2,process
Organize with Beautify
Use the Beautify button regularly to keep your workflow visually organized and easy to understand.
Test Incrementally
Test each node configuration individually before connecting the complete workflow. Use Save & Run frequently during development.
Use the Undo Feature
The Undo button appears after making changes. Use it to quickly revert mistakes without starting over.
Real-World Workflow Example
Below is a realistic example workflow that extracts, analyzes, and publishes requirements:
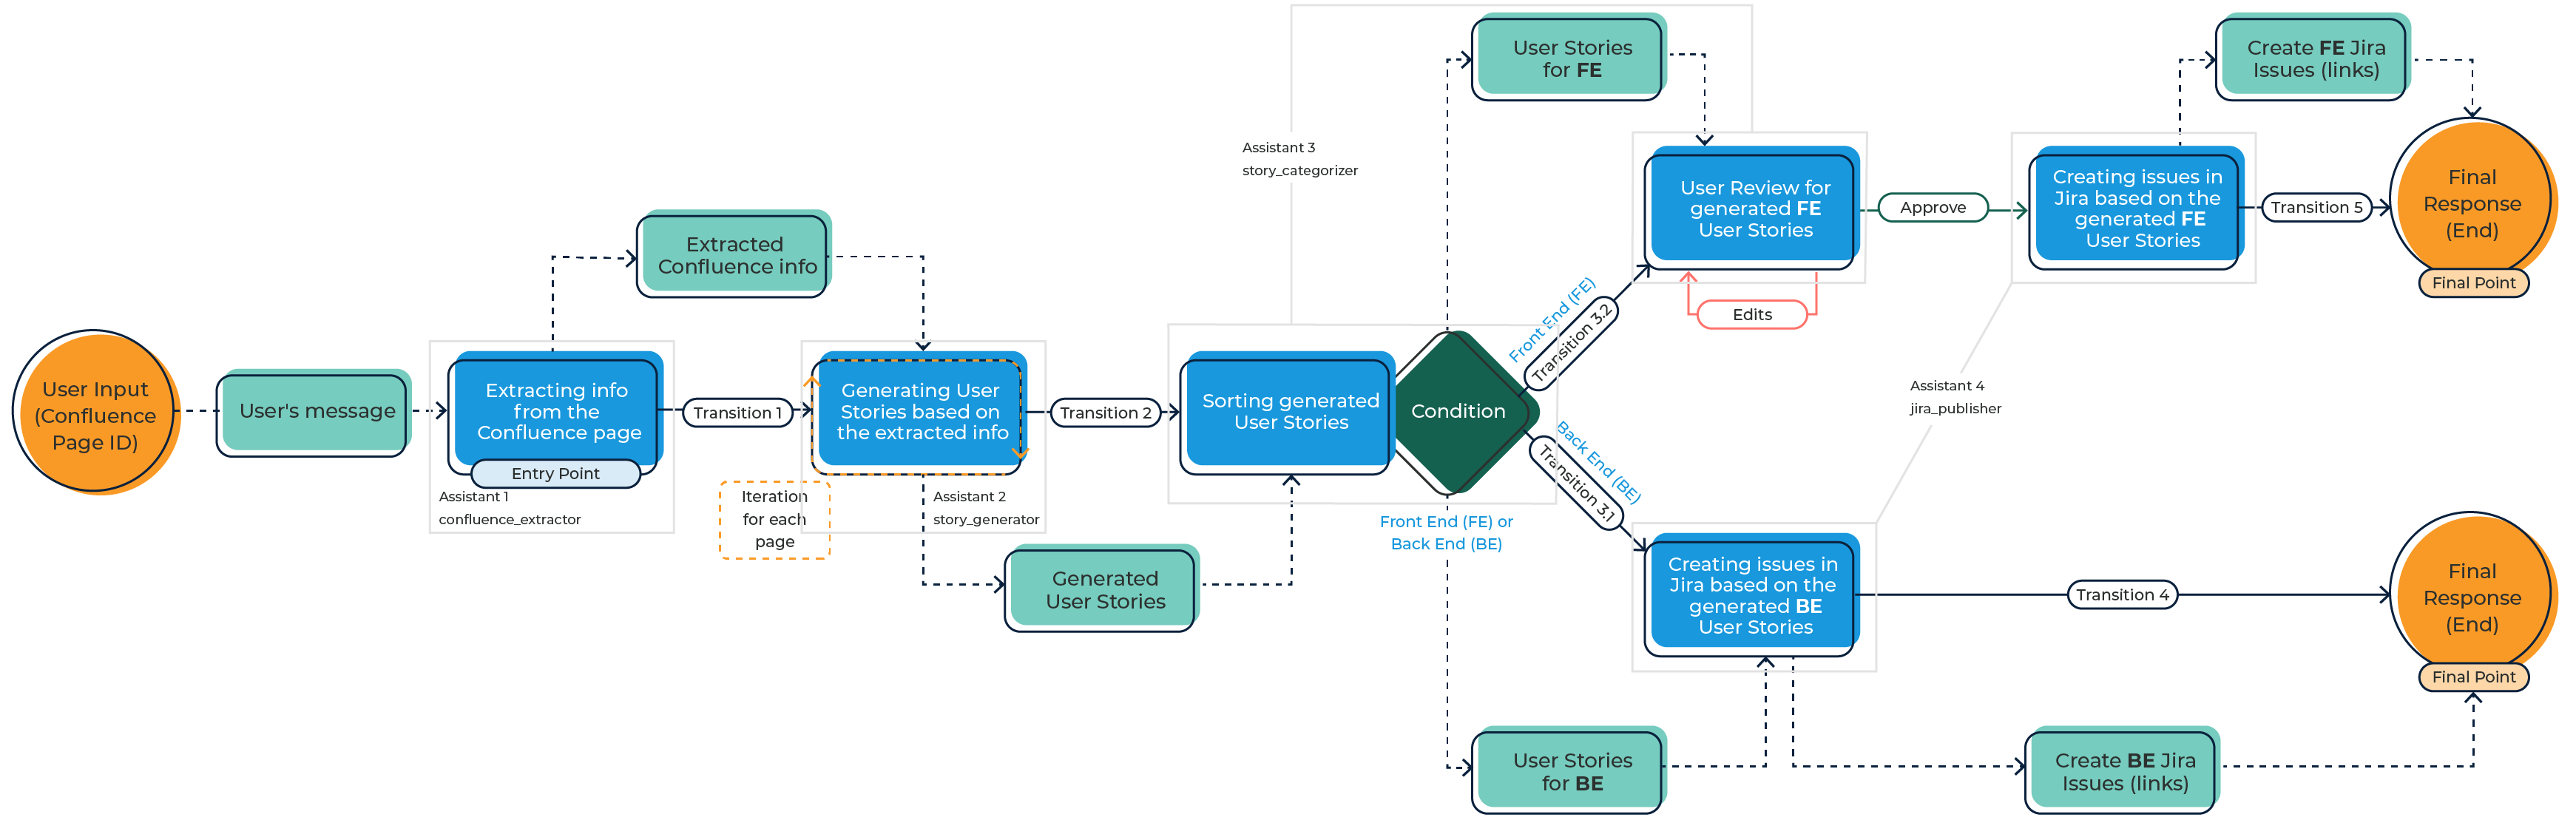
This workflow demonstrates key patterns in action:
- Multiple Assistants: Four specialized assistants working together (confluence_extractor, story_generator, story_categorizer, jira_publisher)
- Iteration: Processing multiple pages in a loop to generate user stories
- Conditional Logic: Routing to different paths based on story type (Frontend vs Backend)
- Human-in-the-Loop: User review and approval checkpoint before creating Jira issues
- External Integrations: Extracting from Confluence and creating issues in Jira
- Parallel Paths: Processing Frontend and Backend stories simultaneously
Workflows enable you to build sophisticated automation that adapts to your data, involves human decision-making when needed, and integrates with your existing tools.
Next Steps
Now that you understand the Visual Workflow Editor interface and controls, explore these topics:
- Create from Template: Start with pre-built templates and customize them
- Sub-workflows: Invoke another workflow with an isolated execution context
- LLM Model Configuration: Configure AI models for workflow states
- Workflow Templates: Browse available templates for common use cases
- YAML Configuration Guide: Deep dive into advanced YAML features
- Advanced Features: Learn about templating, interruptions, and complex patterns
Try the AI Katas workflow series for hands-on practice building workflows with guided challenges.
Watch the complete video walkthrough to see the Visual Workflow Editor in action with real examples.