Integrations
There are three types of integrations, distinguished by scope and who can create them. If you don't explicitly select an integration, CodeMie picks one automatically — see How the Default Integration Is Selected below.
- User Integration: Personal configuration scoped to the current project. Available only to you.
- User Global Integration: Personal integration with the Global toggle enabled. Available to you across all projects where you are onboarded.
- Project Integration: Shared configuration available to all project members. Requires the
isAdminorapplications_adminrole.
To create a Project Integration, you need the isAdmin or applications_admin role. To request applications_admin access, submit a Support ticket. See Project & User Management for details on managing roles.
How the Default Integration Is Selected
When a tool requires an integration and no specific one has been chosen, CodeMie picks it automatically. User Integration always takes priority over Project Integration.
| Priority | Type | Created in | Visible to |
|---|---|---|---|
| 1 | User Integration | User tab, current project | You only, in this project |
| 2 | User Global Integration | User tab, Global toggle enabled | You only, in all projects where you are onboarded |
| 3 | Project Integration | Project tab (isAdmin or applications_admin only) | All project members |
If no matching integration is found at any level, the action requiring it will fail.
When does this matter?
One integration of a type — it is always used automatically. Nothing to configure.
Multiple integrations of the same type — the priority above applies unless a specific one is selected manually in the assistant form.
Tips
- Use User Global Integration if you use the same credentials across multiple projects — configure once, use everywhere.
- Project Integration acts as a shared fallback for team members who haven't set up their own.
- If a tool is using unexpected credentials, go to Integrations → User and check whether a User Integration is overriding the project-level one.
Automatic Credentials Lookup
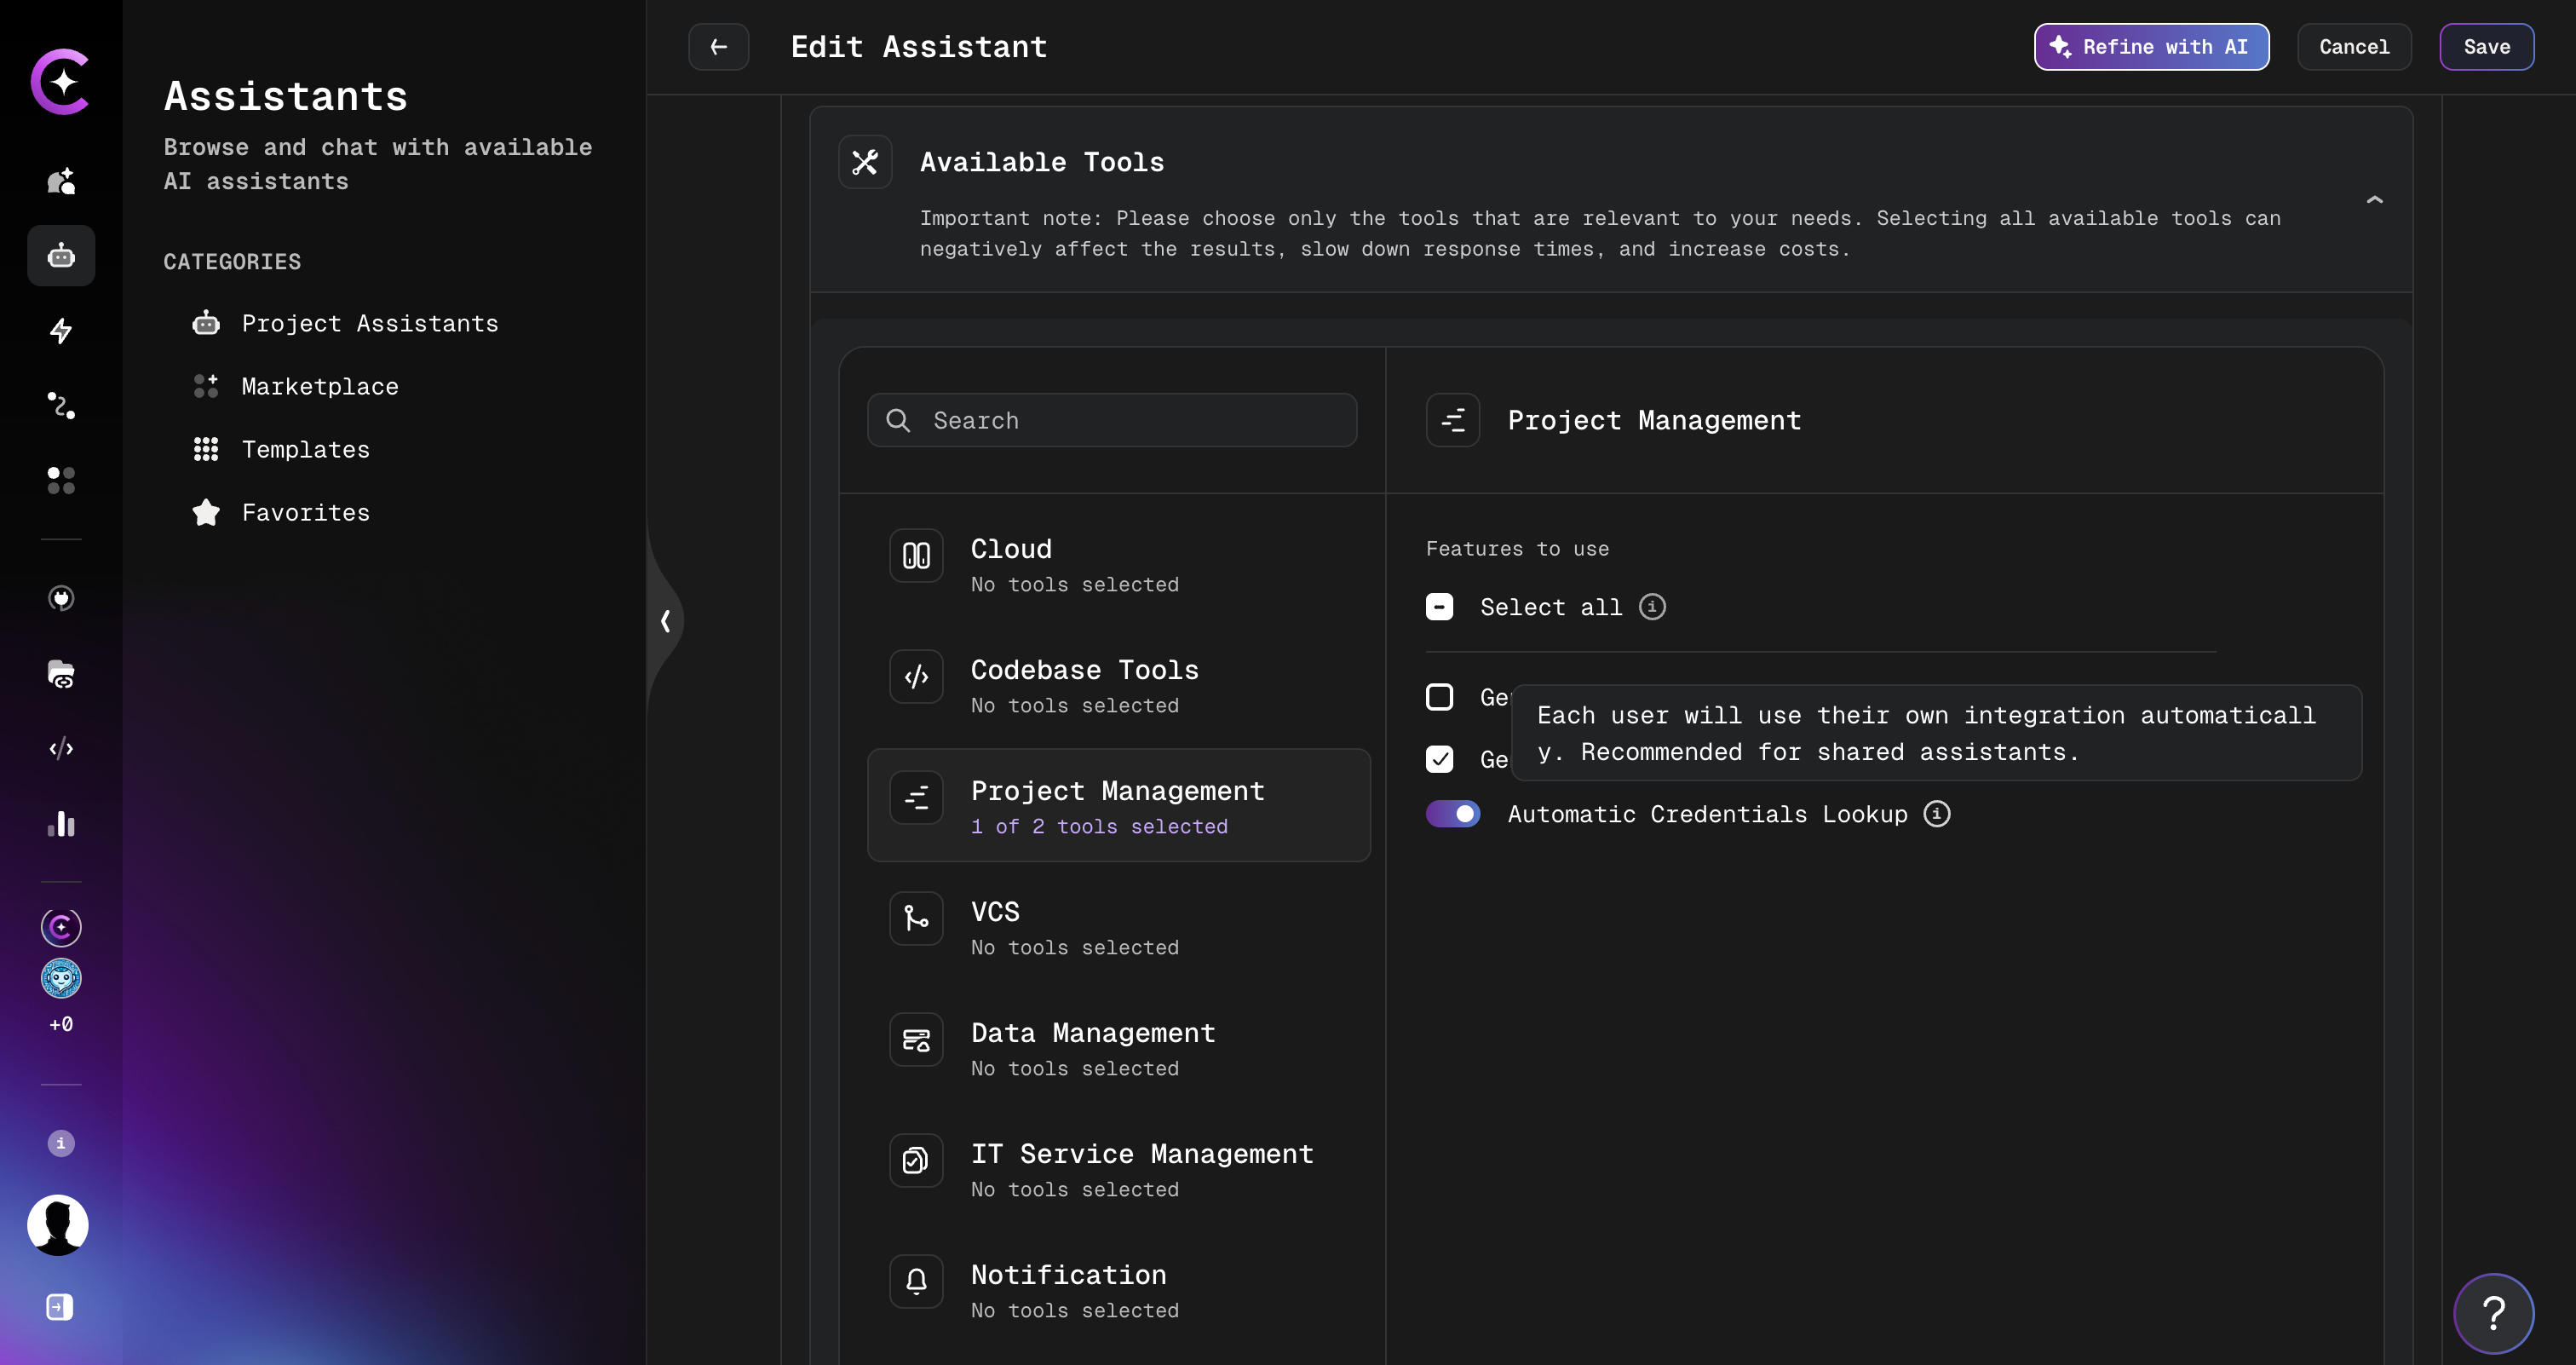
When adding a tool to an assistant, each tool that has at least one configured integration displays an Automatic Credentials Lookup toggle. The toggle and the integration dropdown together record the assistant author's decision for that integration slot — a slot being any place where a tool, a toolkit, or an MCP server takes an integration.
The decision is stored per slot and has three distinct states:
| Author's decision | How the slot resolves at run time | Offered for personal selection |
|---|---|---|
| Lookup on (default) | Resolved per user, using the priority order above — everyone runs under their own integration of that type | Yes |
| Lookup off, integration selected | The author's integration is pinned and applied on behalf of everyone using the assistant | No |
| Lookup off, no integration | Nothing is resolved automatically — the slot has No integration | Yes |
When the toggle is On, the integration dropdown is hidden — no manual selection is needed:
When the toggle is Off, the dropdown becomes visible and a specific integration can be pinned:
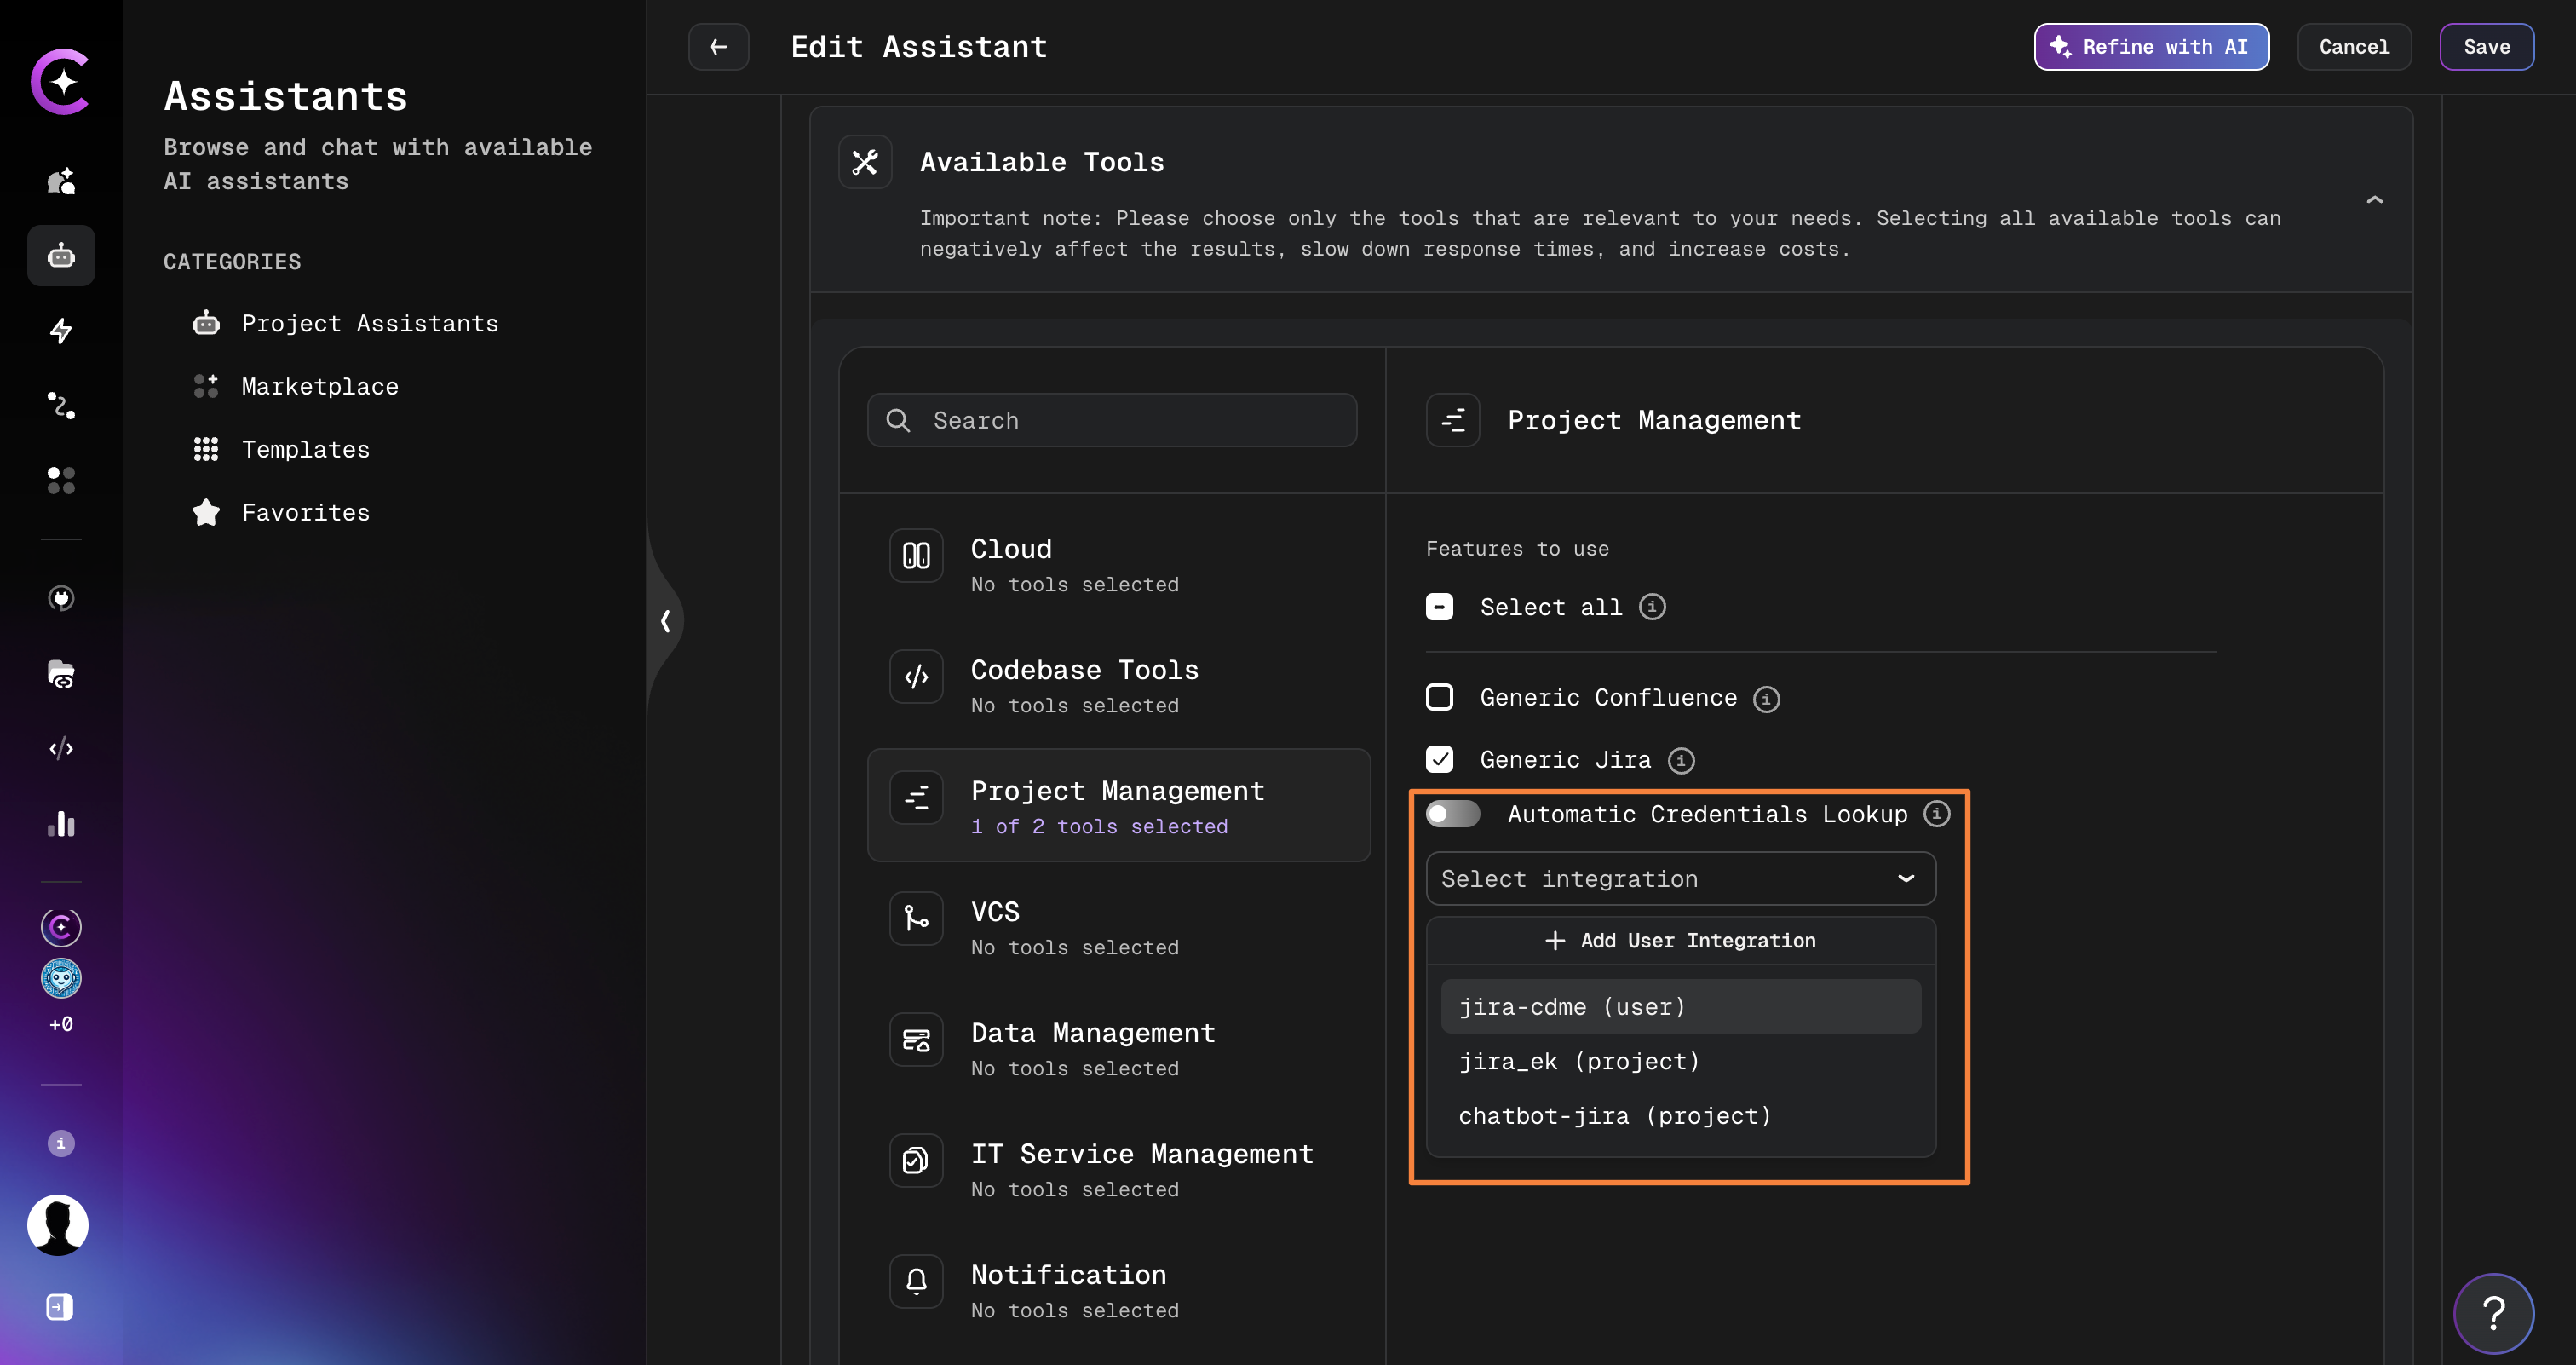
Lookup off with nothing pinned
Turning the toggle off and leaving the dropdown empty is a deliberate state, not an unfinished one: it means the slot carries no credentials at all. Nothing is looked up automatically, the assistant shows No integration for the slot, and the tool reports the missing integration when it is called — the tool is not silently dropped from the assistant. A user of the assistant can still pick an integration for such a slot themselves.
Personal selection by users of the assistant
Every slot the author did not pin is offered to each user of a shared assistant in its Your Integration Settings section — on the assistant page, and in the assistant panel on the workflow executions page. Personal selection is available on any shared assistant, not only on assistants published to the marketplace.
A user's own decision always wins over automatic lookup, including an explicit No integration: the choice is remembered and is not replaced by an automatically resolved integration the next time the assistant is opened or run.
How widely the choice is remembered depends on where it is made:
| Saved from | Applies to |
|---|---|
| The assistant page | The assistant everywhere for that user — chat, the assistant page, and every workflow using the assistant |
| The assistant panel of a workflow | That workflow only, unless Apply to the whole assistant, not just this workflow is selected before saving |
A workflow-scoped selection takes precedence over the assistant-scoped one when that workflow runs, and leaves the same assistant untouched in chat and in other workflows. Both scopes are personal and never affect other users. See Assistant Panel on the Executions Page for the full behavior.
Leave Automatic Credentials Lookup on for shared assistants. This ensures each team member uses their own credentials automatically, without requiring the assistant owner to share their personal integration.
Pinning a specific integration applies the author's credentials to every user of the assistant. The secret values are not exposed to other users, but everyone works through the same account, and no one can substitute their own. Pin a slot only when a single shared account is intended.
Setting Up Integrations
-
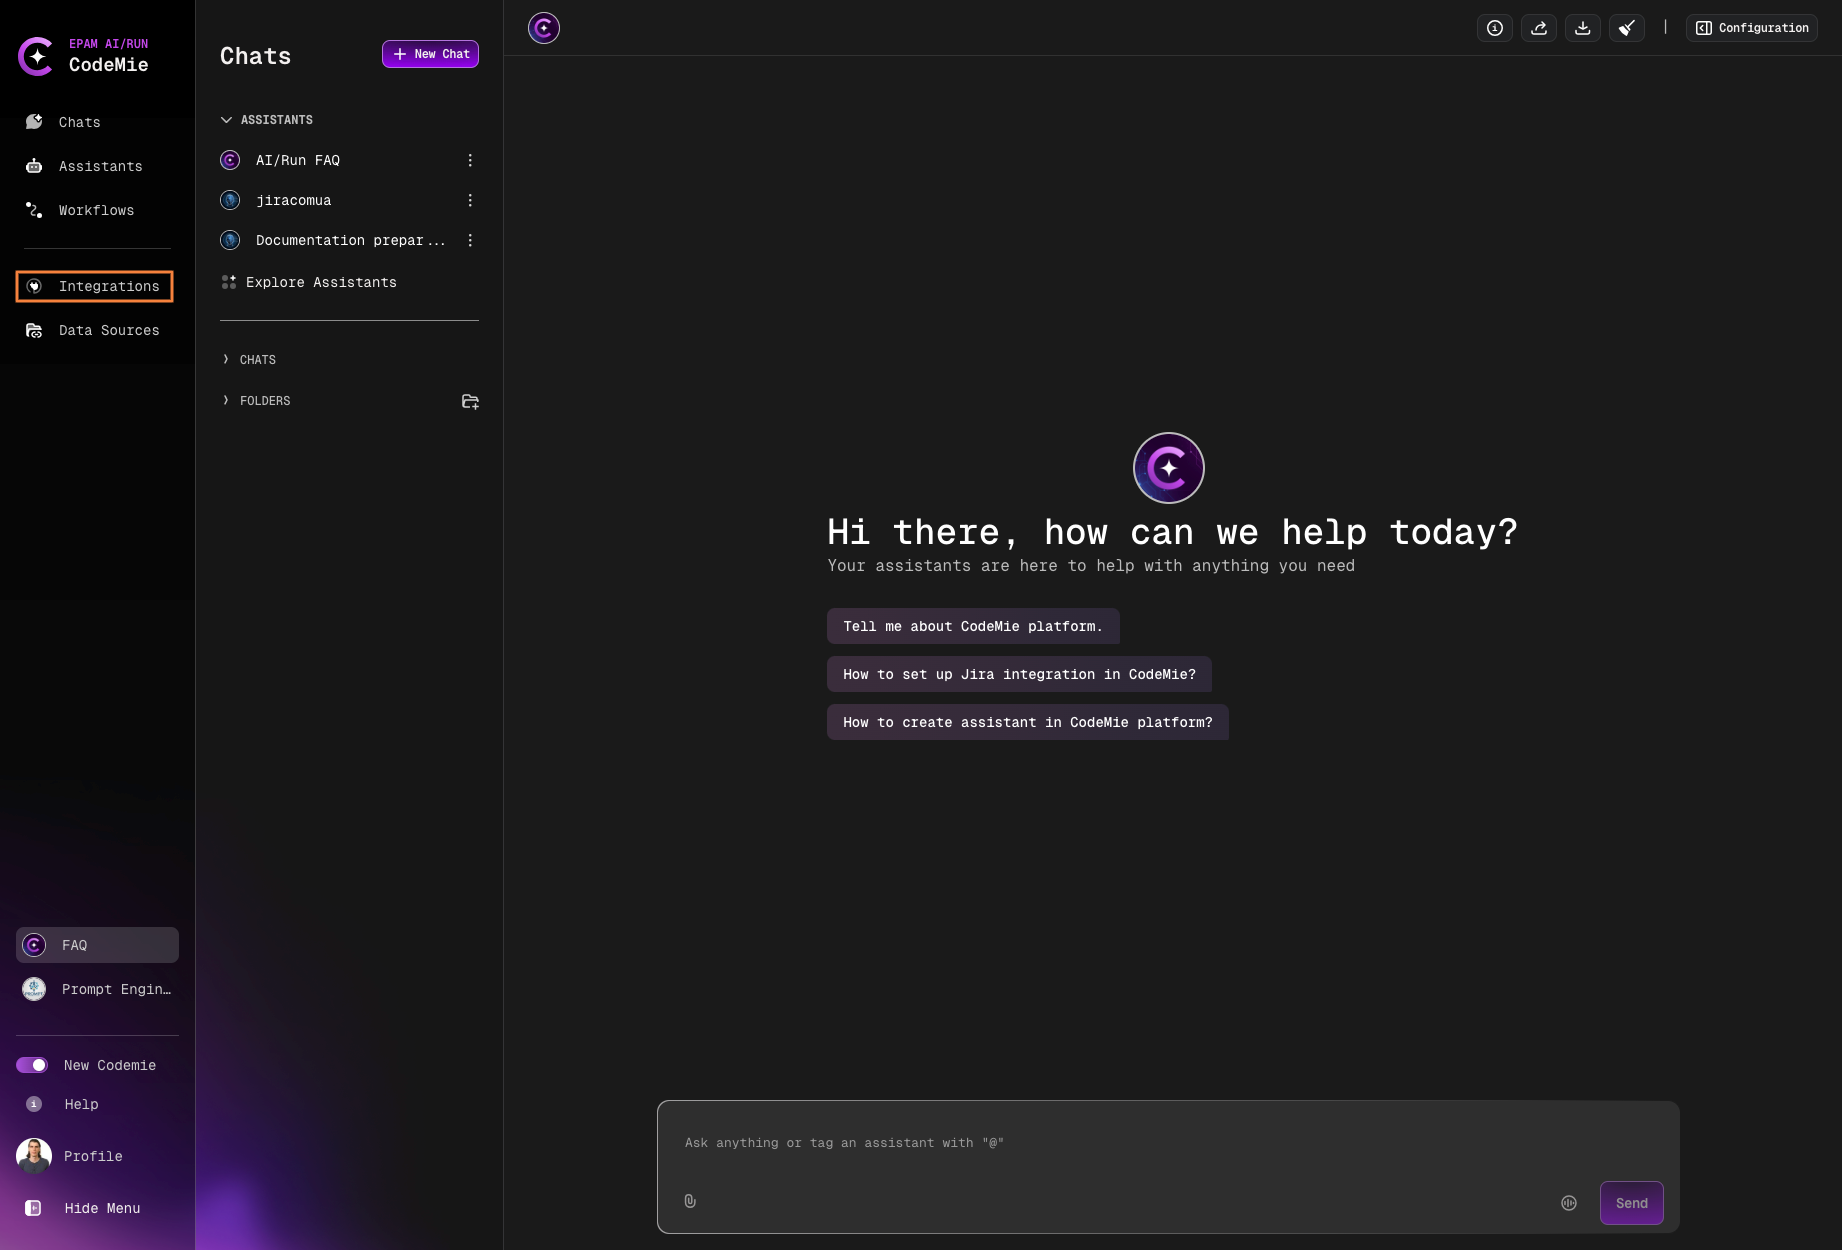
In the AI/Run CodeMie main menu, click the Integrations tab:
-
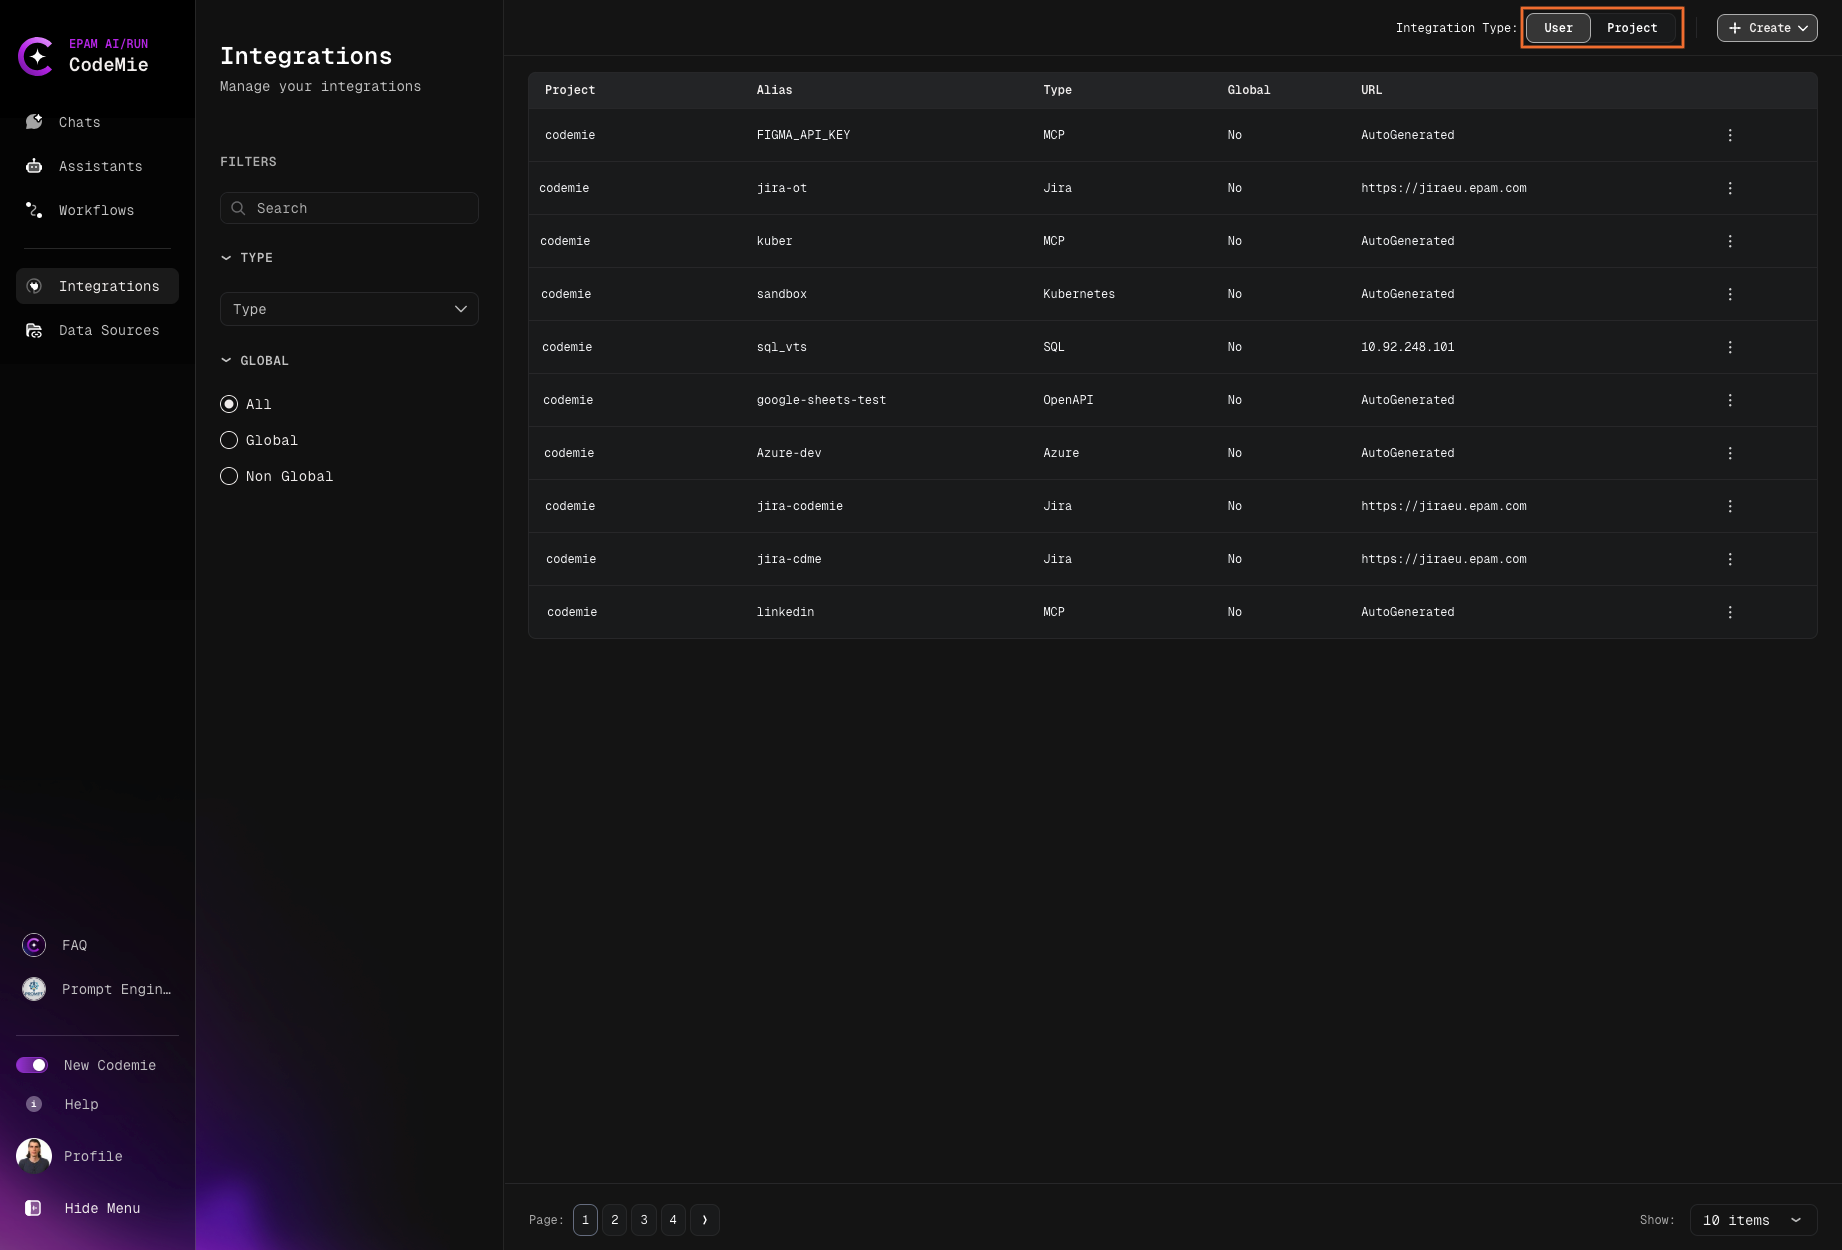
In the Integrations menu, click User or Project and then click the + Create button:
-
Select the desired tool from the Credential Type dropdown and specify the credentials, then click Save:
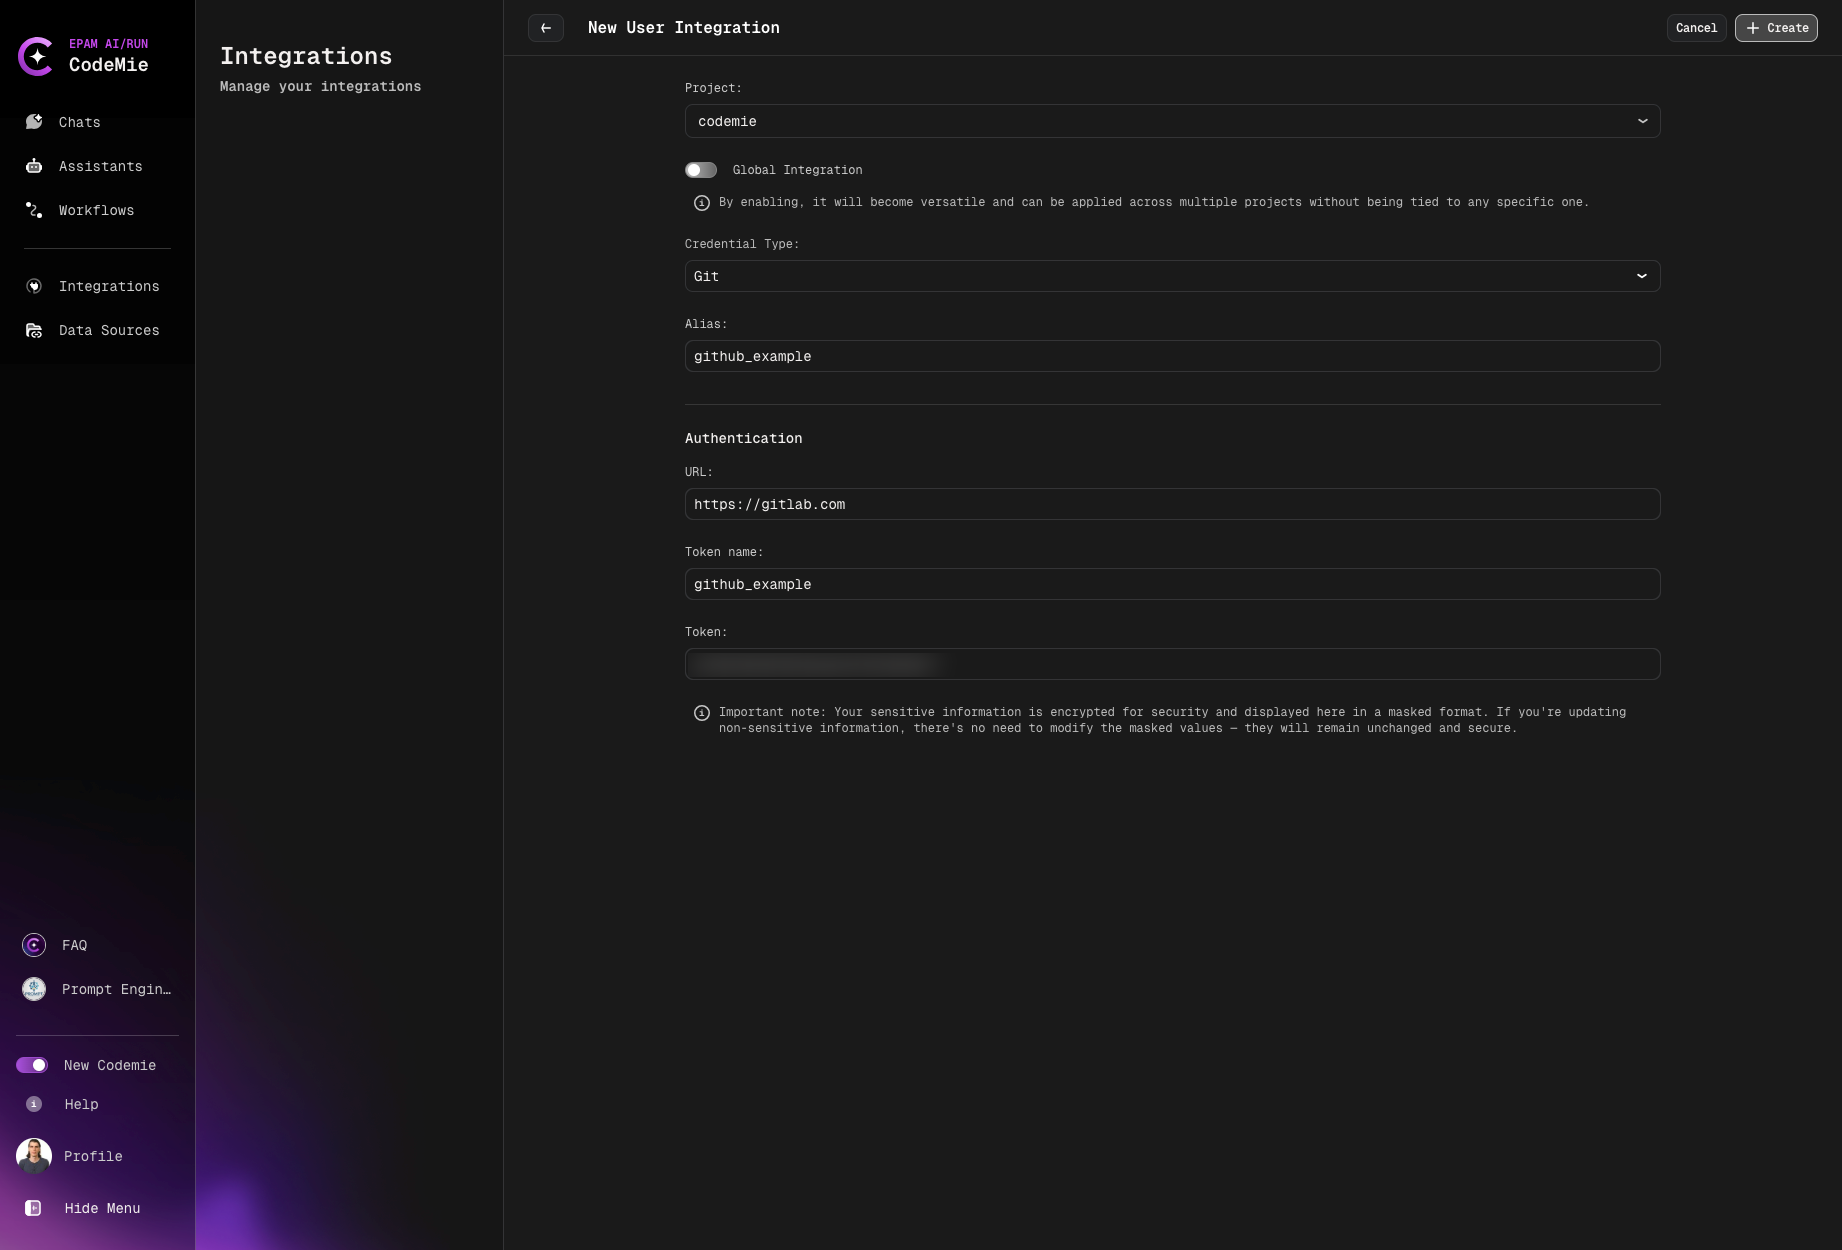
Most of the tools require you to specify the URL, token, and alias. Alias is the name of the setting that will be displayed in the integrations list.
The Credential Type dropdown is sorted alphabetically and includes a scrollbar, making it easy to locate the required credential type even when many options are available.
Integration Validation During Assistant Save
When you save or publish an assistant, the platform automatically checks whether all selected tools have the required integrations configured. If any are missing, a Missing Integrations modal appears before saving.
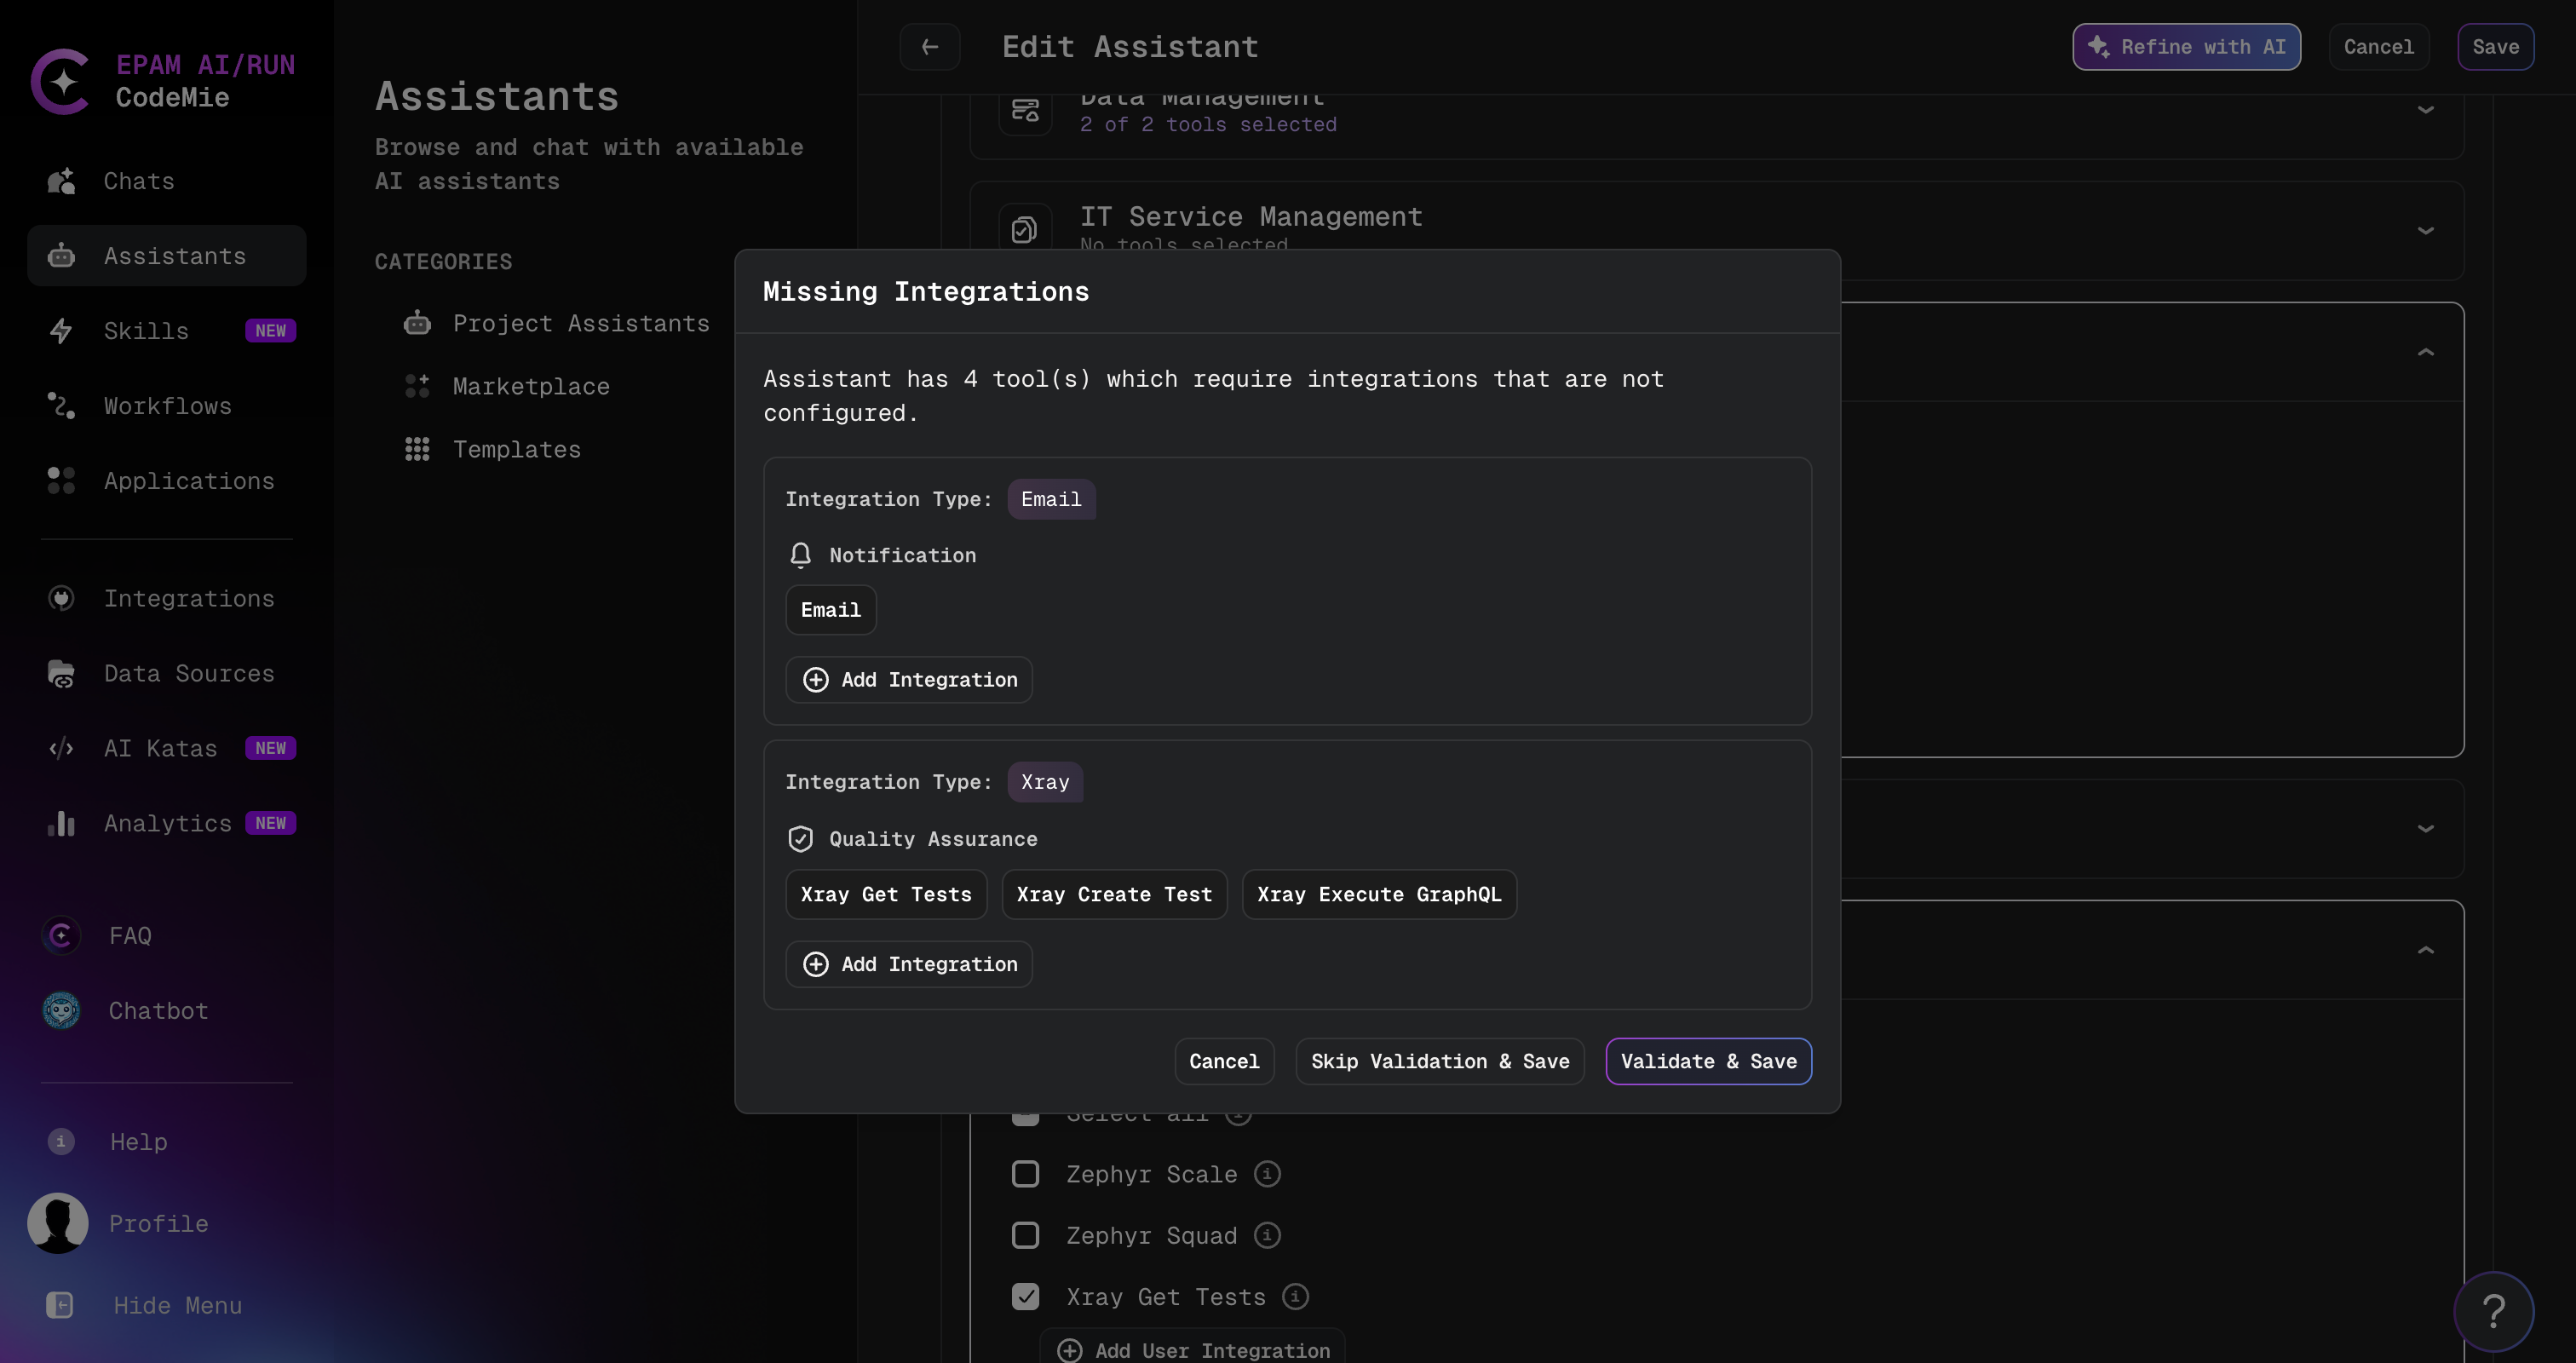
The modal lists every integration type that needs to be set up, grouped by type, and shows which tools depend on each one. For each missing integration you have two options:
- Click Add Integration — opens the Create User Integration page for that type. After saving the integration, return to the assistant and save again.
- Leave it as-is and click Skip Validation & Save — saves the assistant without the missing integrations. Tools without integrations will not work until you set them up.
Modal action buttons:
| Button | Behavior |
|---|---|
| Validate & Save | Re-checks integrations and saves if all required ones are now configured |
| Skip Validation & Save | Saves immediately, bypassing the validation check |
| Cancel | Closes the modal and returns to the assistant form without saving |
An assistant saved with missing integrations will fail at runtime for any tool that requires those integrations. Configure all required integrations before publishing.
Alternative Ways to Create Integrations
As an alternative way of getting to the Integrations page, you can click the Add User Integration button in front of the desired tool when creating/editing your assistant:
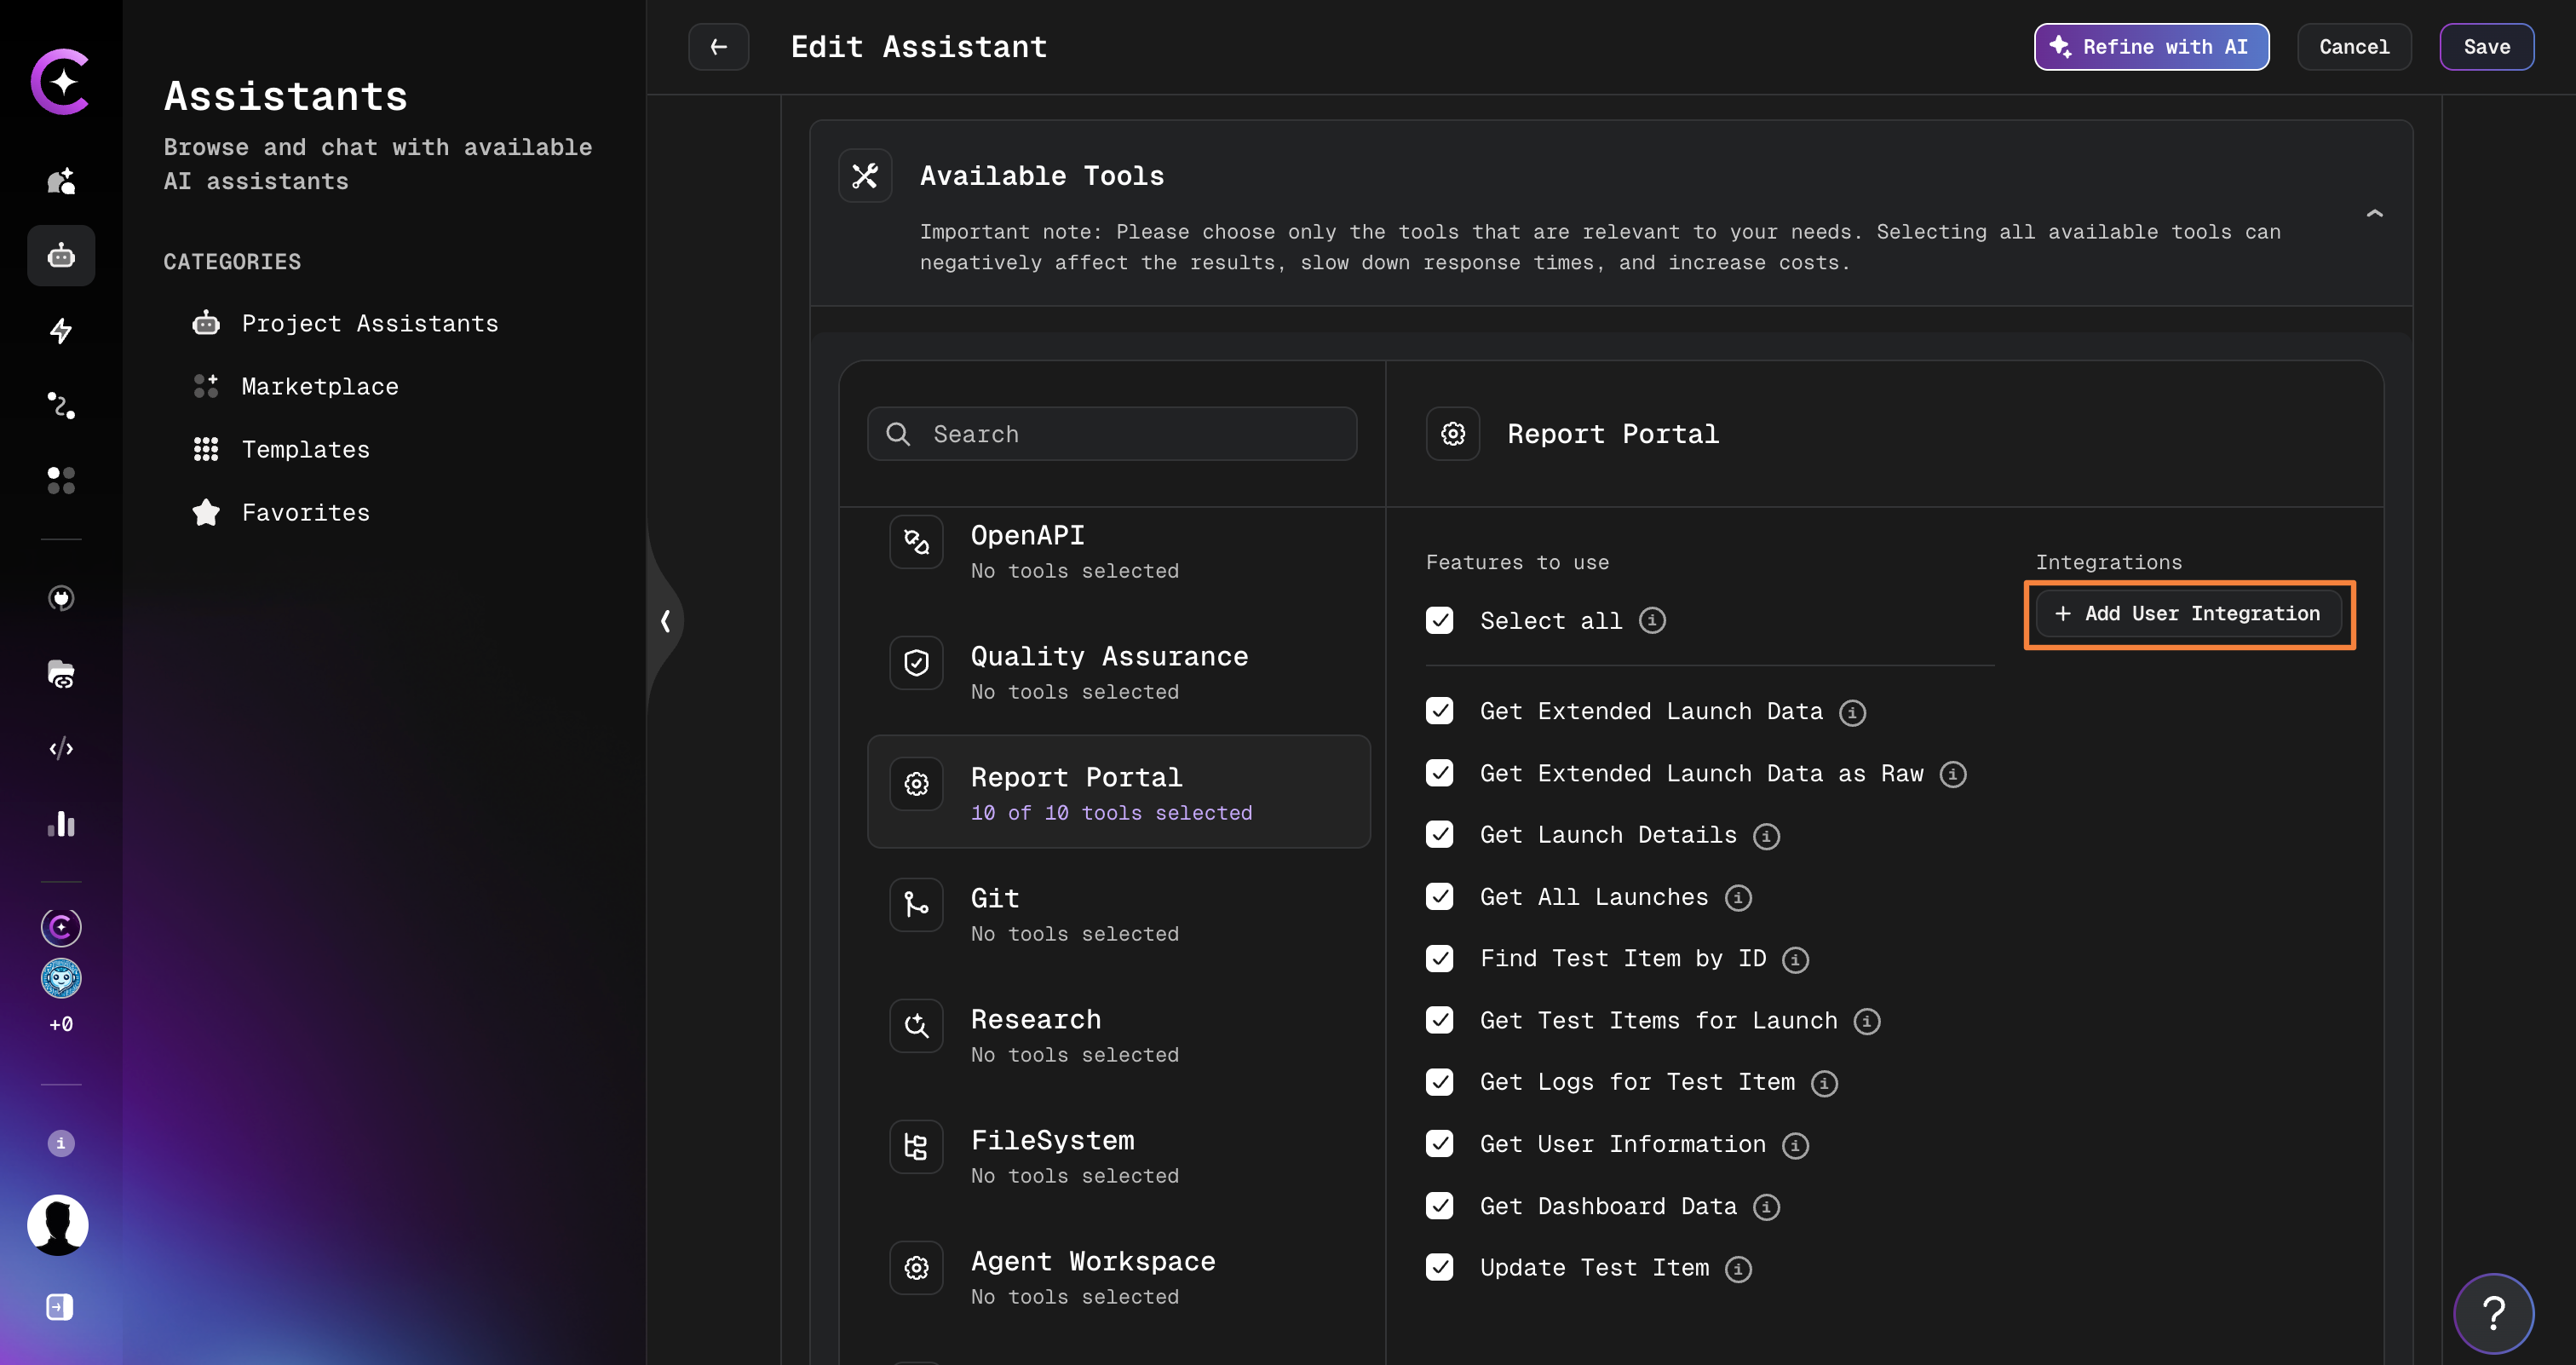
This link will also lead to the Create User Integration page. Note that this link appears only if no such tools are configured by the users.
If you have two or more integrations related to one tool, you can specify the needed one when adding/editing assistants.
Creating Integration from Data Source Page
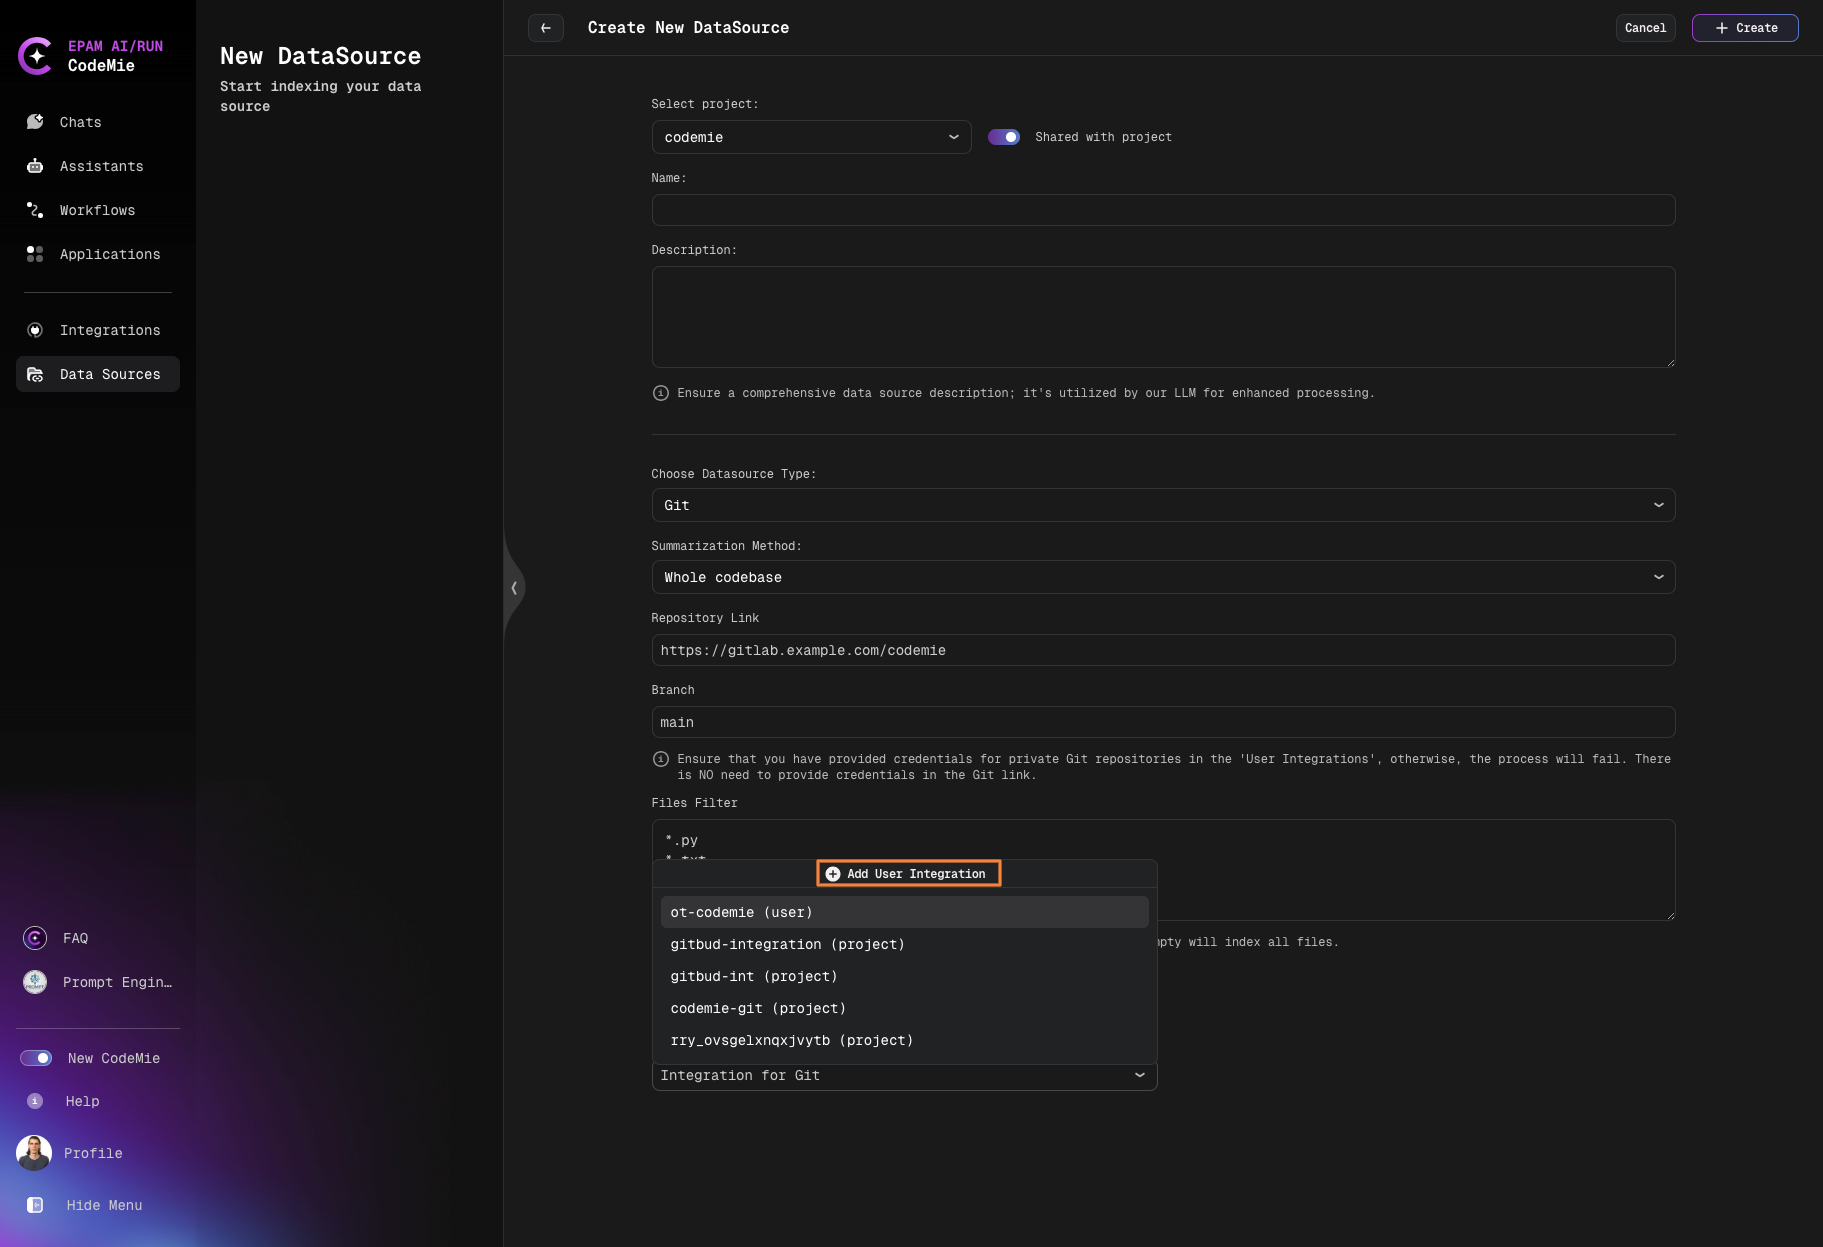
For Datasource you can create user integration from data source page:
-
Navigate or create a new datasource.
-
Click Select integration for.
-
Click the Add User Integration button.
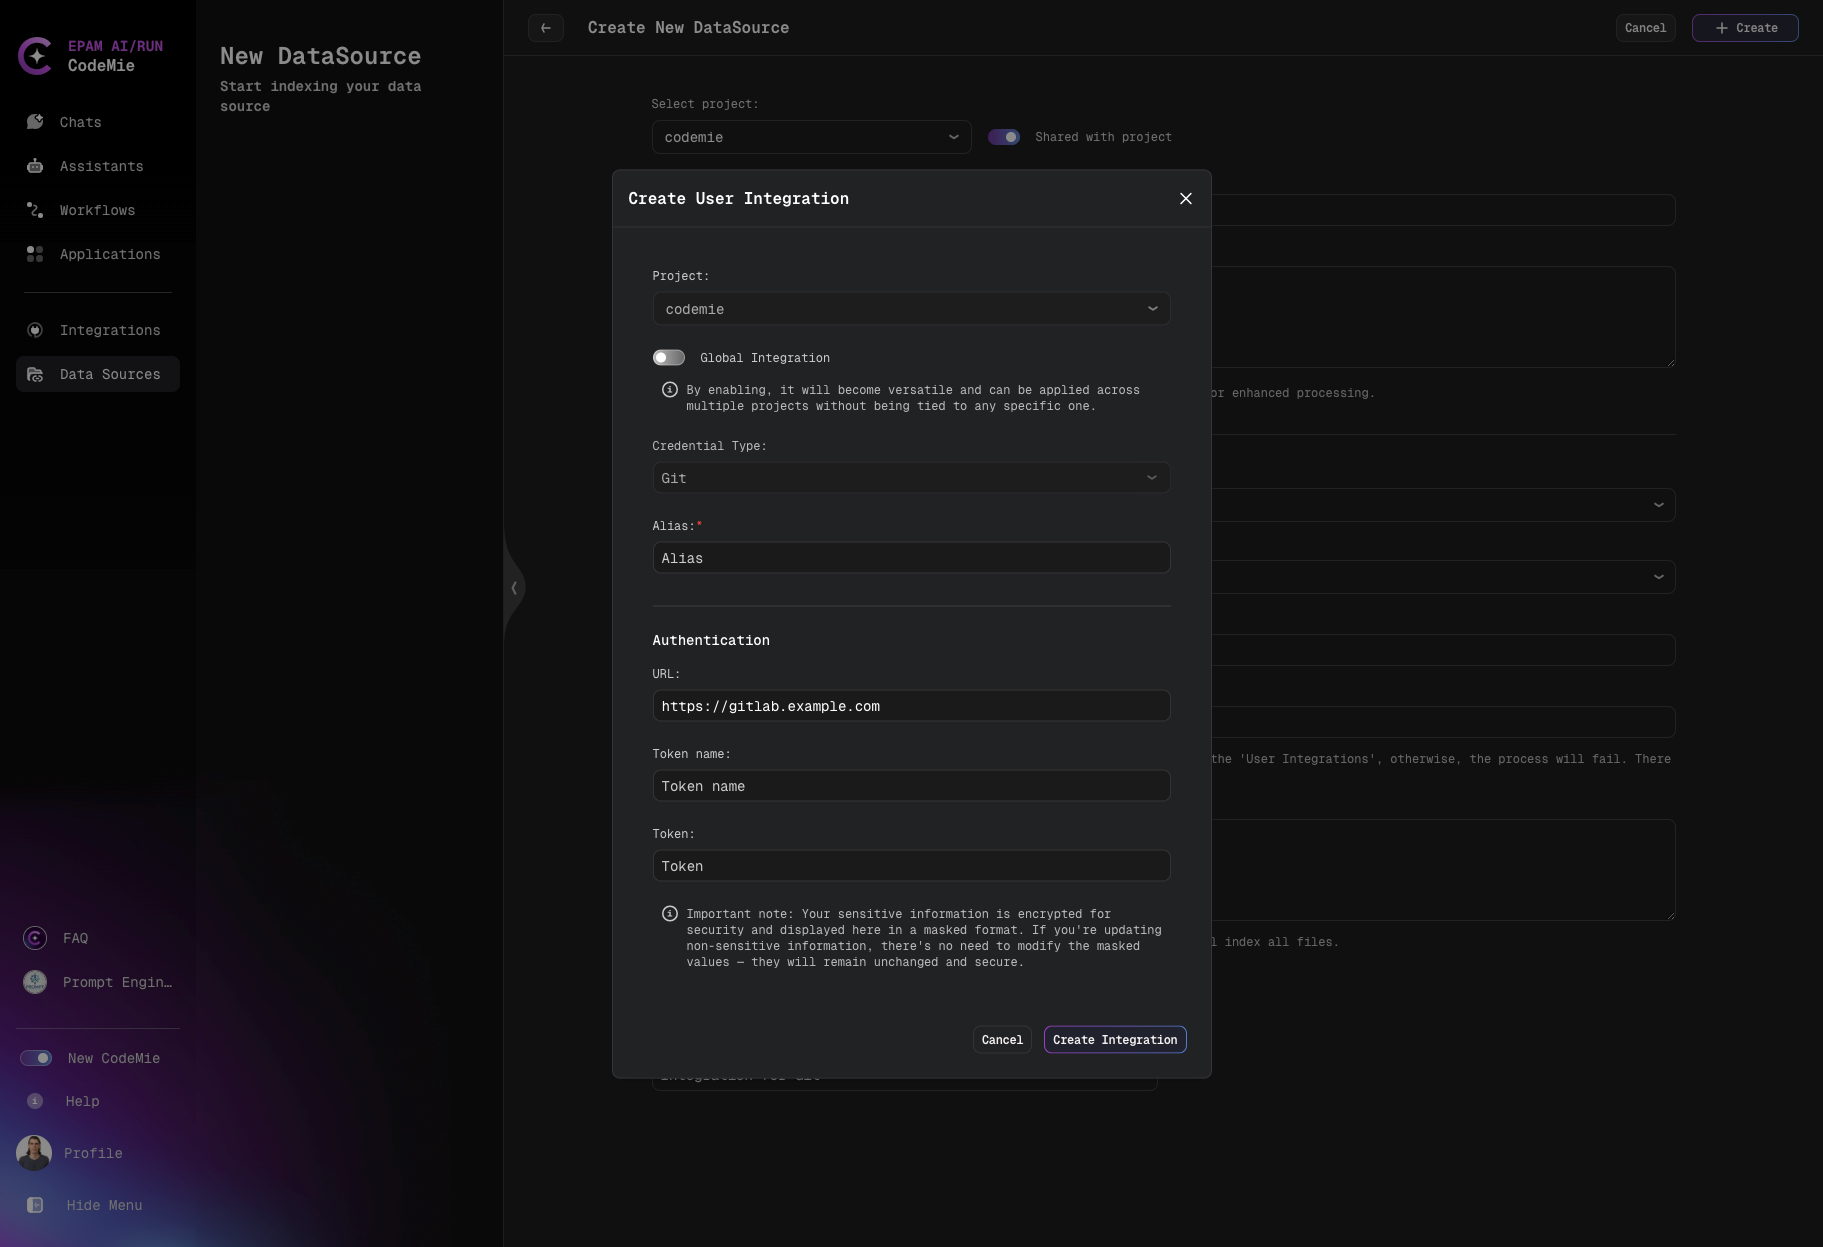
-
After saving, the new integration appears in the existing list without requiring a page reload or navigation away.
Scheduler State in the Integrations List
For integrations with Credential Type: Scheduler, the enabled/disabled state is shown directly in the integration list — no need to open individual records to check whether a scheduler is active.
Each scheduler entry in the list displays a visible state indicator (enabled or disabled). This makes it possible to scan all scheduled integrations at a glance and identify which ones are currently running without navigating into the record.
To see all scheduler integrations in one view, use the TYPE filter and select Scheduler. The state of each scheduler is immediately visible in the filtered list.
To change the state of a scheduler, open the record and toggle the Is Enabled field.
Filter Integrations
As you work with AI/Run CodeMie, the number of integrations will increase. To simplify navigation between integrations, use the filters. You can filter integrations by:
- NAME
- PROJECT
- TYPE
- GLOBAL