Jira
AI/Run CodeMie integrates with Atlassian Jira to enable automated issue tracking, project management, and task organization within your development workflow.
1. Create Atlassian API Token
- Jira Cloud
- Jira Self-hosted
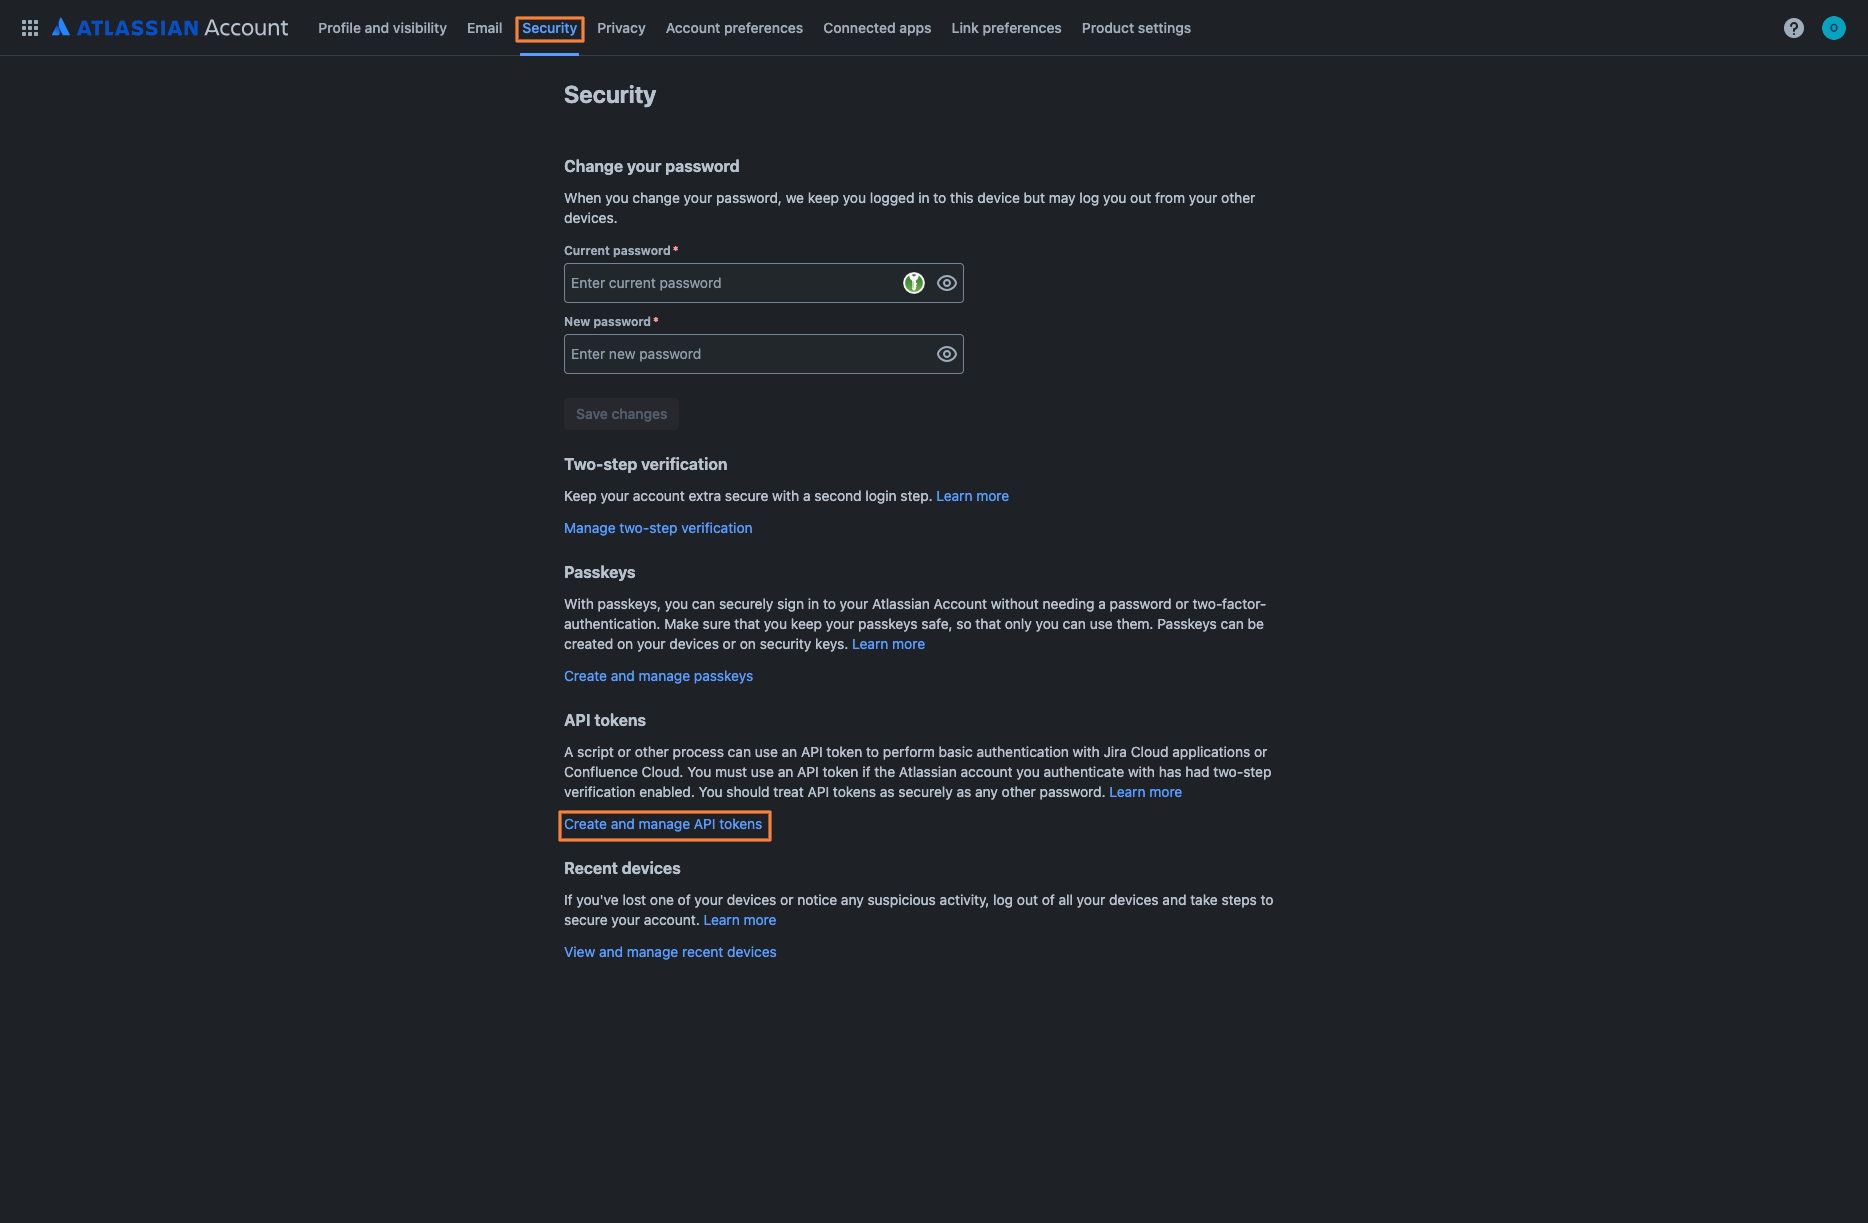
1.1. Go to your Atlassian Account settings and navigate to the Security tab.
1.2. Scroll down to the API tokens section and click Create and manage API tokens:
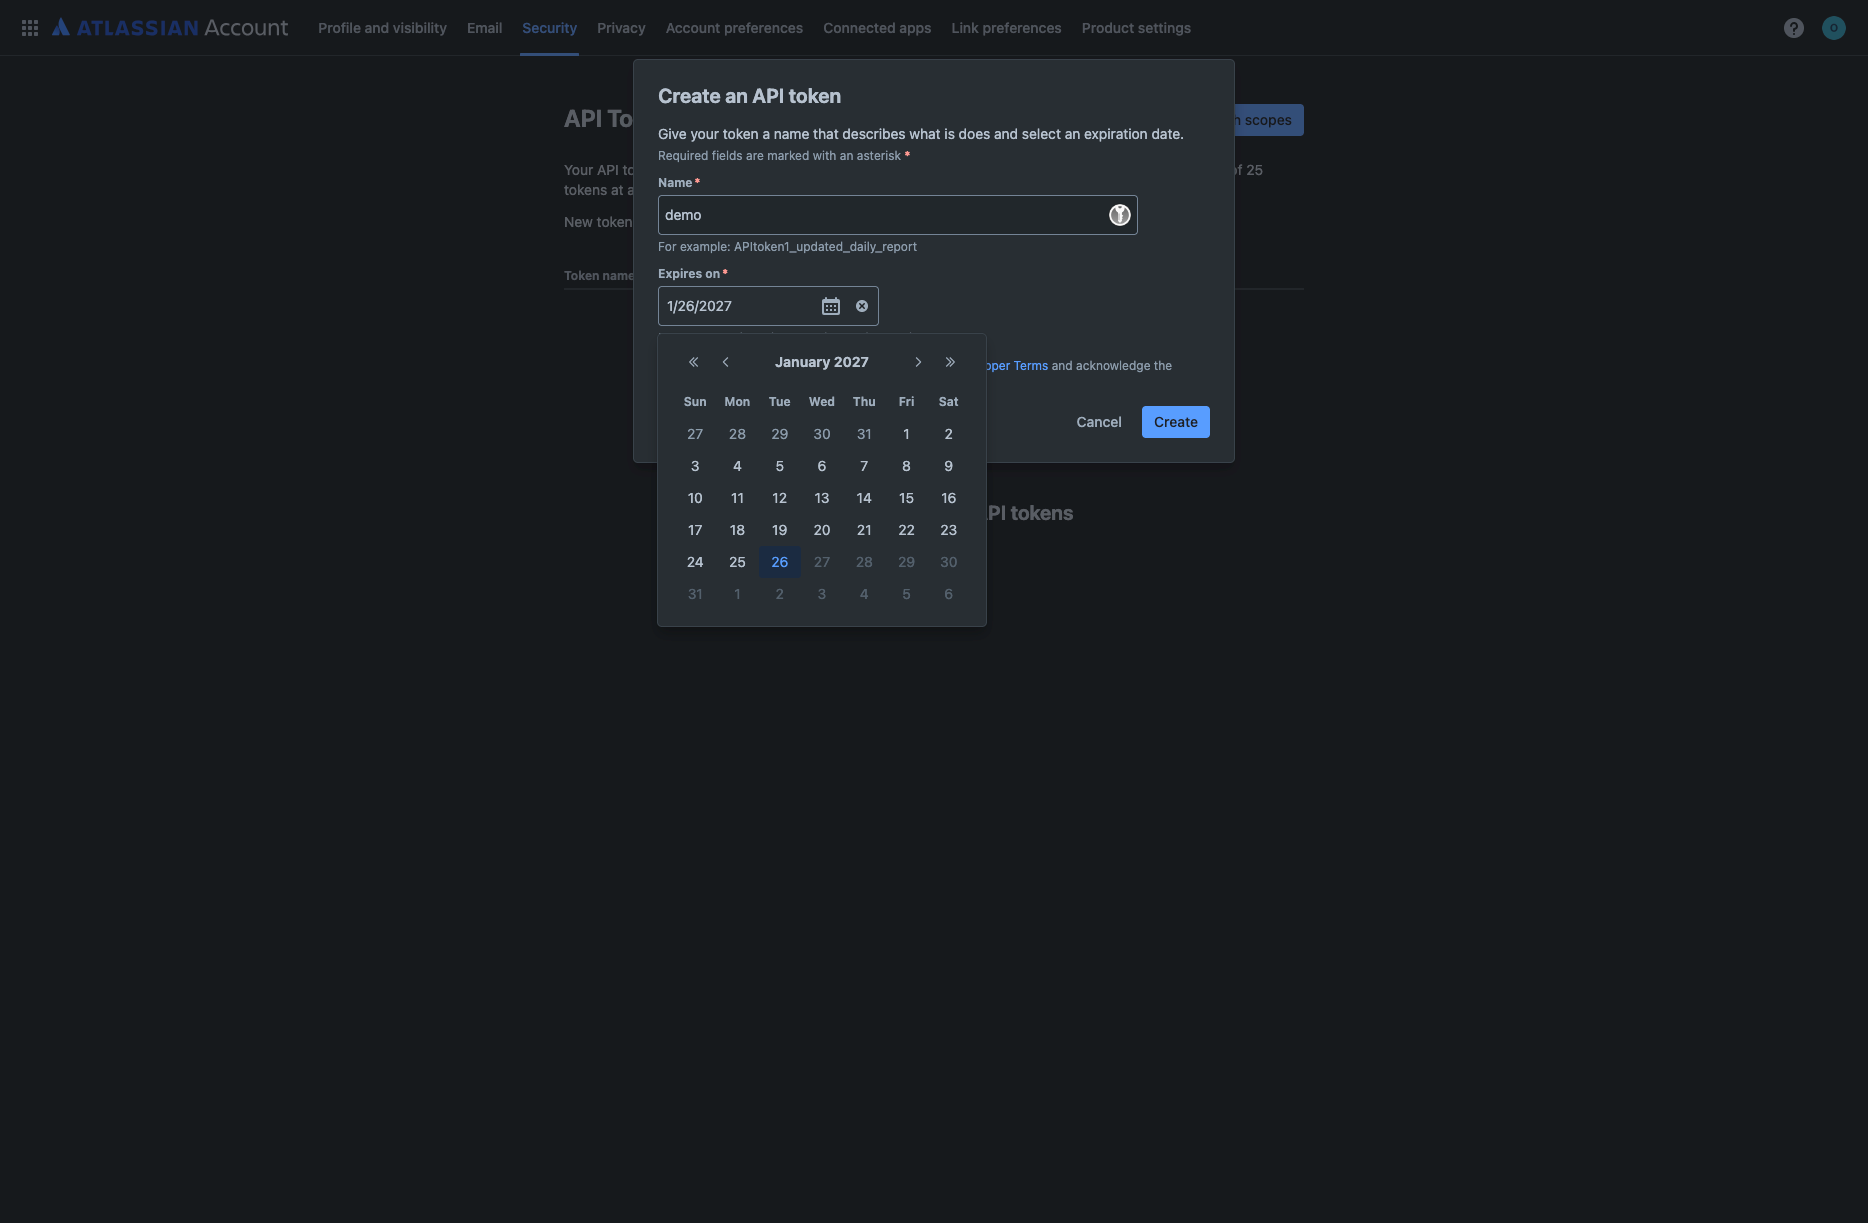
1.3. Click Create API token button and provide a name for your token. Set an expiration date for security:
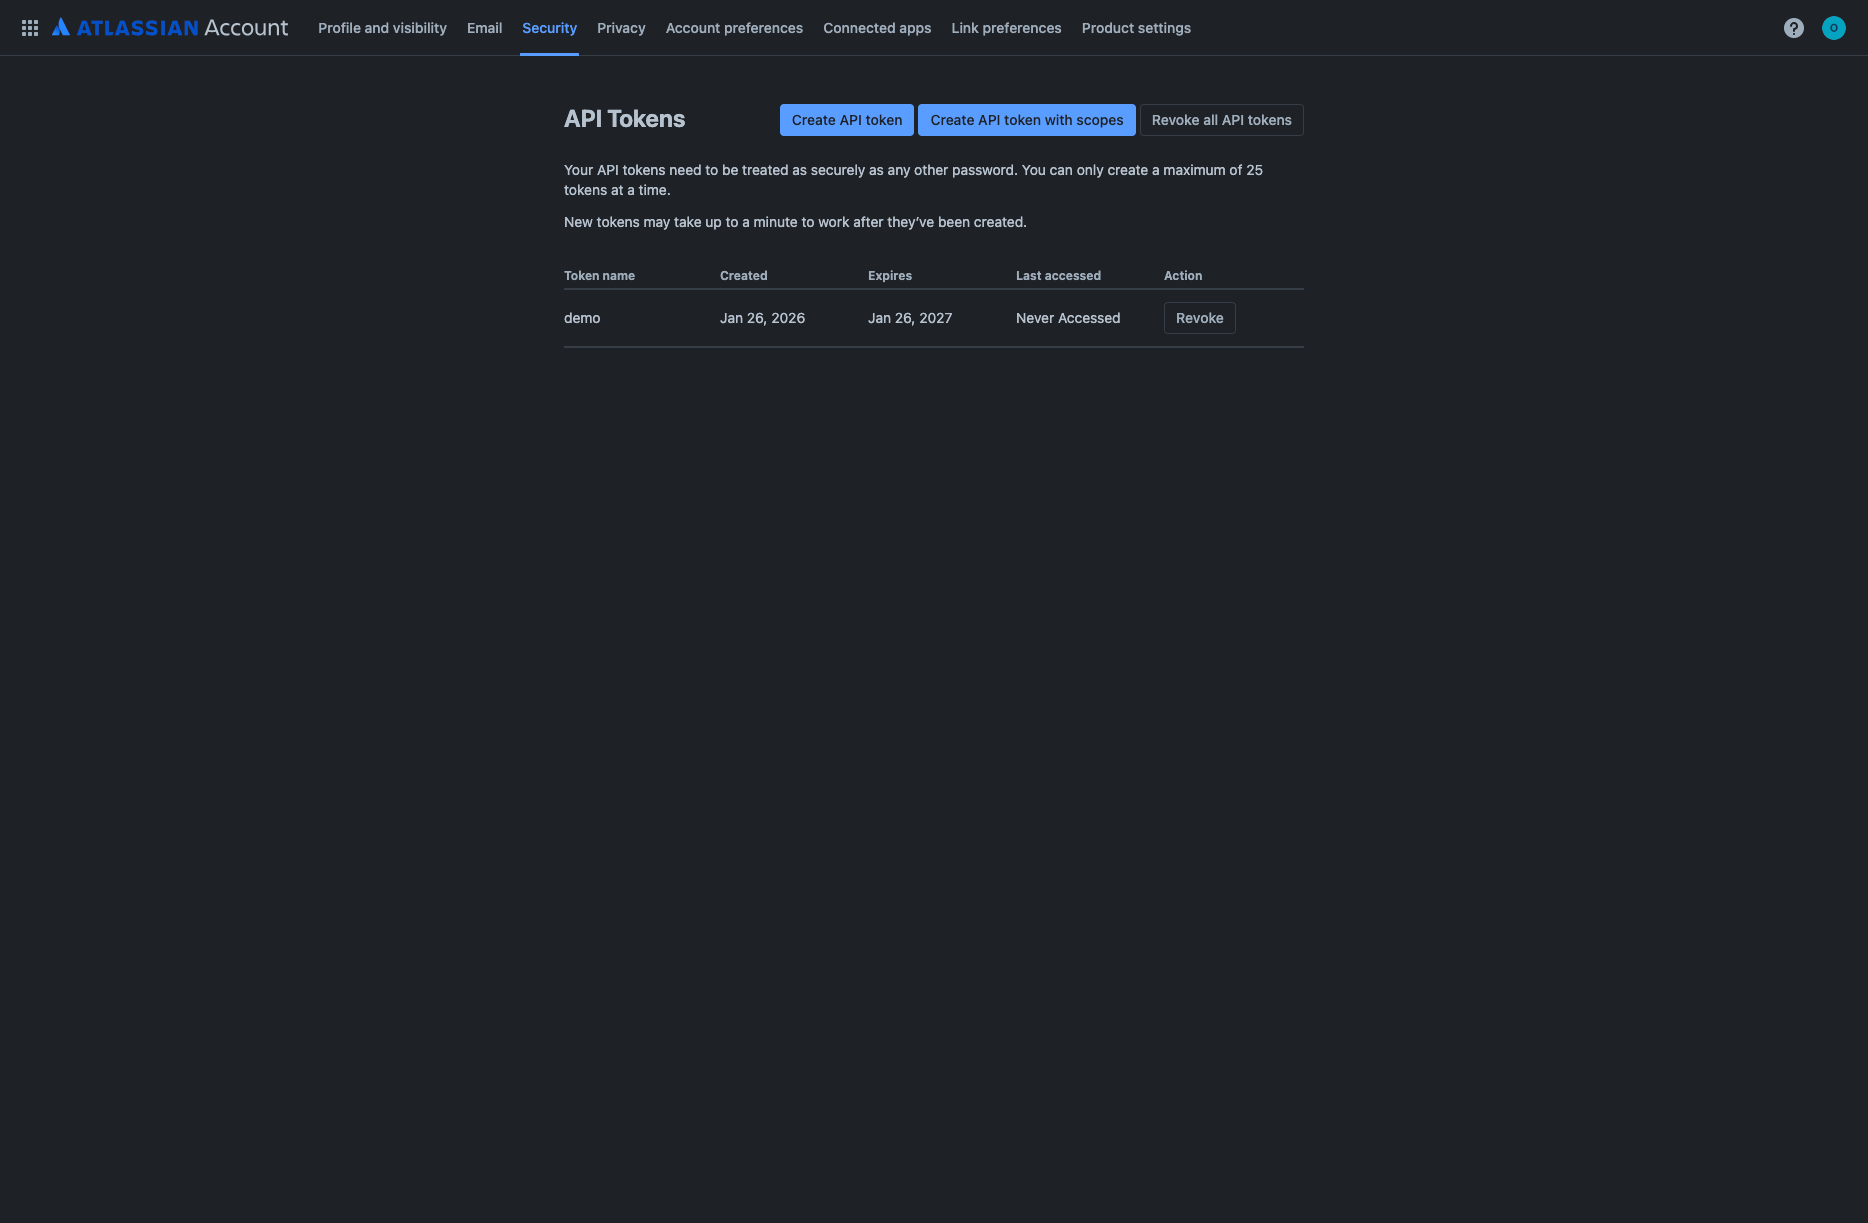
1.4. Click Create. The system will display your newly created API token:
1.5. Copy the generated API token using the Copy button and store it securely:
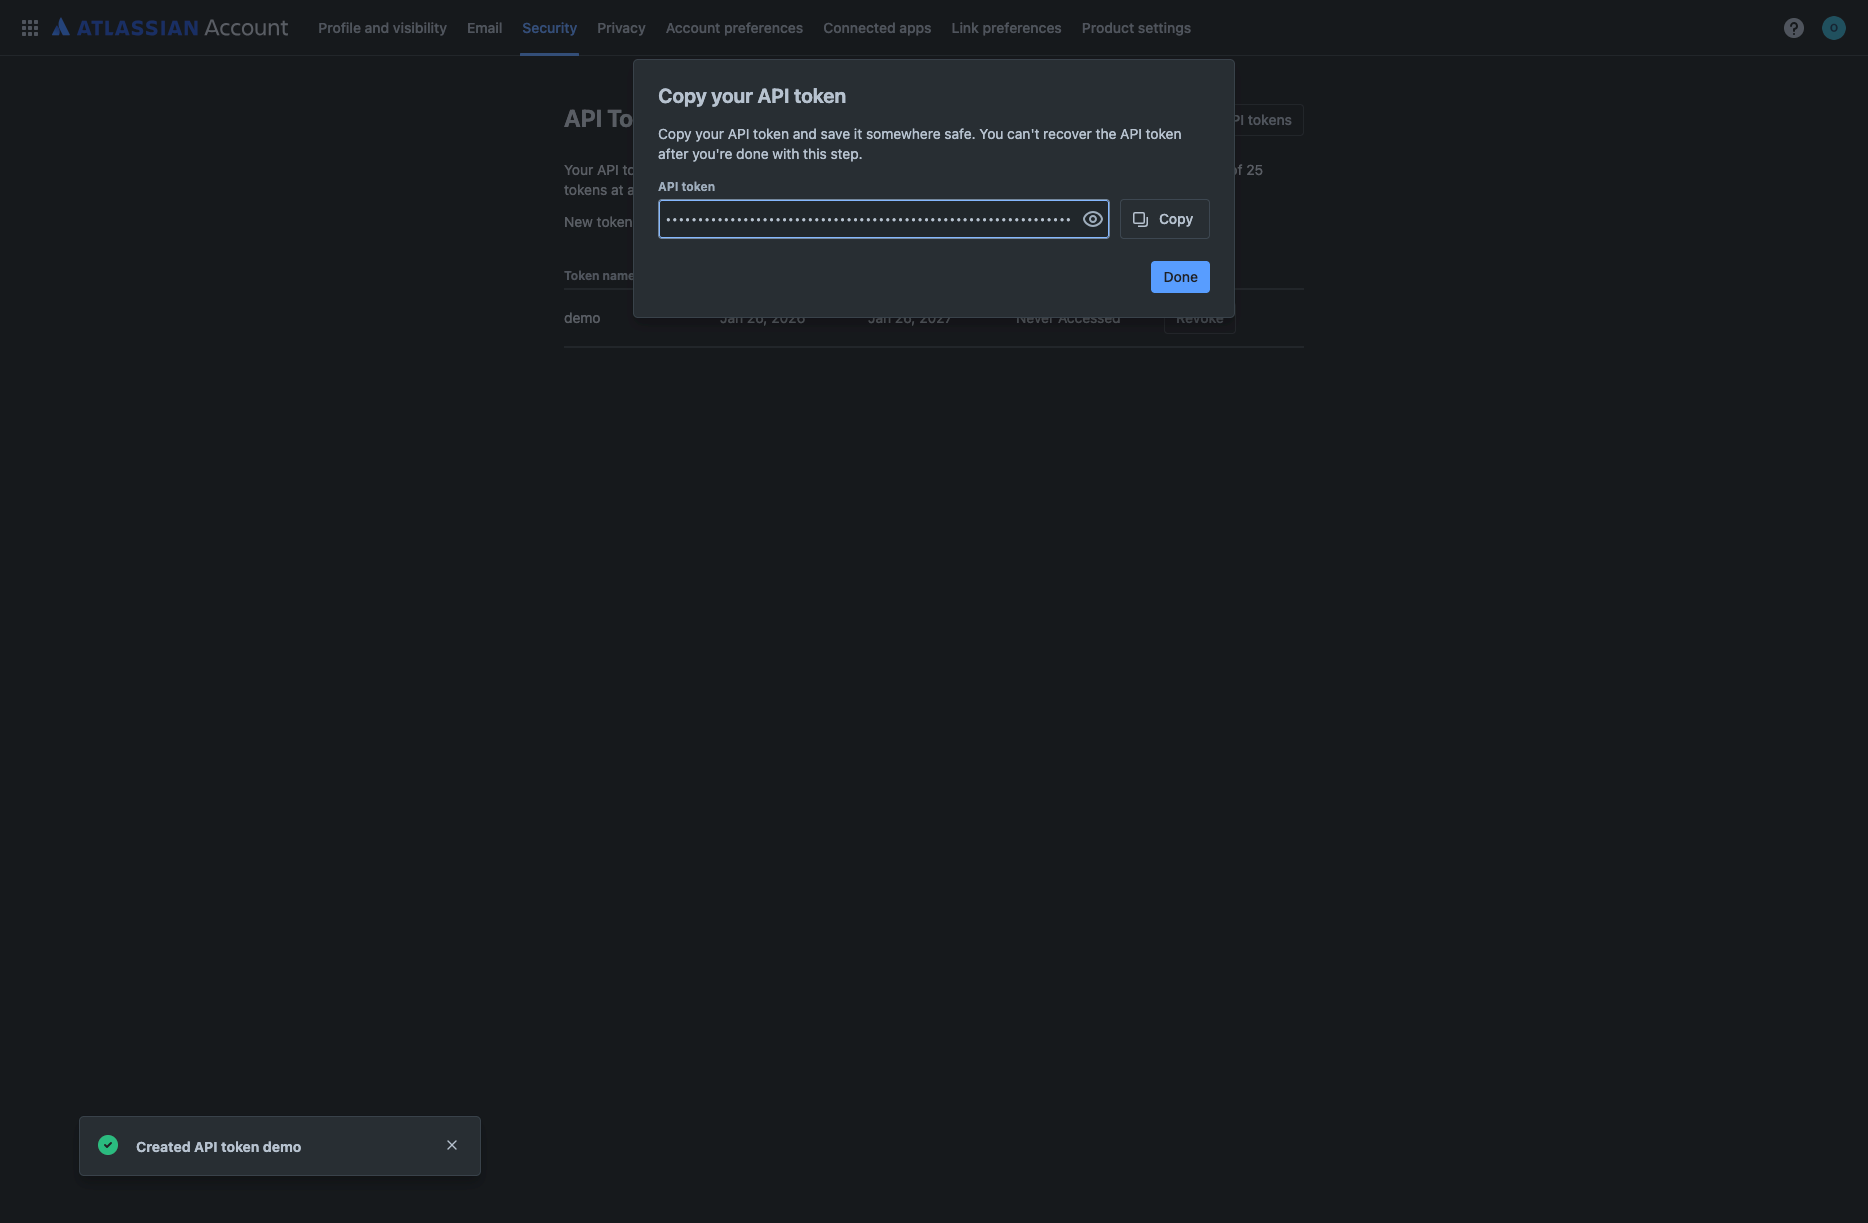
API tokens should be treated as passwords. Keep them secure and never share them publicly.
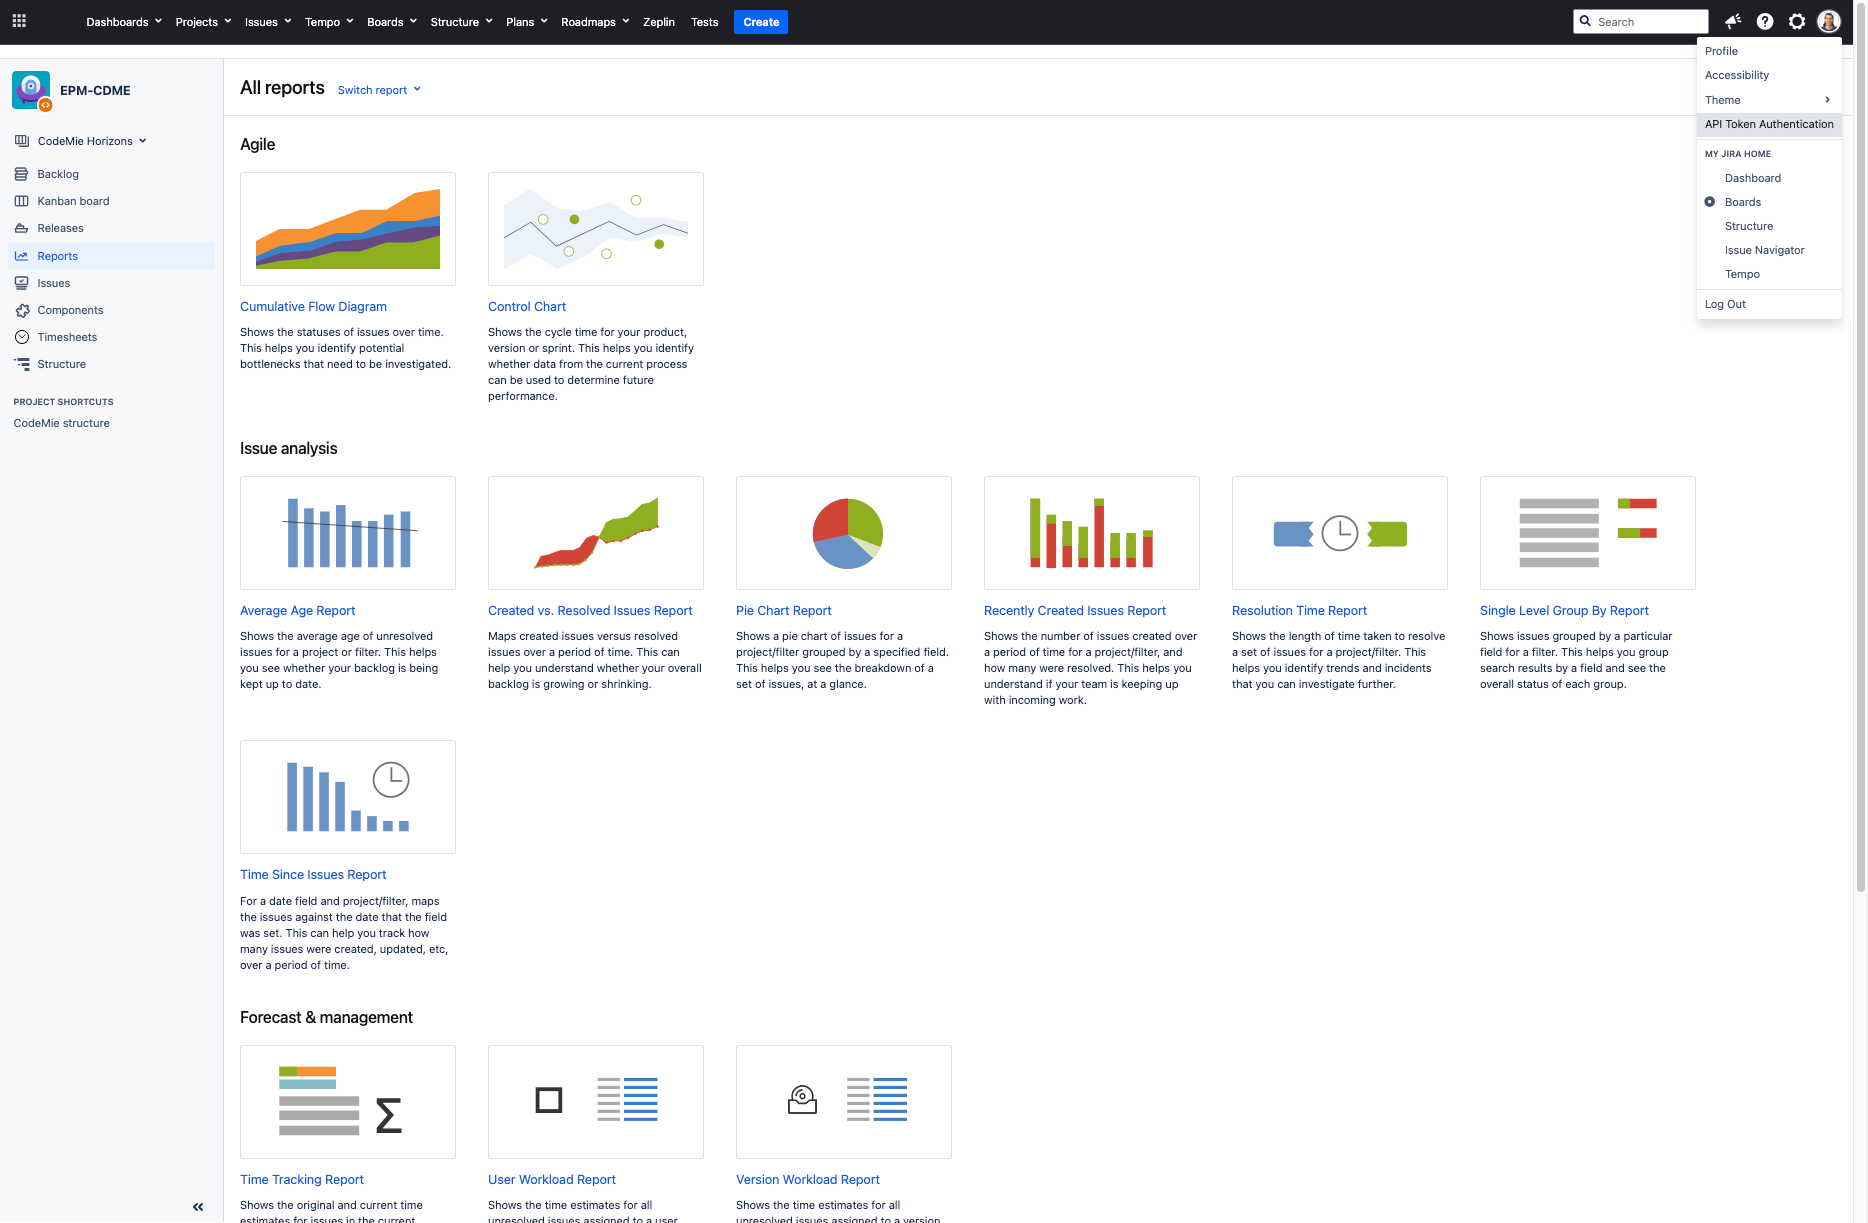
1.1. Log in to your Jira instance and click on your profile icon in the top-right corner. Select API Token Authentication from the menu:
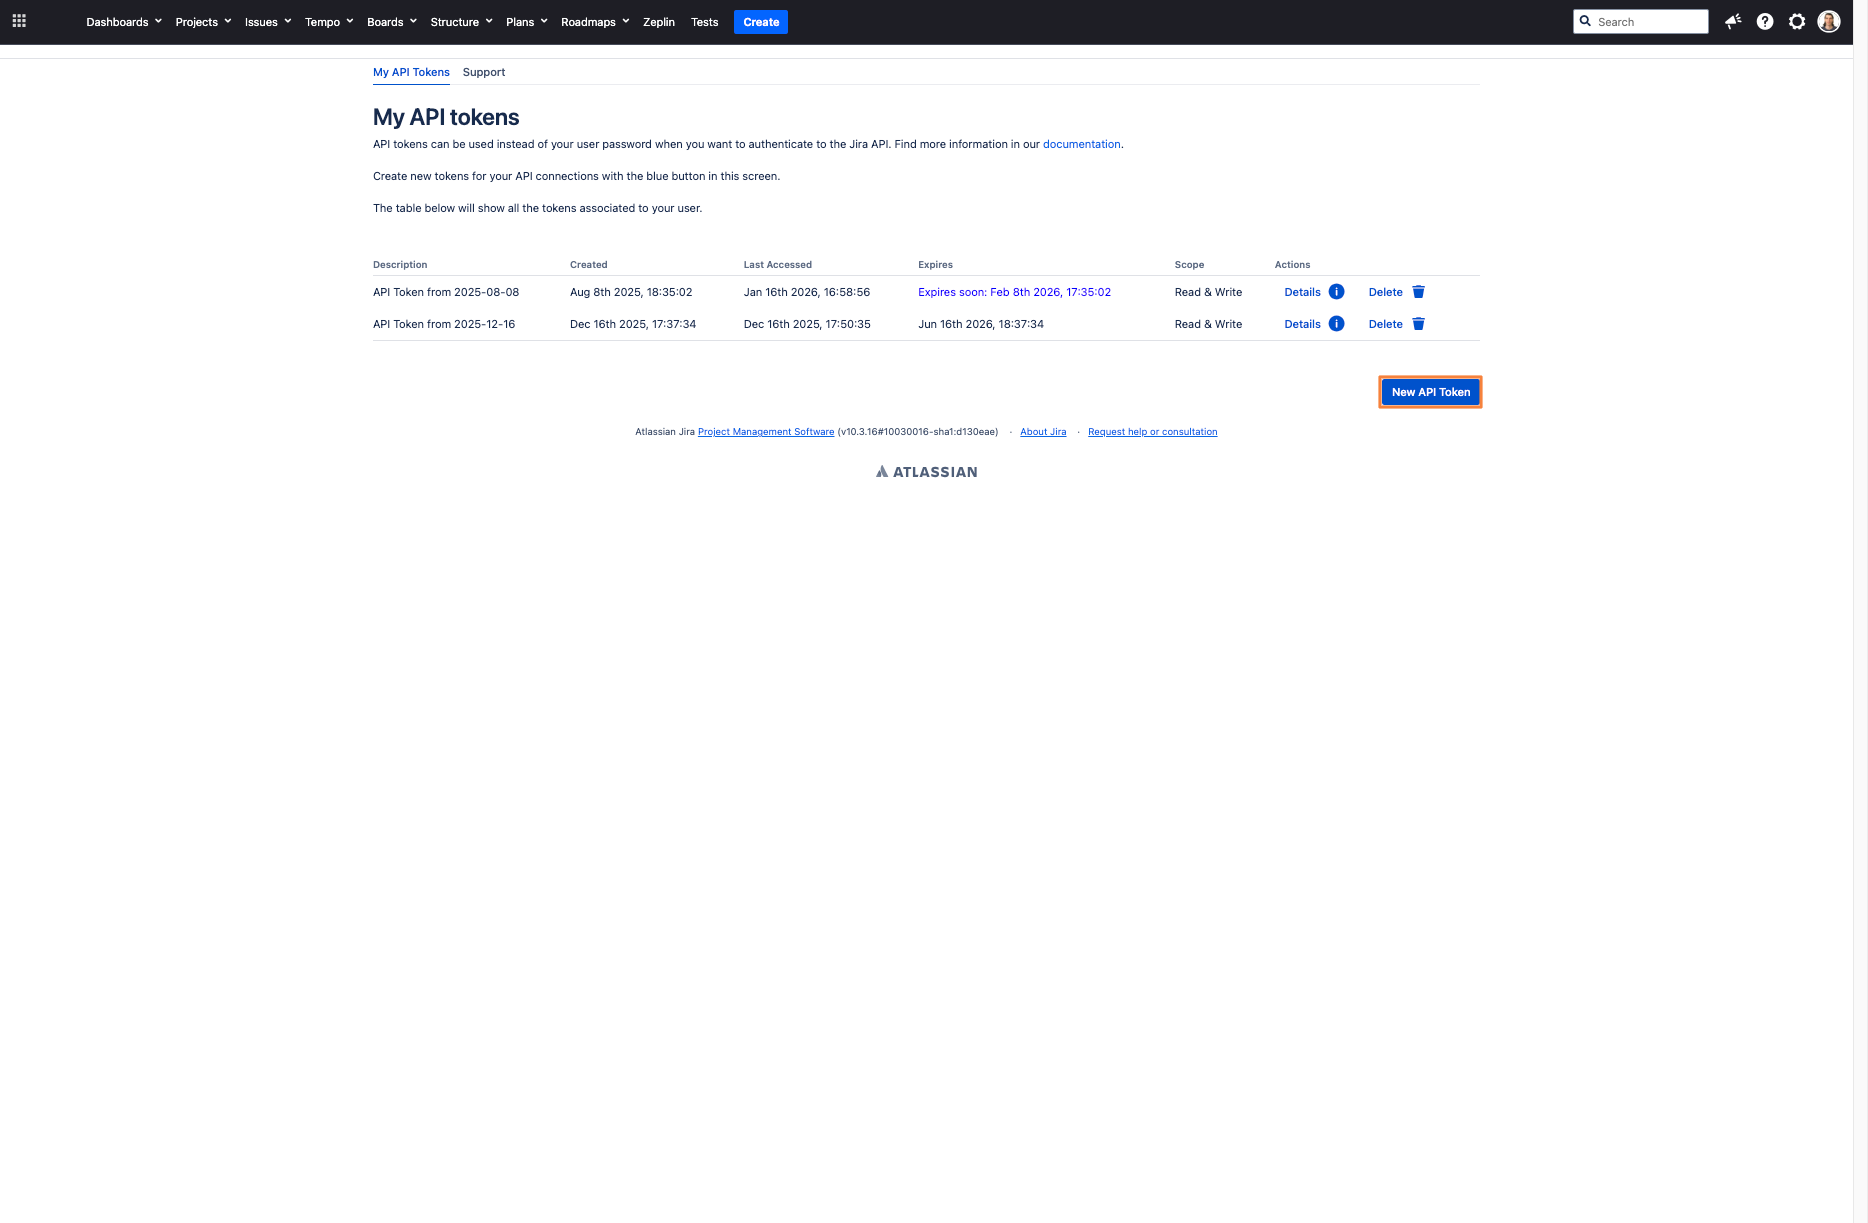
1.2. On the My API Tokens page, click the New API Token button:
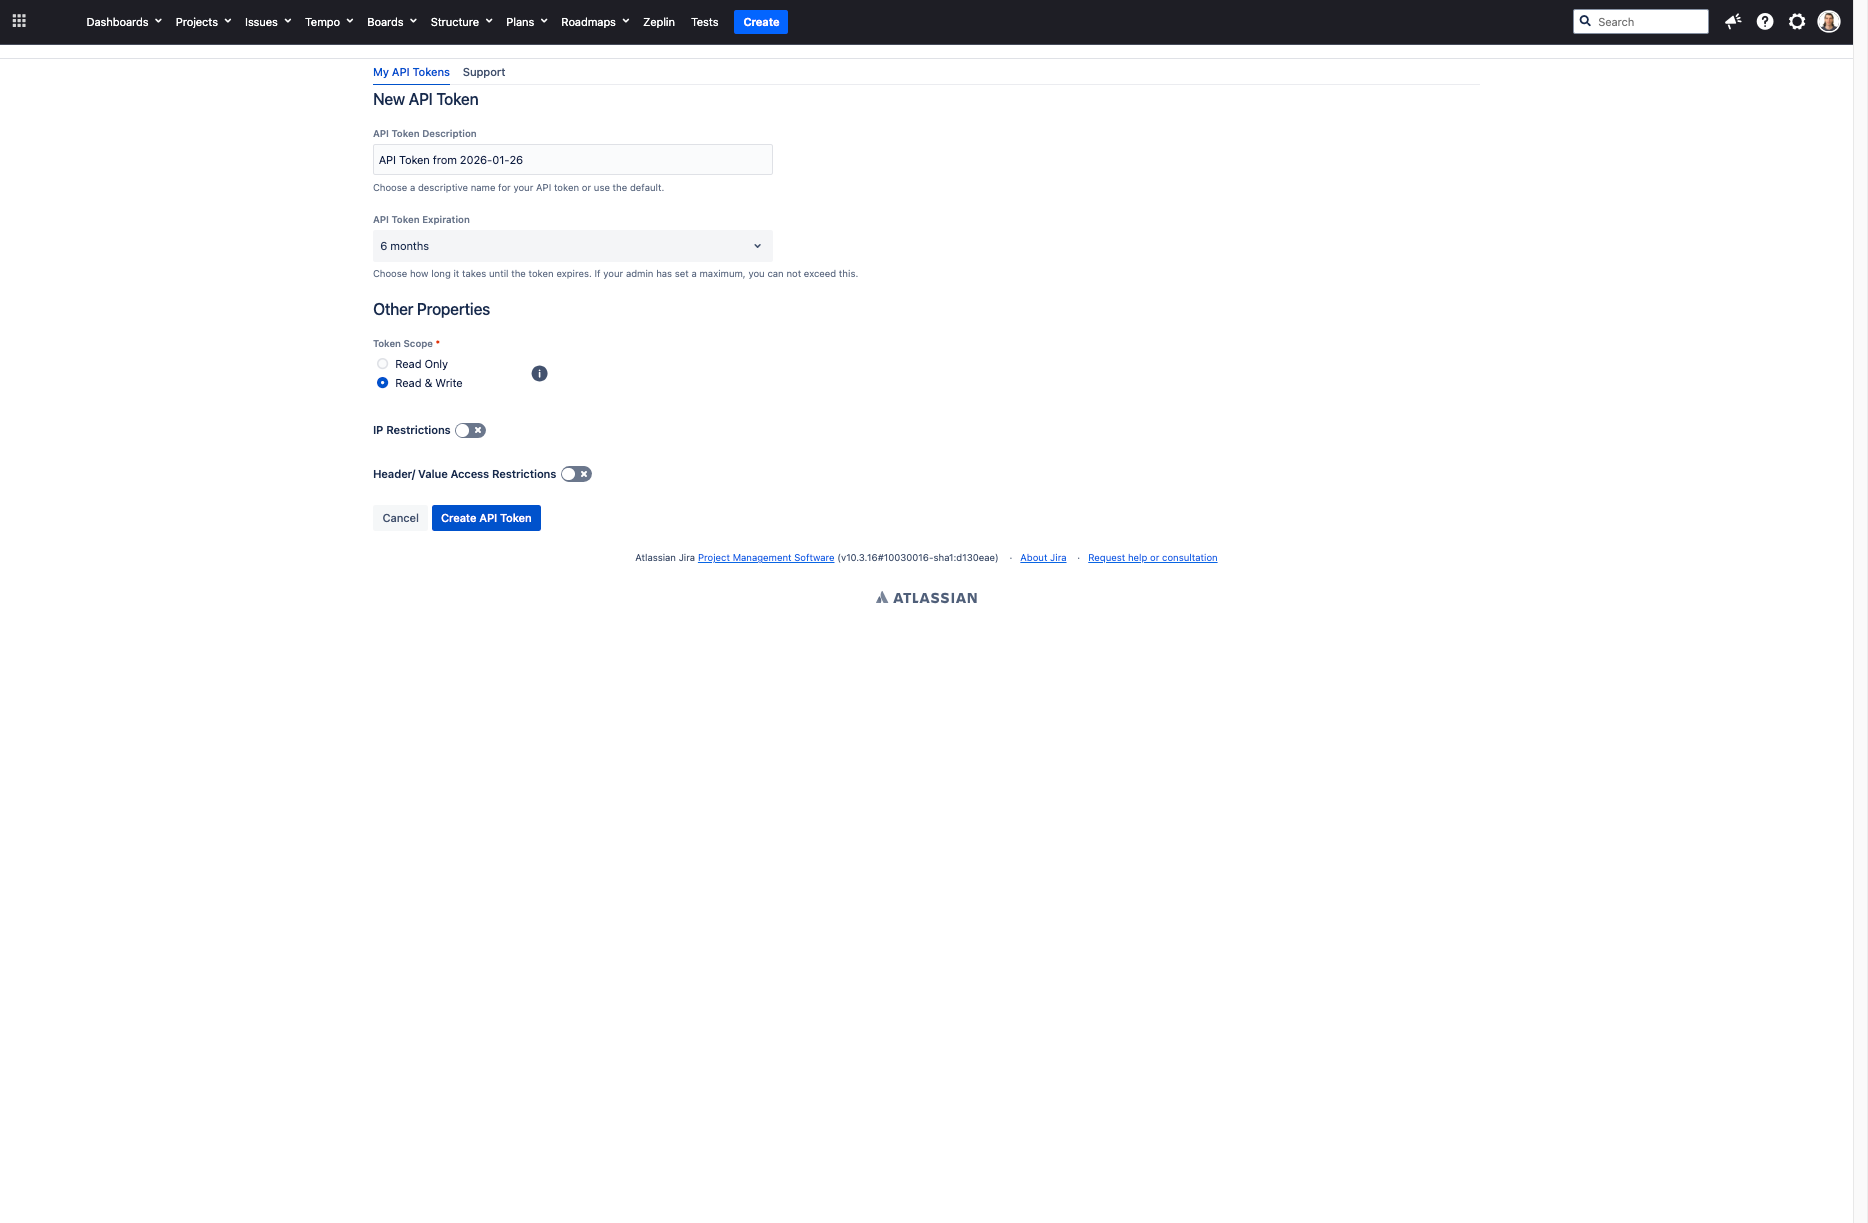
1.3. Fill in the token details:
- API Token Description: Enter a descriptive name for your token (e.g., "API Token from 2026-01-26")
- API Token Expiration: Select expiration period (e.g., "6 months")
- Token Scope: Choose Read & Write for full access
- Configure IP Restrictions and Header/Value Access Restrictions if needed
Then click Create API Token:
1.4. Copy the generated API token from the screen. The token will be displayed in two fields (e.g., "nEO" and "mLyv0"). Copy both parts and store them securely:
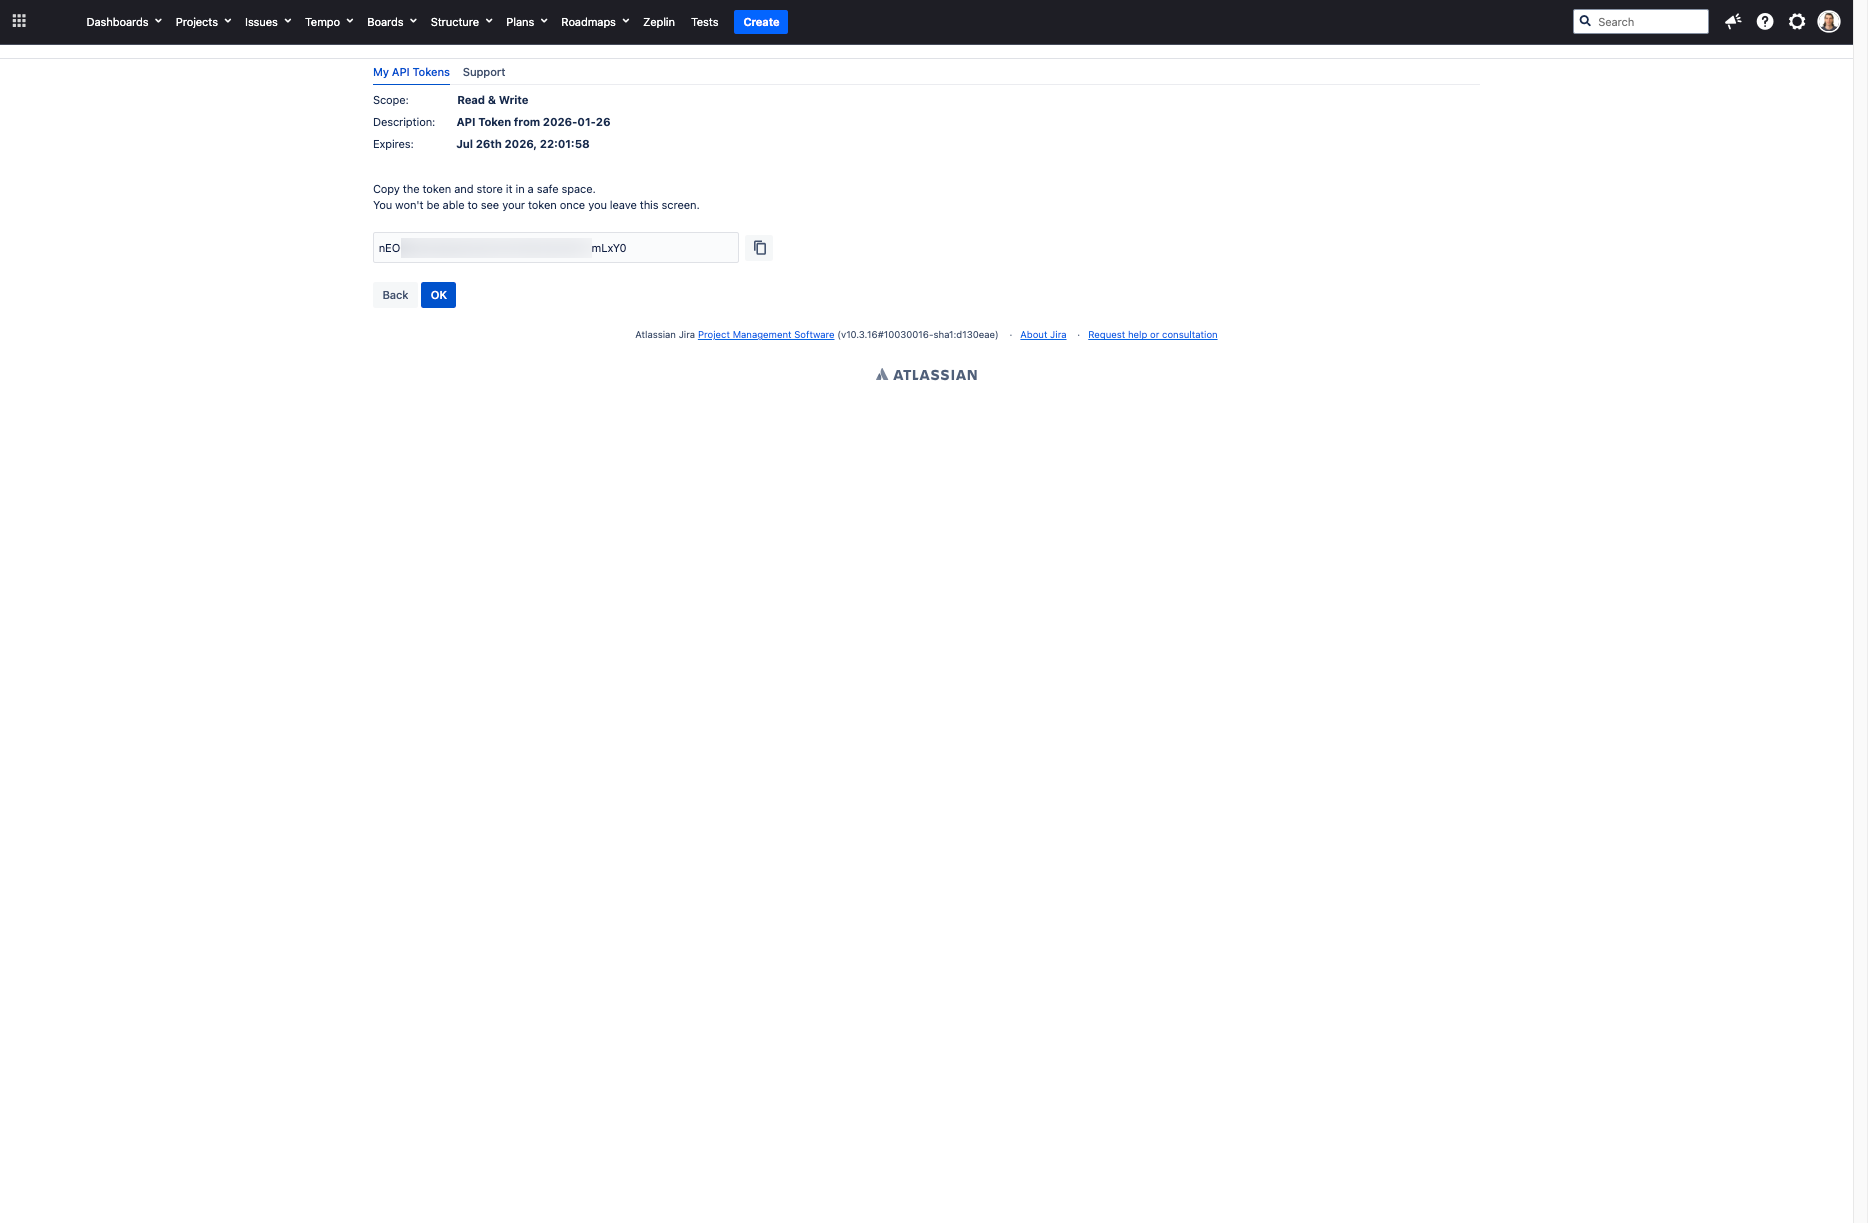
API tokens should be treated as passwords. Keep them secure and never share them publicly. You won't be able to see your token once you leave this screen.
2. Configure Integration in CodeMie
2.1. In the CodeMie main menu, click the Integrations button.
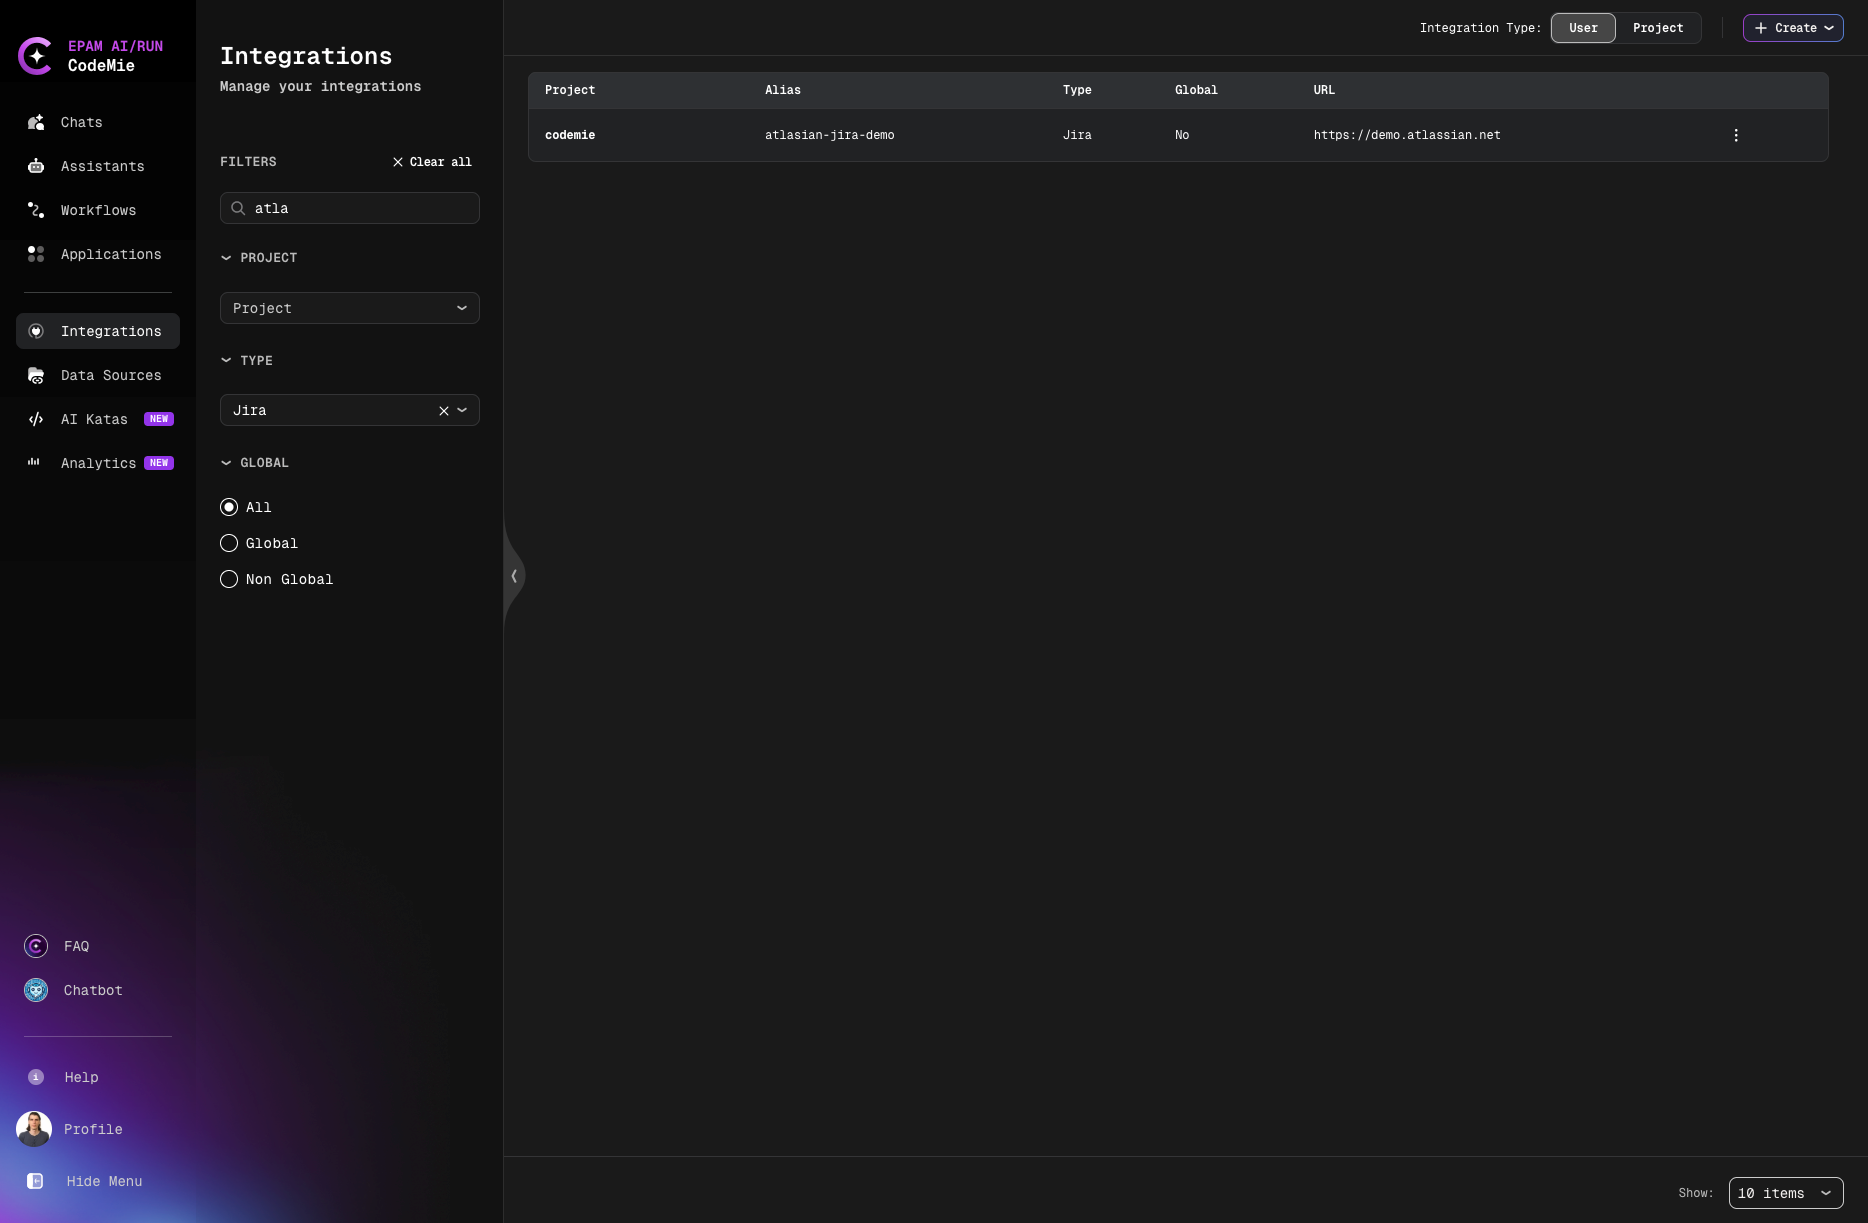
2.2. Select User or Project integration type and click + Create button.
2.3. In the new integration settings, fill in the following parameters:
- Project Name: Select the name of your project.
- Global Integration: Toggle on if you want to use this integration across multiple projects.
- Credential Type: Select Jira from the dropdown.
- Alias: Alias is a representation of the integration (e.g.,
jira-example). - URL: Your Jira instance URL:
- For Jira Cloud:
https://<your-domain>.atlassian.net - For Jira Self-hosted:
https://<your-jira-server-url>
- For Jira Cloud:
- Is Jira Cloud:
- ✅ Check this box if you're using Jira Cloud
- ❌ Leave unchecked if you're using Jira Self-hosted (self-hosted Jira)
- Username/email for Jira: Your Atlassian account email (e.g.,
user@example.com). - Token: Paste the API token created in step 1.

2.4. (Optional) Click Test button to verify the connection. You should see "Integration test successful" notification.
2.5. Click Save to create the integration.
You can create both User-level and Project-level integrations. User-level integrations are available across all your projects, while Project-level integrations are specific to a single project.
3. Create Assistant with Jira Tool
3.1. Click Explore Assistant, then click Create Assistant and fill in the following parameters:
- Project Name: Select the name of your project.
- Name: Specify the assistant name (e.g., "Jira Task Manager").
- Description: Specify description (e.g., "Assistant for managing Jira tasks and issues").
- System Instructions: Specify system instructions for how the assistant should work with Jira.
- Available tools: Expand Project Management section, check Generic Jira, and select your Jira integration alias from the dropdown list.
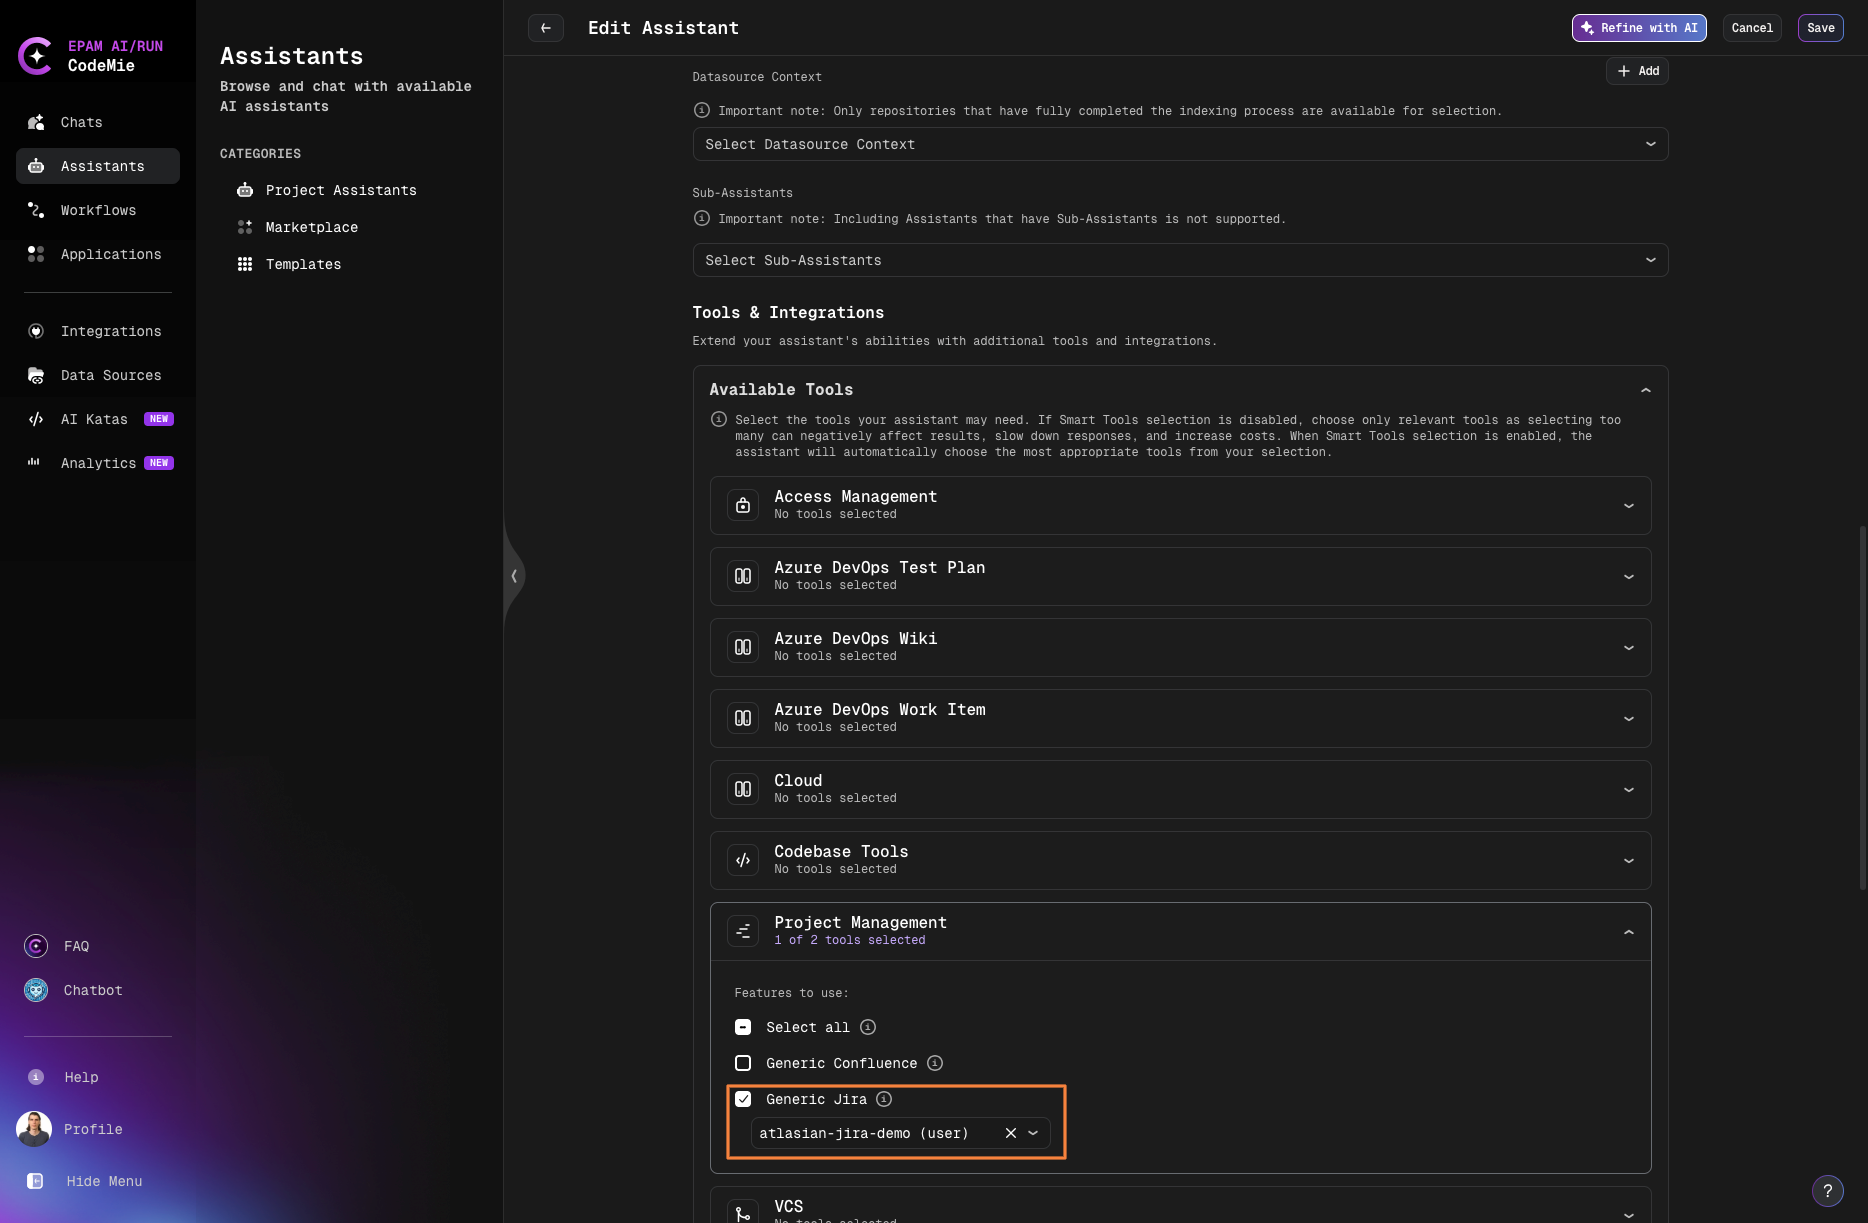
3.2. Click Create or Save to finalize your assistant.
4. Use Your Assistant
4.1. Click Explore Assistant, select My Assistant and choose your Jira assistant by name.
4.2. You can now interact with your Jira instance through natural language:
- Create new issues and tasks
- Create subtasks and assign them
- Search and filter issues
- Update issue status and assignees
- Add comments to issues
- Link related issues
- View project boards and backlogs
Example: You can ask the assistant to create tasks with natural language commands like "create me new task with name and text hello from codemie in project key KAN":
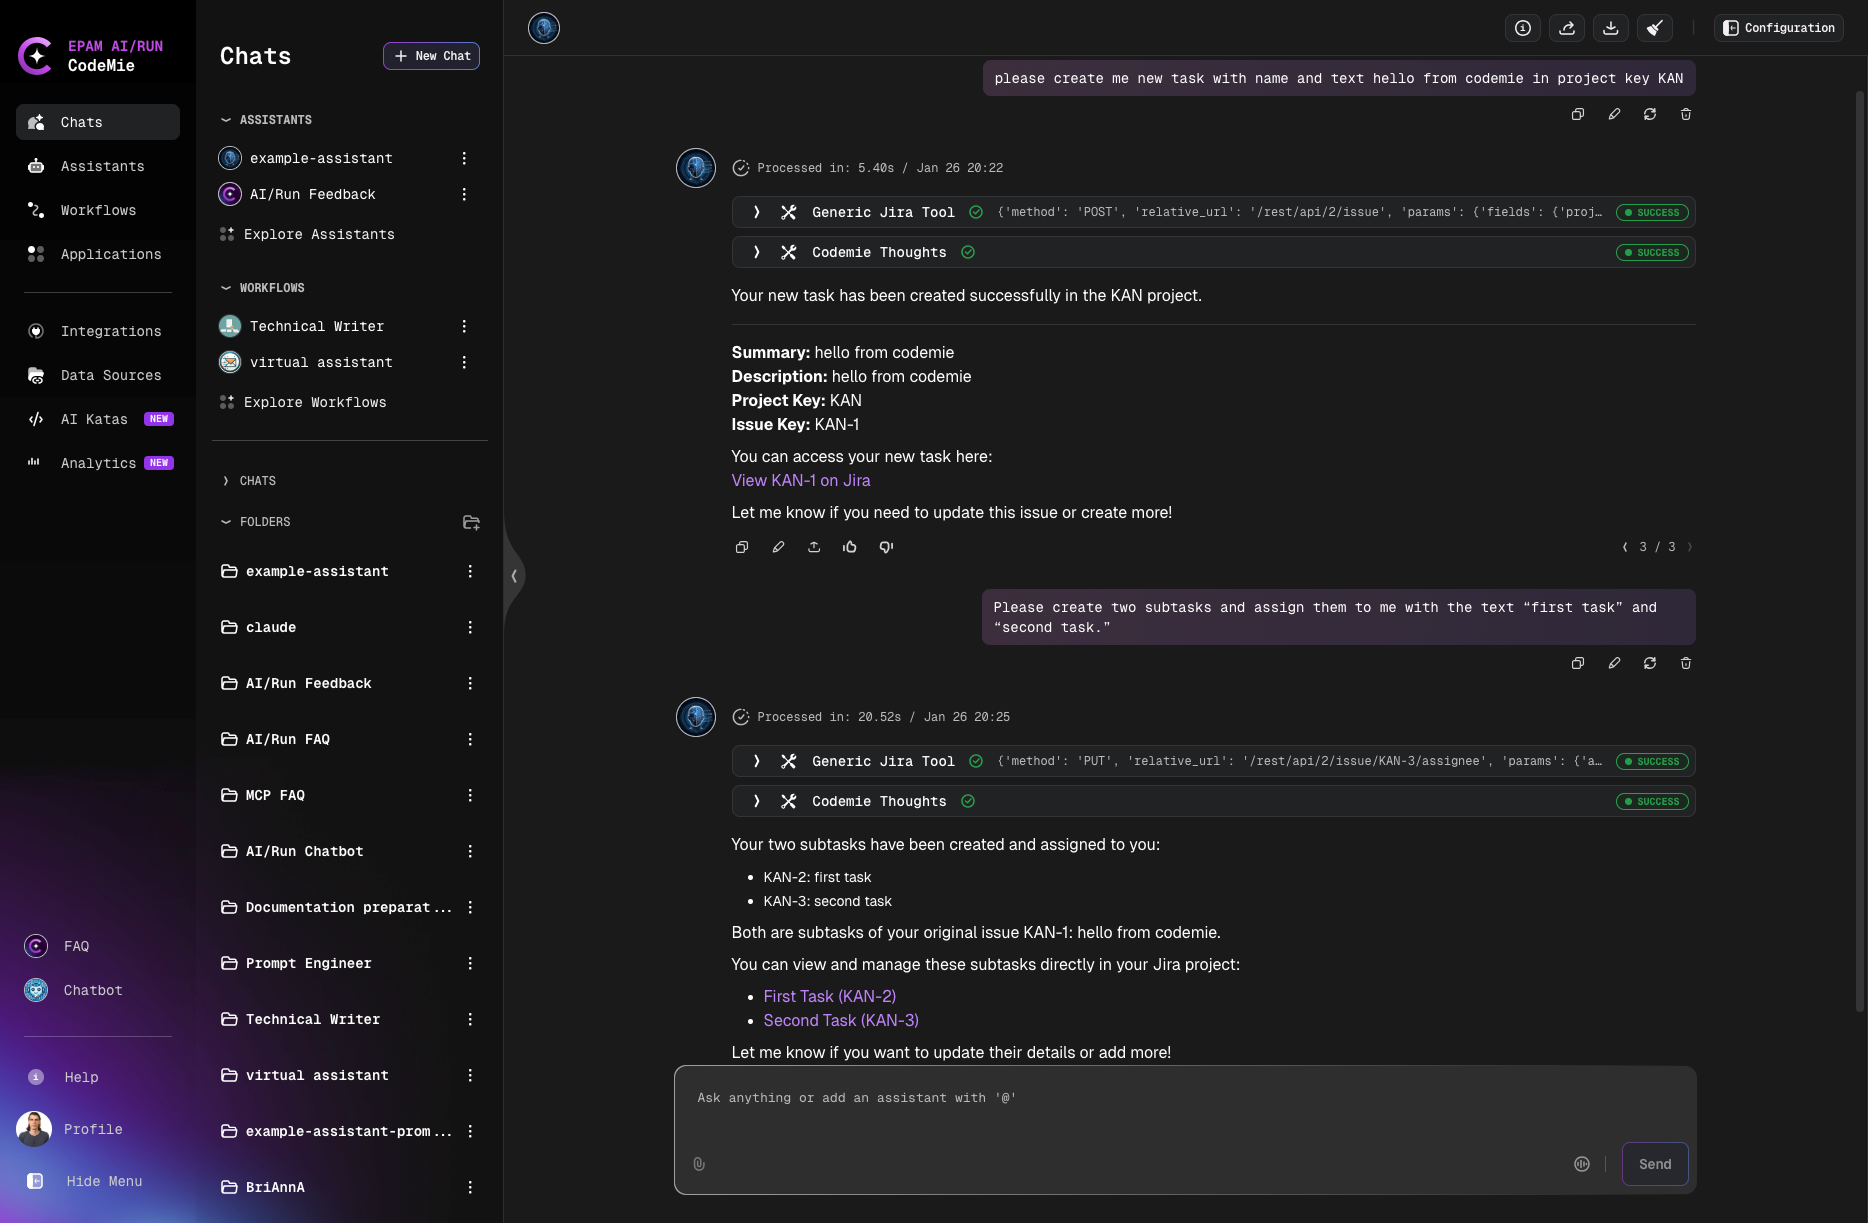
The assistant will create the tasks in Jira and provide you with links to view them directly in your Jira workspace.
Use Cases
Project Management
Use the Jira integration to:
- Automatically create tasks from conversation context
- Track progress on development work
- Link code changes to Jira issues
- Update sprint planning and backlog
Issue Tracking
Streamline issue management by:
- Quickly searching for existing issues
- Creating detailed bug reports
- Assigning tasks to team members
- Monitoring issue resolution progress
Workflow Automation
Integrate Jira with CodeMie workflows to:
- Automatically transition issues based on events
- Generate reports from Jira data
- Synchronize status across tools
- Trigger notifications on issue updates
Best Practices
- Use descriptive issue titles and descriptions for better AI understanding
- Configure appropriate permissions for the API token
- Regularly review and update integration credentials
- Leverage JQL (Jira Query Language) for advanced filtering
- Set up project-specific integrations for better access control