Adding an MCP Server
Configuration Steps
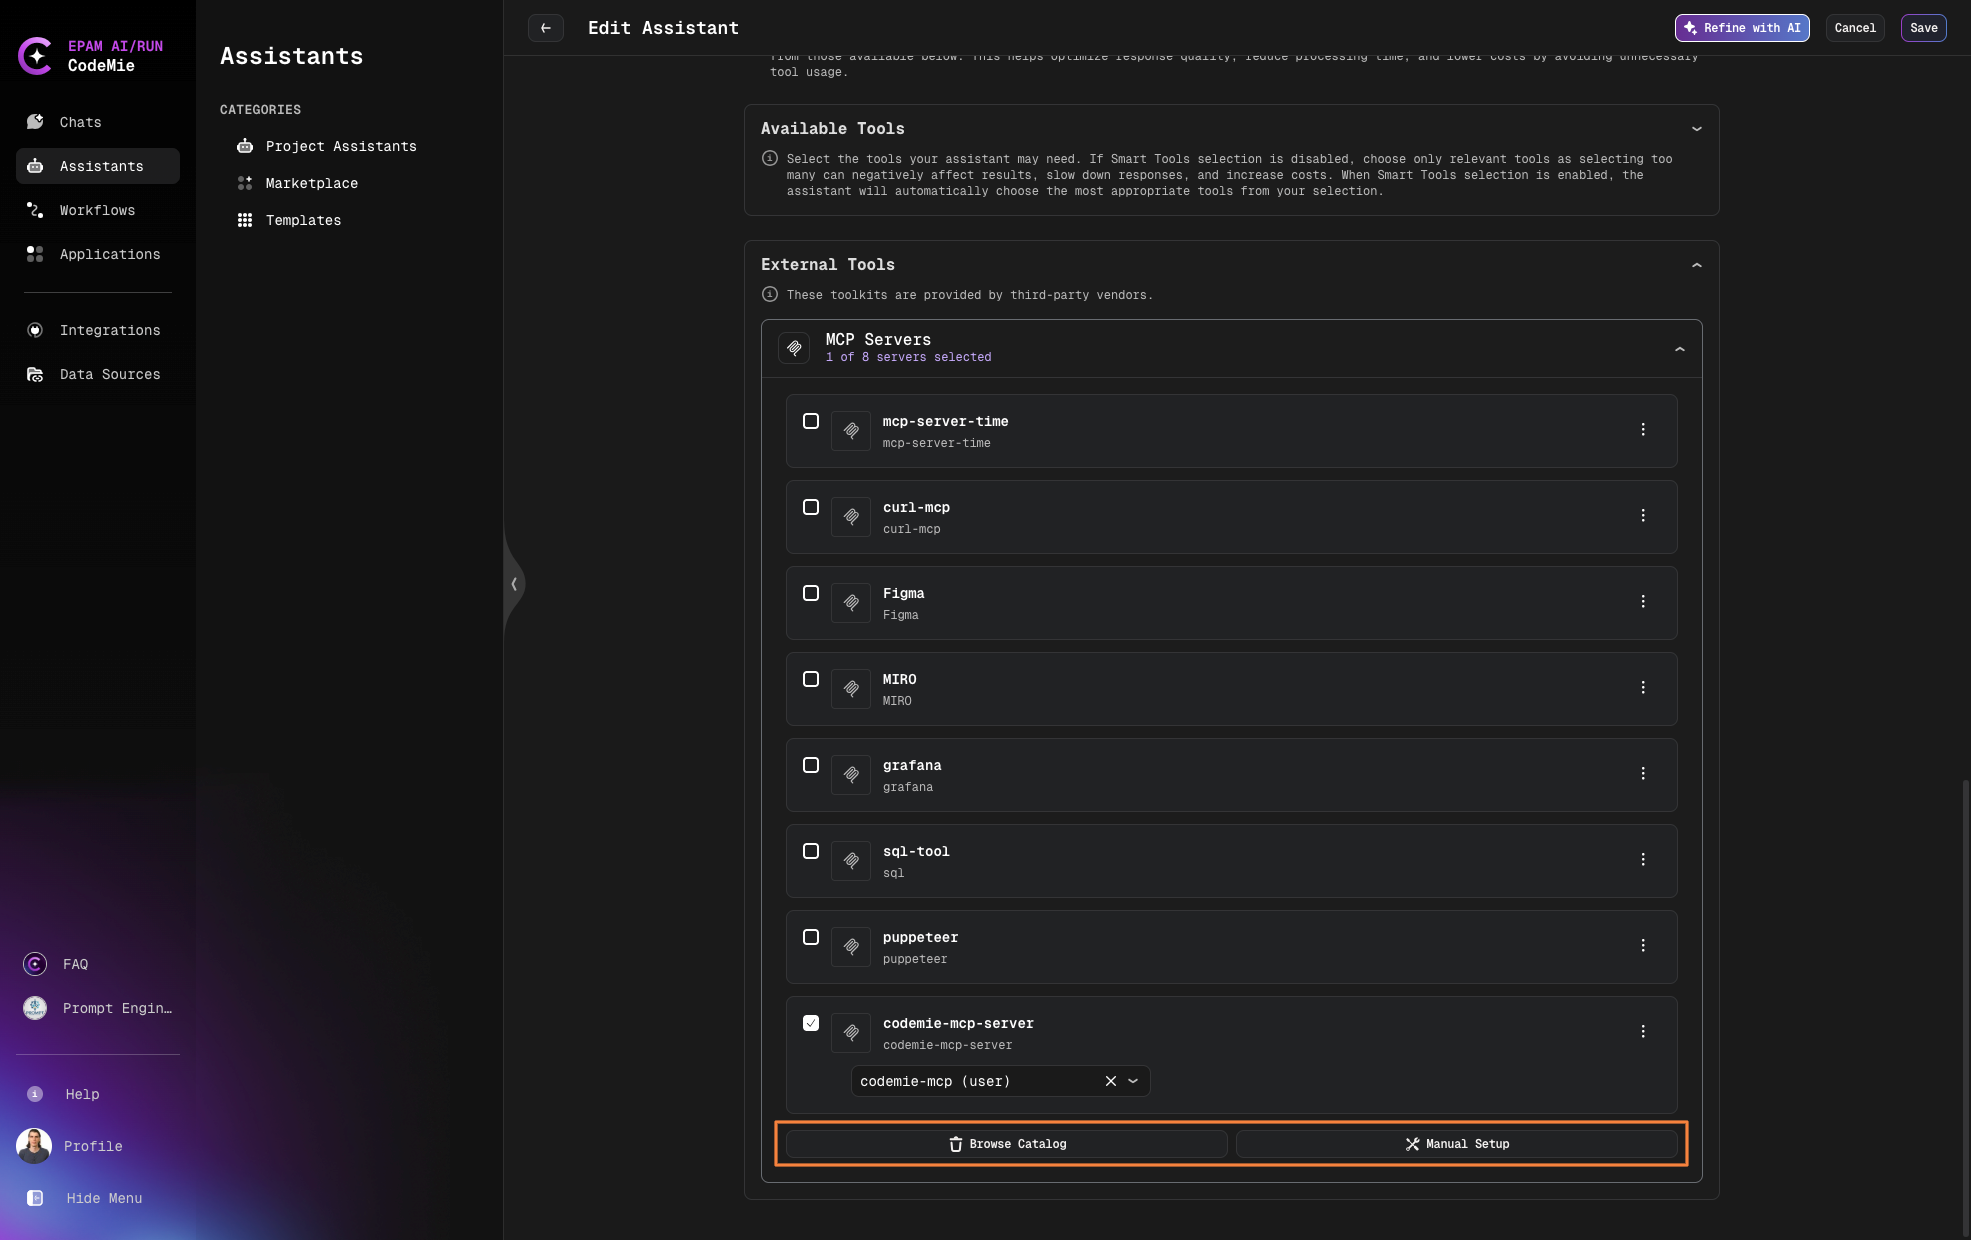
- Navigate to the Create Assistant or Edit Assistant page
- In the Available tools section, expand the External tools category
- Click on the External tools card to expand it
- Select Browse Catalog for already predefined MCP servers or Manual Setup for adding your own MCP server
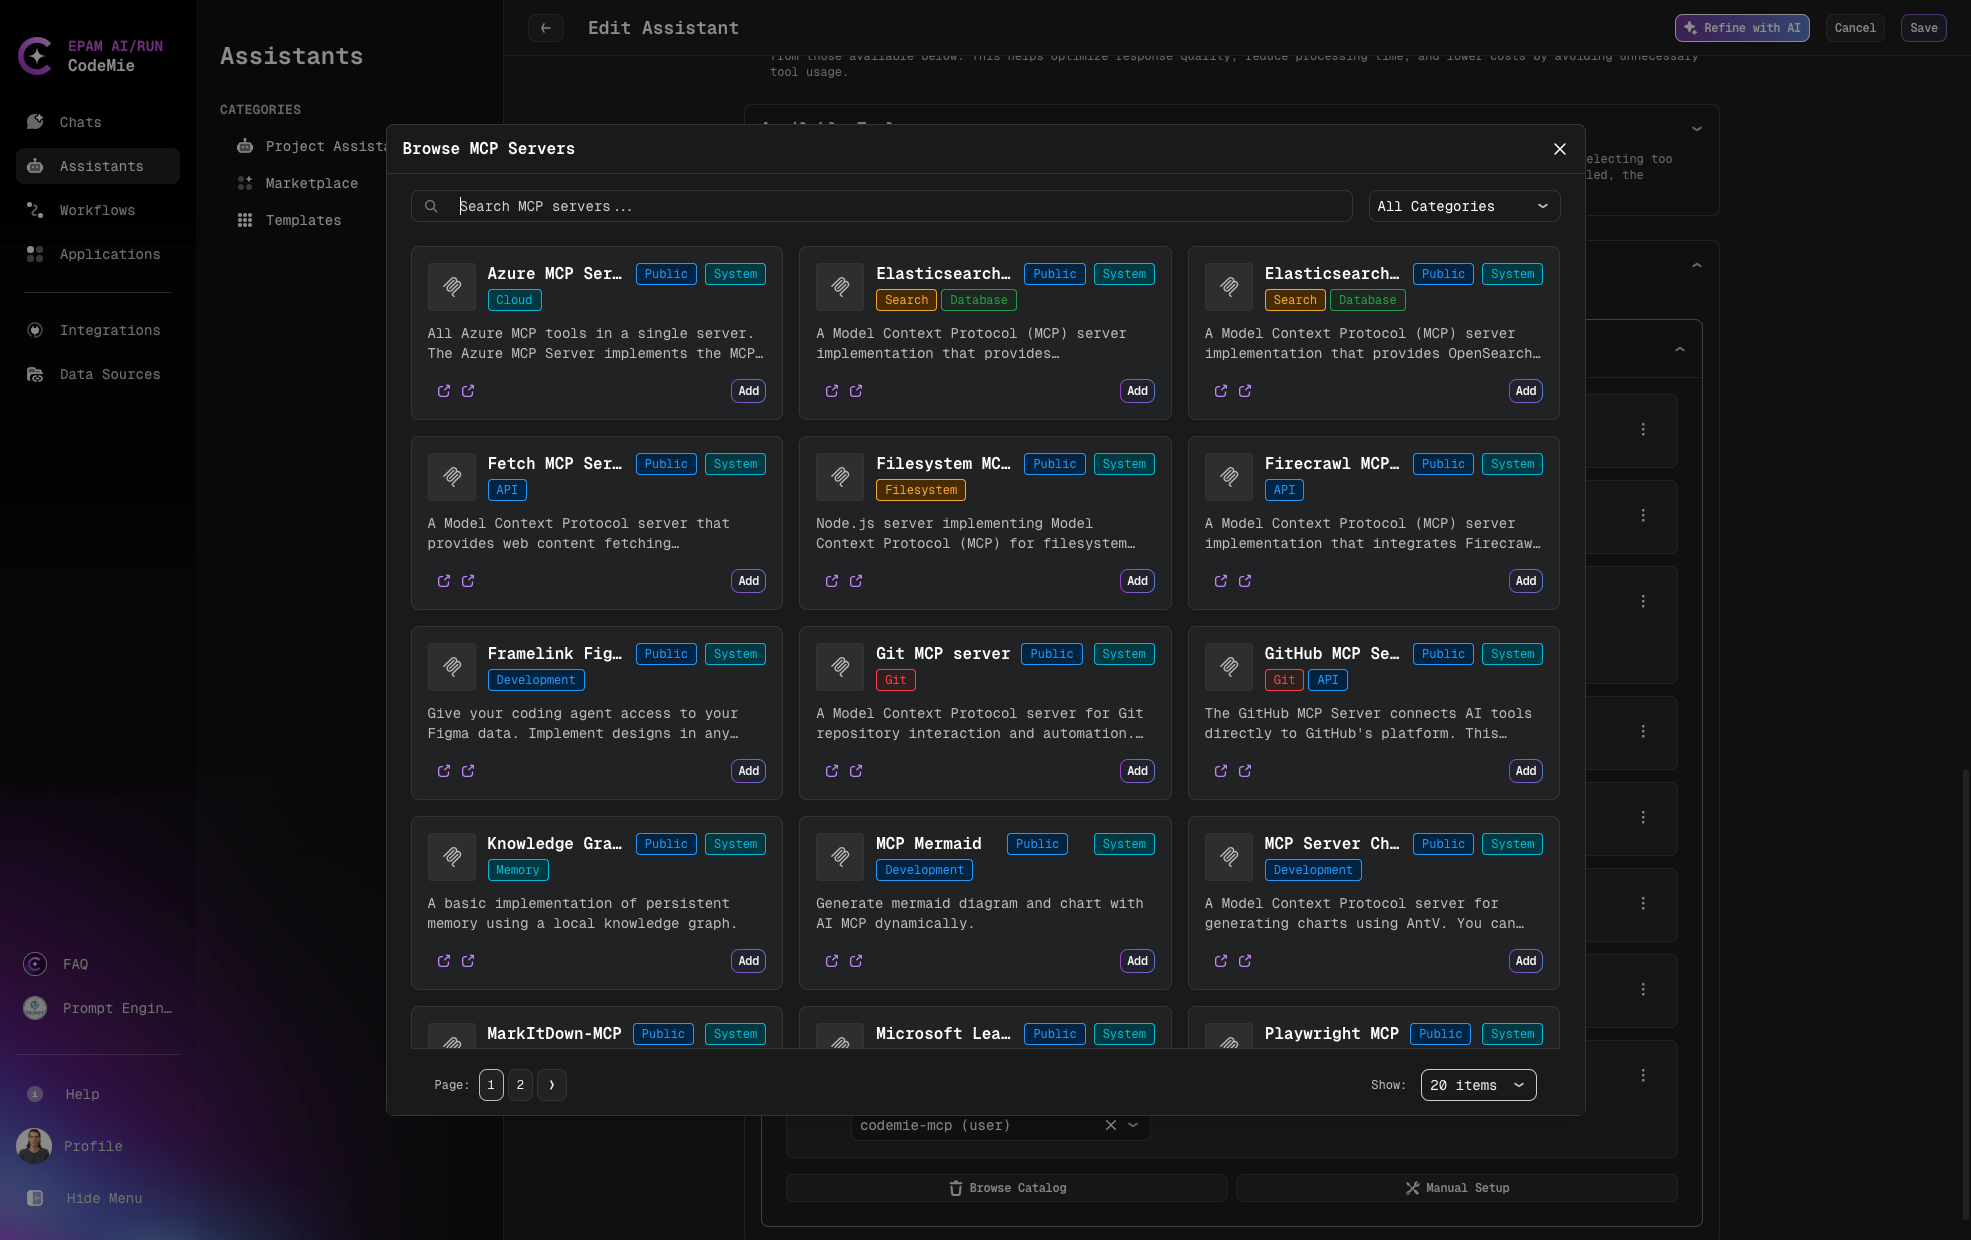
Add Predefined MCP Servers from Browse Catalog
- Search MCP with Categories filter or by name and click Add
- Add required Environment Variables
- Add or select environment variables from the dropdown list if needed
- And click Save
- Click Test Integration and Add to complete the configuration
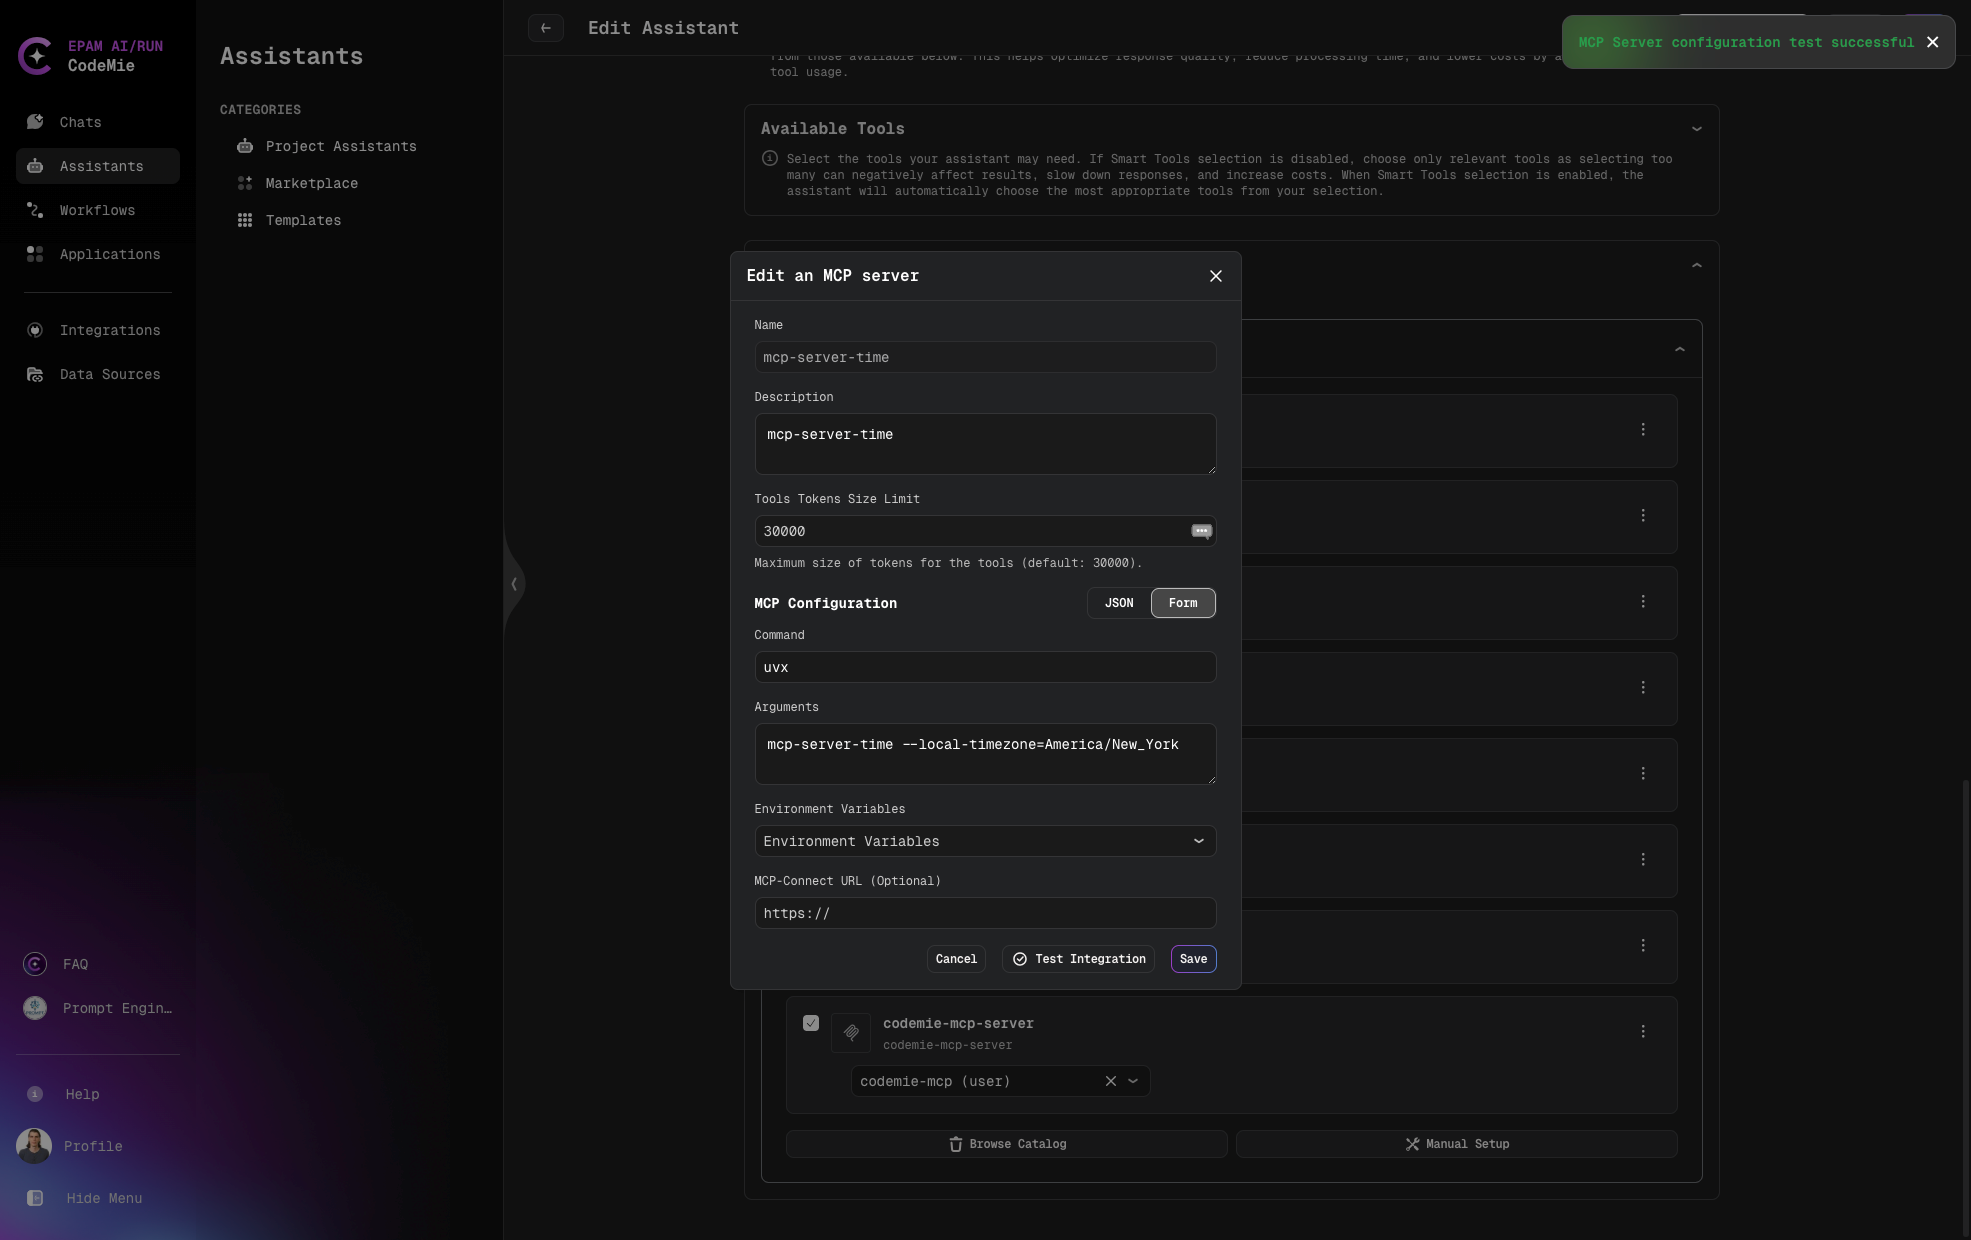
Add MCP Server with Form Manual Setup
When configuring an MCP server using the Form method:
- Fill in the required fields:
- Name: A unique identifier for your server (required)
- Description: Details about the server's purpose (optional)
- Tools Tokens Size Limit: in need to change value by default
- Command: The command used to invoke the server (required)
- Arguments: Any additional parameters needed, space-separated (optional)
- Select environment variables from the dropdown if needed
- Click Test Integration and Add to complete the configuration
Example:
- Name: time-mcp-server
- Description: time-mcp-server
- Command: uvx
- Arguments:
mcp-server-time --local-timezone=America/New_York
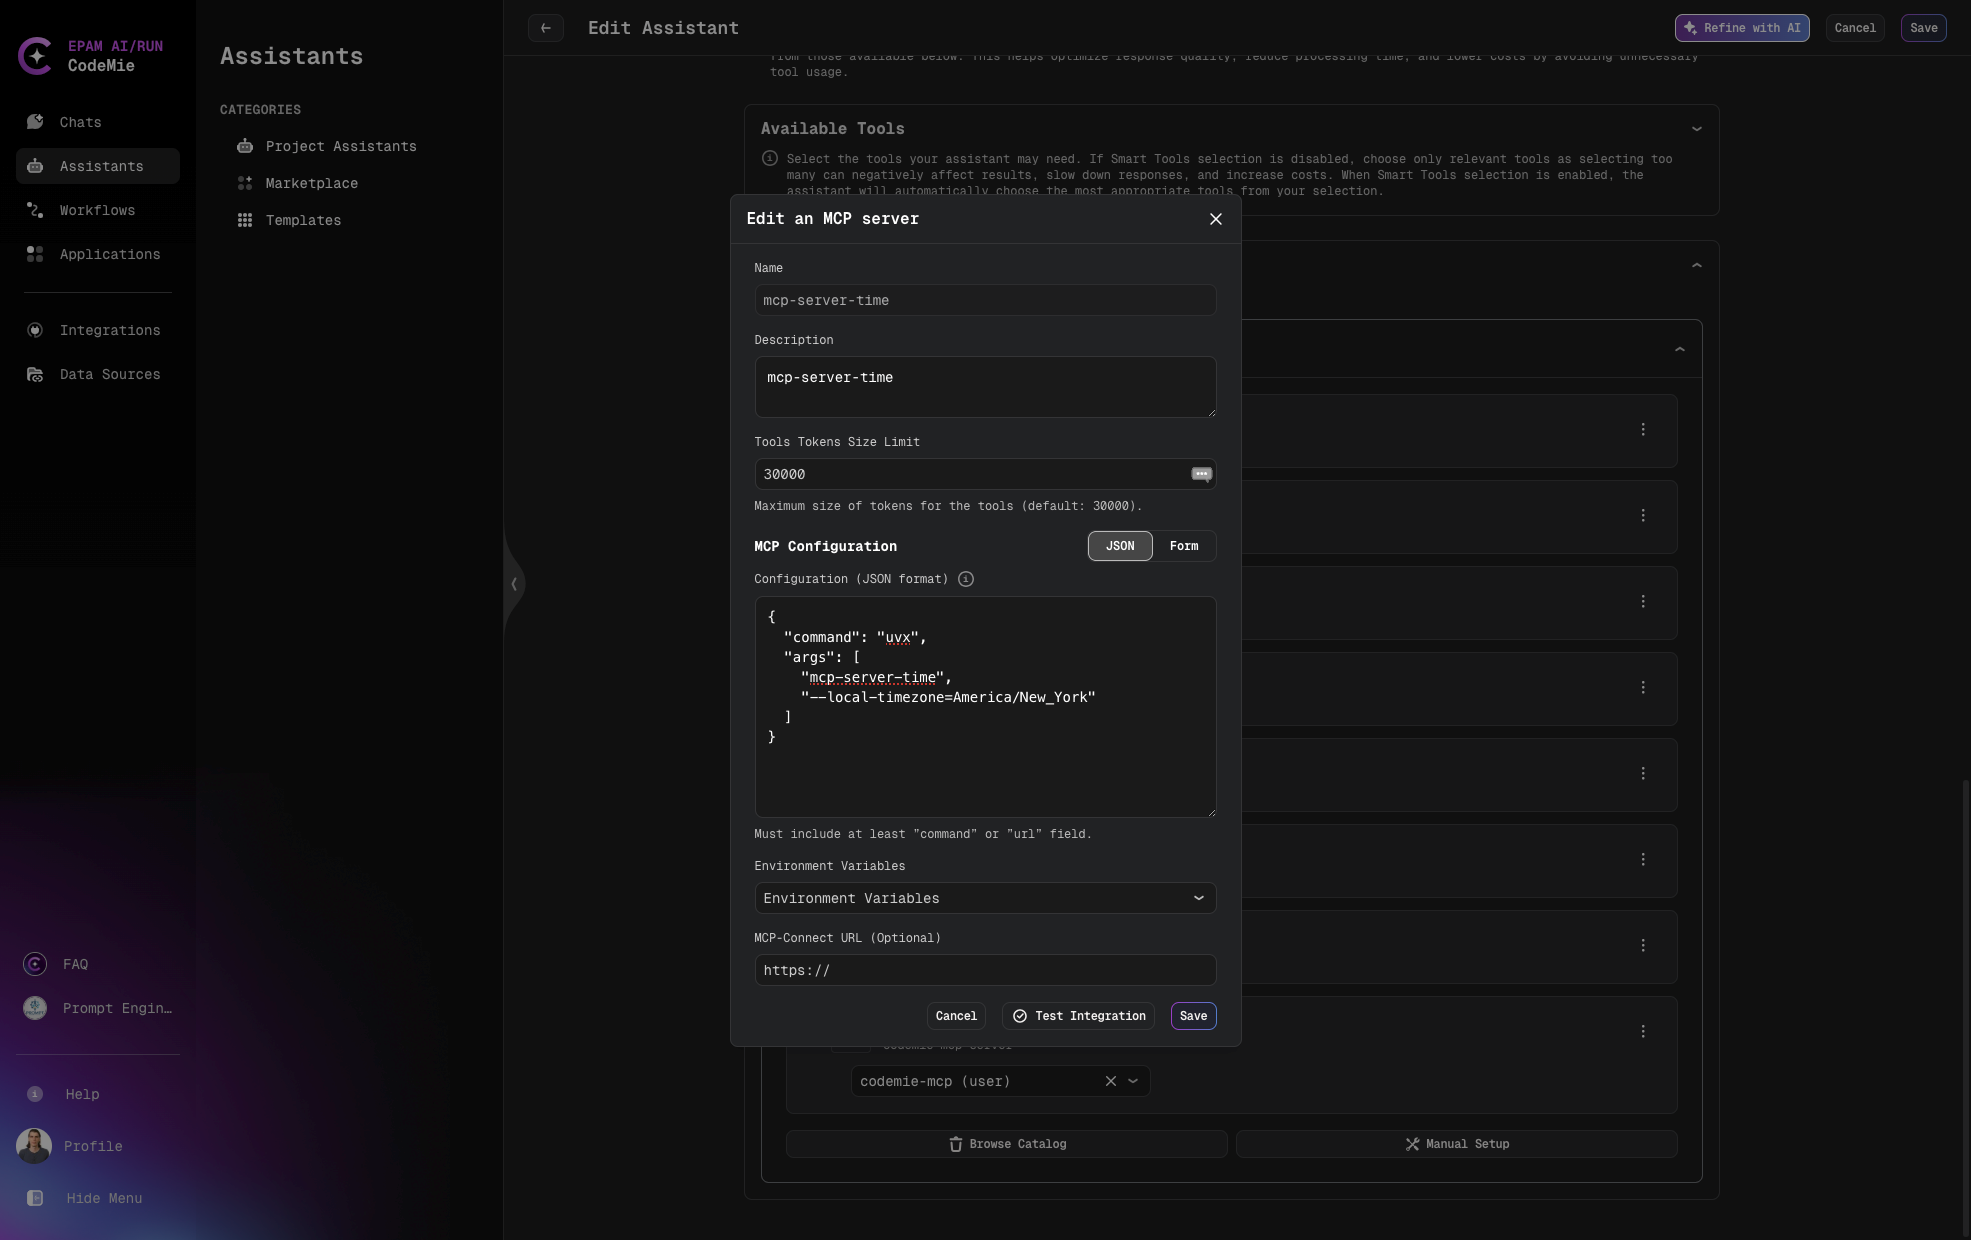
Add MCP Server with JSON Method Manual Setup
For advanced configurations, you can use the JSON method:
- Fill in the basic fields (Name, Description, Command, Tools Tokens Size Limit)
- Enter valid JSON data in the JSON format field
- Select environment variables as needed
- Click Add Server to complete the configuration
Example:
{
  "command": "uvx",
  "args": ["mcp-server-time", "--local-timezone=America/New_York"]
}
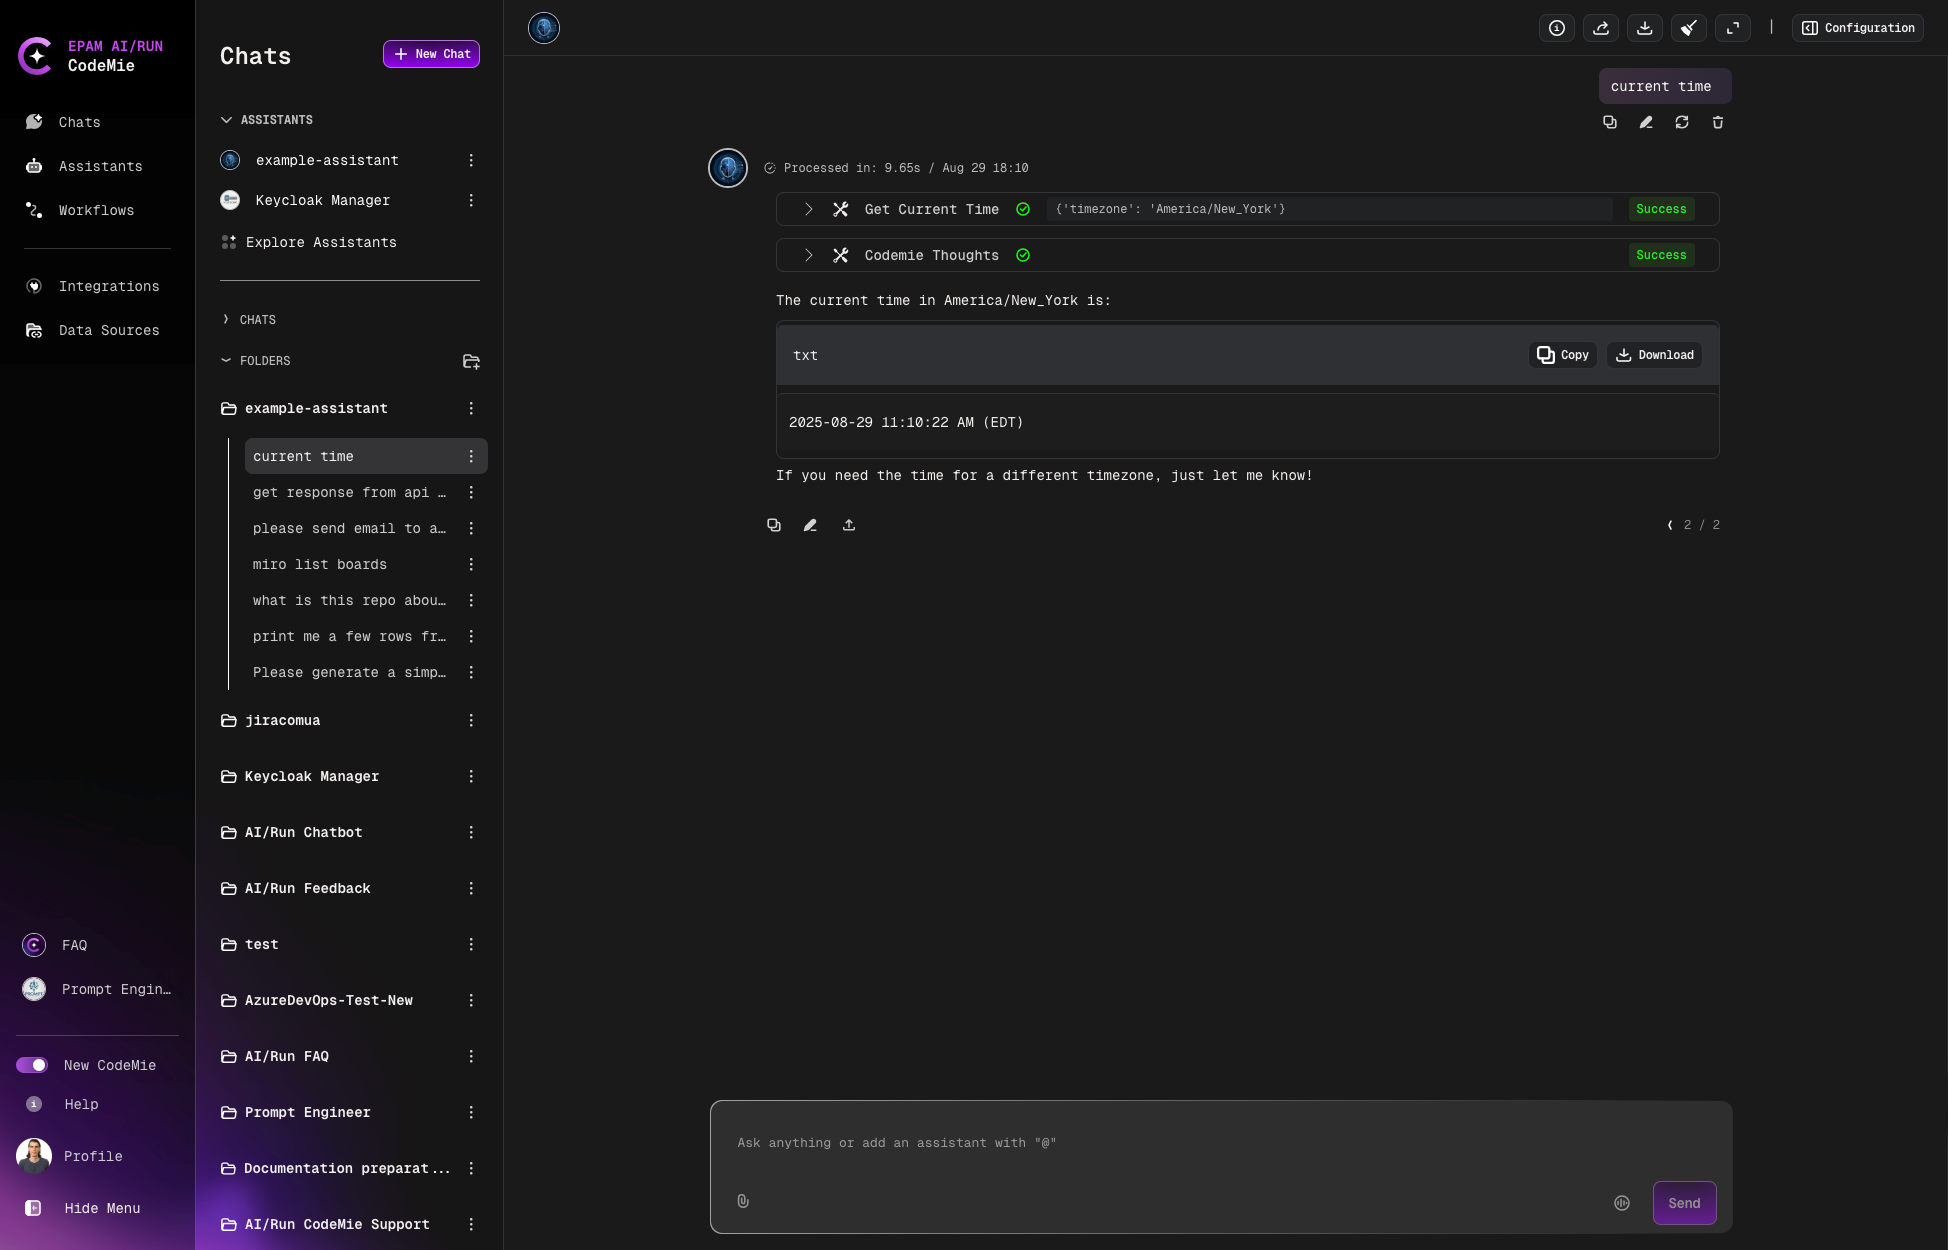
Example of the conversation:
Managing Environment Variables
MCP servers often require environment variables for proper operation:
- Click Add environment variables on the expanded MCP tool card
- Choose between Project Environment Variables or User Environment Variables
- Fill in the required fields:
- Alias: A user-friendly name for the variable
- Key: The environment variable key name
- Value: The value to assign (will be securely stored)
- Click Add Environment Variables to save the configuration
Configuring Headers with User Context Placeholders
For Streamable HTTP MCP servers, you can configure custom headers with dynamic placeholders that are automatically resolved at request time. This feature enables user-specific routing, audit logging, and context propagation.
Available Placeholders
User Context Placeholders:
{{user.name}}- Resolves to the authenticated user's full name (e.g., "John Doe"){{user.username}}- Resolves to the authenticated user's username/email (e.g., "John.Doe@epam.com"){{user.token}}- Resolves to the authenticated user's JWT token for per-user authentication
Environment Variable Placeholders:
{{VARIABLE_NAME}}- Resolves to values from configured environment variables
User context placeholders like {{user.token}}, {{user.name}}, and {{user.username}} are automatically resolved from the authenticated user's session at request time. You don't need to configure them in environment variables or integrations - each user automatically gets their own token/name/username injected. This differs from environment variable placeholders like {{API_KEY}}, which use static values configured in the env section and are the same for all users.
Example Configuration
{
  "name": "example-http-server",
  "type": "streamable-http",
  "url": "http://127.0.0.1:3001/mcp",
  "headers": {
    "Content-Type": "application/json",
    "X-User-Name": "{{user.name}}",
    "X-Username": "{{user.username}}",
    "X-Project": "{{PROJECT_NAME}}",
    "X-API-KEY": "{{API_KEY}}",
    "Authorization": "Bearer {{user.token}}"
  },
  "env": {
    "PROJECT_NAME": "my-project",
    "API_KEY": "my-api-key"
  }
}
When an authenticated user "John Doe" (username: John.Doe@epam.com) makes a request, the headers sent to the HTTP MCP server will be resolved to:
Content-Type: application/json
X-User-Name: John Doe
X-Username: John.Doe@epam.com
X-Project: my-project
X-API-KEY: my-api-key
Authorization: Bearer eyJhbGciOiJIUzI1NiIsInR5cCI6IkpXVCJ9...
Use Cases
User context placeholders are beneficial for:
- User authentication: Pass authenticated user JWT to MCP servers requiring per-user authentication (
{{user.token}}) - User-specific routing: Route requests to different backends based on user identity
- Audit logging: Track which user triggered specific MCP server operations
- Authorization: Pass user information to downstream services for access control
- Context propagation: Maintain user context across microservices architecture
- User placeholders (including
{{user.token}}) are resolved securely at request time from the authenticated user context - Token resolution is thread/async-safe: each concurrent request receives its own user JWT with no cross-request leakage
- JWT token values are never logged to prevent security exposure
- If no authenticated user context exists, the system fails safely without injecting a token
Testing MCP Server Integration
To ensure your MCP server is correctly configured and accessible, CodeMie provides a convenient Test integration feature:
Testing from the Edit MCP Server Page
- Navigate to the Edit assistant page
- Find and expand the MCP server tool card
- Click on the three dots menu, then click Edit
- On the Edit an MCP server page, locate the Test integration button next to Cancel and Save
- Click the Test integration button
- The system will immediately verify the connection and display the result:
- Success: The MCP server is properly configured and accessible
- Failure: Troubleshooting information will be provided
Testing from the MCP Server Card
- Navigate to the Edit assistant page
- Find and expand the MCP server tool card
- Click on the three dots menu
- Select the Test integration option
- The system will perform the verification and display results immediately
This feature helps you quickly confirm that your MCP server connection is working properly without having to test it through actual assistant conversations.
Propagating Client Headers to MCP Servers
CodeMie supports forwarding custom HTTP headers from client SDK requests to MCP server invocations. This allows you to pass request-scoped context — such as tenant identifiers, correlation IDs, or custom authorization tokens — directly through to the tools your assistant calls on an MCP server.
Overview
Header propagation is opt-in and disabled by default. Clients must explicitly enable it per request by setting propagate_headers: true in the request body.
How It Works
When header propagation is enabled:
- A client sends a request to CodeMie with
propagate_headers: trueand includes one or moreX-*HTTP headers - CodeMie extracts all
X-*headers from the incoming request, filtering out a configurable blocklist of sensitive headers - The extracted headers are attached to the MCP execution context and sent to the MCP-Connect bridge in the body of every tool invocation (
tools/listandtools/call) - The MCP-Connect bridge receives the headers and forwards them to the target MCP server
SDK Request  ──►  CodeMie API  ──►  MCPToolkitService  ──►  MCPConnectClient
  X-Tenant-ID: abc          extract_custom_headers()         request_headers in body
  propagate_headers: true   (filters blocked headers)        ──►  MCP-Connect  ──►  MCP Server
Using Header Propagation
With Assistant Chat
Set propagate_headers: true in the request body when calling the assistant chat endpoint. Any X-* headers you include in the HTTP request are forwarded to MCP tool invocations.
POST /v1/assistants/{assistant_id}/chat
Content-Type: application/json
X-Tenant-ID: my-tenant
X-Correlation-ID: req-abc-123
X-User-Context: engineering-team

{
  "text": "List all open pull requests",
  "propagate_headers": true
}
With Workflow Execution
Set propagate_headers: true in the request body when creating a workflow execution.
POST /v1/workflows/{workflow_id}/executions
Content-Type: application/json
X-Tenant-ID: my-tenant
X-Correlation-ID: req-abc-123

{
  "user_input": "Run the code review pipeline",
  "propagate_headers": true
}
With Workflow Resume
Pass propagate_headers as a query parameter when resuming an interrupted workflow execution.
PUT /v1/workflows/{workflow_id}/executions/{execution_id}/resume?propagate_headers=true
Content-Type: application/json
X-Tenant-ID: my-tenant
Security: Header Filtering
Not all X-* headers are forwarded. CodeMie applies a blocklist to prevent propagation of sensitive credentials and internal tokens.
Default Blocked Headers (case-insensitive):
| Header | Reason |
|---|---|
Authorization | Bearer tokens, Basic auth |
Cookie | Session cookies |
Set-Cookie | Session cookies |
X-Api-Key | API key credentials |
X-Auth-Token | Authentication tokens |
X-Internal-Secret | Internal service secrets |
X-Internal-Token | Internal service tokens |
Administrators can customize the blocklist via the MCP_BLOCKED_HEADERS environment variable. See the API Configuration Guide for details.
Configuring MCP Servers to Receive Propagated Headers
To make use of propagated headers, your MCP server must be prepared to read them from the tool invocation context it receives from MCP-Connect.
HTTP MCP Servers
For HTTP-transport MCP servers, the propagated headers are delivered to the MCP-Connect bridge as part of the invocation request body under the request_headers field. MCP-Connect can be configured to forward them as HTTP headers to the upstream MCP server.
Example Configuration:
{
  "name": "my-api-server",
  "description": "Internal API MCP server",
  "type": "streamable-http",
  "url": "https://my-api-server.internal/mcp",
  "headers": {
    "Content-Type": "application/json",
    "X-Service-Name": "codemie"
  }
}
When propagate_headers: true is set on the request, the client-supplied headers (e.g., X-Tenant-ID, X-Correlation-ID) are passed alongside the static headers defined in the server config.
stdio MCP Servers
For command-based (stdio) MCP servers, the propagated headers are included in the invocation request body sent to MCP-Connect. How MCP-Connect delivers them to the stdio process depends on your MCP-Connect configuration (for example, via environment variables or standard input). Consult your MCP-Connect deployment documentation for details.
Common Use Cases
Multi-Tenant Context
Pass a tenant identifier so the MCP server can scope its responses to the correct tenant.
POST /v1/assistants/{assistant_id}/chat
X-Tenant-ID: acme-corp

{
  "text": "Show me this week's deployment status",
  "propagate_headers": true
}
The MCP server receives X-Tenant-ID: acme-corp and uses it to filter data for the acme-corp tenant.
Request Tracing
Propagate a correlation ID so that traces span from the SDK call all the way to the MCP server and back.
POST /v1/workflows/{workflow_id}/executions
X-Correlation-ID: trace-7f3a9b21
X-Request-Source: ci-pipeline

{
  "user_input": "Run integration tests",
  "propagate_headers": true
}
Forwarding User Identity
Pass end-user identity metadata when the MCP server needs to perform access control or audit logging on its side.
POST /v1/assistants/{assistant_id}/chat
X-End-User-ID: u-4892
X-End-User-Role: developer

{
  "text": "Deploy to staging",
  "propagate_headers": true
}
Do not pass raw auth tokens (e.g., X-Auth-Token) via header propagation — these are blocked by default. If the MCP server needs user authentication, configure it through the MCP server's integration_alias or env credentials instead.