Control Plane on Kubernetes
Part of the CodeMie Enterprise package, and may not be enabled on every deployment. If this capability is missing from the UI described below, contact the CodeMie platform administrator. See all Enterprise features.
This guide provides instructions for installing and configuring the Control Plane, which shows project leads what AI-assisted delivery produced and what it cost. It combines CodeMie CLI sessions with tickets from the issue tracker and merge requests from Git, and presents the results per project, stream and person. The Control Plane is installed with a Helm chart into the Kubernetes cluster next to AI/Run CodeMie, reads AI usage metrics from the CodeMie backend, and lets users sign in with the same SSO as CodeMie.
Prerequisites
General Requirements
Before you begin, ensure you have:
- AI/Run CodeMie Deployment: AI/Run CodeMie deployed in the target cluster
- Kubernetes Cluster Access:
kubectlandhelmconfigured to access your target cluster - Helm Charts Repository: Clone access to codemie-helm-charts
- Container Registry and Helm Charts: Access to the AI/Run Control Plane container registry and Helm chart repository in ai-run-registry
- CodeMie Version: AI/Run CodeMie v2.65.0 or higher
Control Plane System Requirements
The diagram below depicts the Control Plane deployed on Kubernetes infrastructure within a cloud environment.
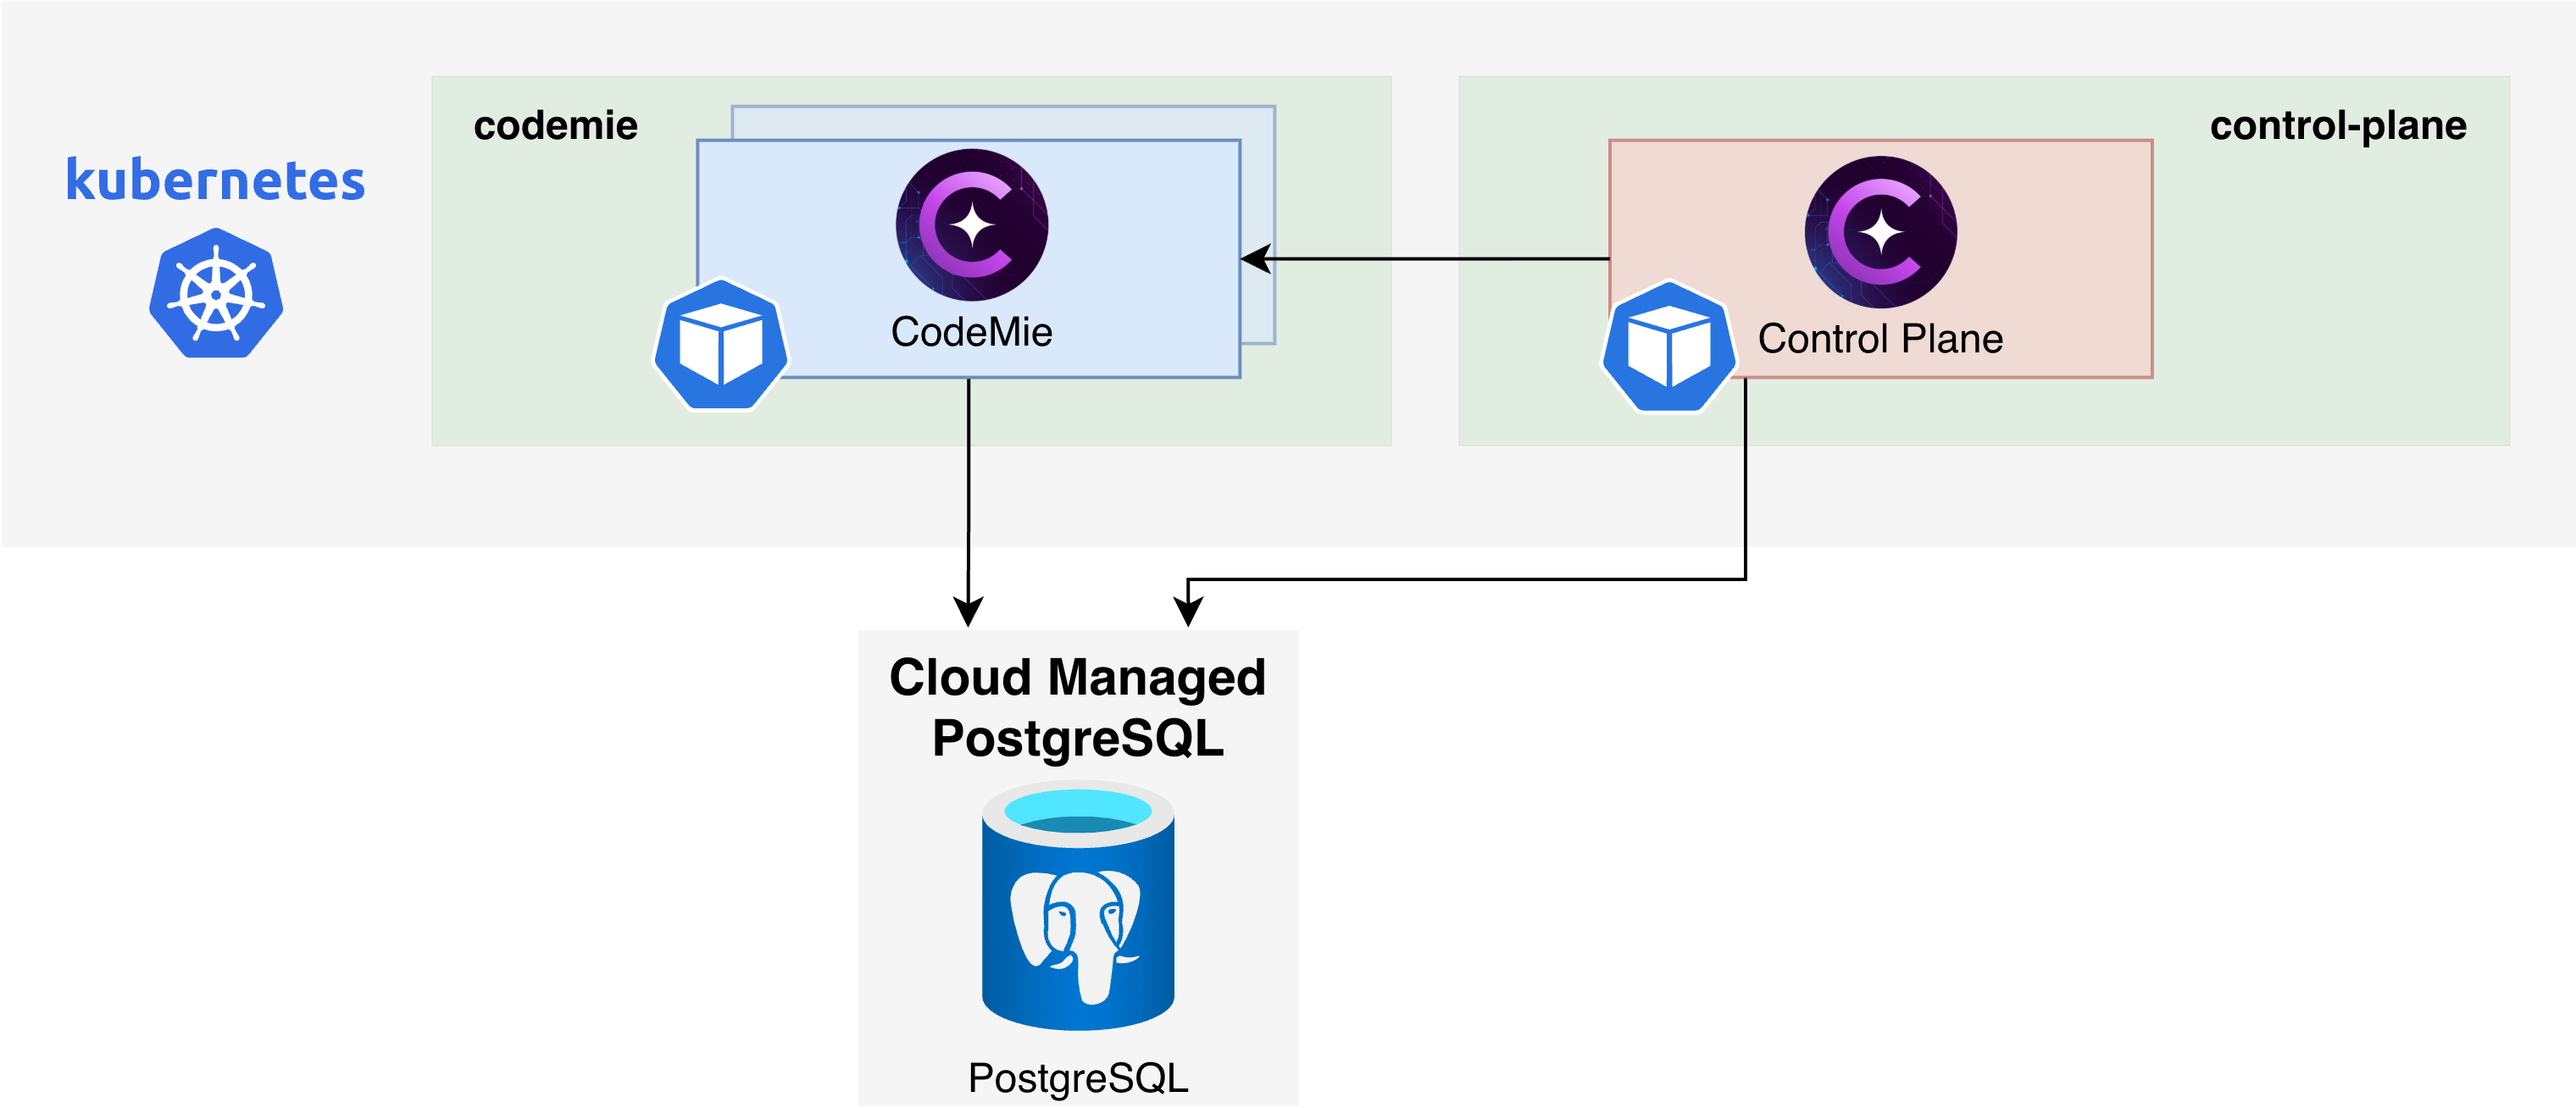
Components and Requirements
| Component | CPU (Limits/Requests) | Memory (Limits/Requests) | Storage |
|---|---|---|---|
| Control Plane x 1 Replica | 2 / 0.1 | 3Gi / 1536Mi | 20Gi |
| PostgreSQL (CodeMie, read-only) | - | - | - |
| Total | ~2 / ~0.1 vCPU | ~3 / ~1.5 GiB RAM | ~20 Gi PVC |
PostgreSQL Configuration
The Control Plane reads CodeMie CLI sessions from the codemie_analytics schema of the CodeMie
PostgreSQL database. It requires a dedicated read-only user in your PostgreSQL instance. Follow these
steps to configure it.
Connect to PostgreSQL
Connect to the codemie database of your main PostgreSQL instance.
You can connect using one of the following methods:
- Use your cloud provider's built-in query tools.
- Deploy pgAdmin inside the cluster to access your private PostgreSQL instance.
Click here for instructions on deploying pgAdmin
# Create a dedicated namespace
kubectl create ns pgadmin

# Create credentials for pgadmin
kubectl create secret generic pgadmin4-credentials \
--namespace pgadmin \
--from-literal=password="$(openssl rand -hex 16)" \
--type=Opaque

# Inside cloned codemie-helm-charts
# Deploy pgadmin using Helm
helm upgrade --install pgadmin pgadmin/. -n pgadmin --values pgadmin/values.yaml --wait --timeout 900s --dependency-update

# Forward a local port to the service to access the UI
kubectl -n pgadmin port-forward svc/pgadmin-pgadmin4 8080:80

# You can now access the pgadmin UI at http://localhost:8080
# Default user: "pgadmin4@example.com"
# Retrieve the pgAdmin password from the Kubernetes secret.
kubectl -n pgadmin get secret pgadmin4-credentials -o jsonpath='{.data.password}' | base64 -d; echo
Create Read-Only User
Execute the following SQL commands to create the read-only user for the Control Plane and grant it access to the CodeMie analytics tables.
Replace 'your_strong_password_here' with a new, secure password for the control_plane_reader
user. You can generate one using:
openssl rand -base64 16 | tr '+/' '-_' | tr -d '= ' | cut -c1-16
The command above generates a URL-safe password using only alphanumeric characters, hyphens (-),
and underscores (_). This is intentional: passwords containing special characters such as @,
#, $, !, %, &, =, \, spaces, etc., can cause issues when embedded in connection
strings, shell scripts, or Helm values files. Using a password without such characters reduces the
risk of quoting or escaping errors.
CREATE USER control_plane_reader WITH PASSWORD 'your_strong_password_here';
GRANT CONNECT ON DATABASE codemie TO control_plane_reader;
GRANT USAGE ON SCHEMA codemie_analytics TO control_plane_reader;
GRANT SELECT ON
  codemie_analytics.cli_analytics_alembic_version,
  codemie_analytics.session_dims,
  codemie_analytics.session_usage,
  codemie_analytics.subagent_invocations,
  codemie_analytics.hook_events
TO control_plane_reader;
Build Connection String
Build the connection string from the user, its password and the address of the PostgreSQL instance:
postgresql://control_plane_reader:<password>@<pg-host>:<pg-port>/codemie
The connection string goes into the CODEMIE_ANALYTICS_PG_URL variable of the Control Plane,
through the secret in Step 1.
Deployment Steps
Step 1: Create Secrets
Create the control-plane namespace, the secret to pull the Control Plane image, and the secret
with the connection string to the CodeMie analytics database.
-
Create the namespace:
kubectl create namespace control-plane -
Create the secret to pull the image from the AI/Run registry:
kubectl create secret docker-registry gitlab-ai-run-registry \--namespace control-plane \--docker-server=registry.ext.git.epam.com \--docker-username='<username>' \--docker-password='<access-token>' -
Create the secret with the connection string built in Build Connection String:
kubectl create secret generic control-plane-secrets \--namespace control-plane \--from-literal=codemie-analytics-pg-url='postgresql://control_plane_reader:<password>@<pg-host>:<pg-port>/codemie' \--type=Opaque -
Verify that the secrets are created:
kubectl get secret gitlab-ai-run-registry control-plane-secrets -n control-plane
Step 2: Configure Values
In the cloned codemie-helm-charts
repository, open the values file for your cloud (aws, azure or gcp):
codemie-extensions/control-plane/values-<cloud_name>.yaml
Update it:
-
Replace
%%DOMAIN%%with your domain. -
Set the Control Plane version, replacing
x.y.zwith the release you install:image:tag: 'x.y.z-control-plane'
The other settings, such as the ingress, the storage and the database secret, are already configured.
To change other Control Plane parameters, add them to the env list of the values file:
env:
  # ... existing variables
  - name: FEATURE_CHAT
    value: 'false'
For all available parameters, see Control Plane Configuration Reference.
Step 3: Install Helm Chart
-
Log in to the AI/Run registry with Helm (requires Helm 3.8+):
helm registry login registry.ext.git.epam.com -u '<username>' -p '<access-token>' -
Install the chart from the root of the cloned
codemie-helm-chartsrepository:helm upgrade --install control-plane \oci://registry.ext.git.epam.com/epm-cdme/ai-run-registry/helm-charts/control-plane \--version x.y.z \--namespace control-plane \-f ./codemie-extensions/control-plane/values-<cloud_name>.yaml \--wait \--timeout 600sReplace
x.y.zwith the chart version from the AI/Run registry.
Step 4: Verify Deployment
kubectl get pods -n control-plane
kubectl logs -n control-plane deployment/control-plane --tail=50
Expected result: the pod is Running and ready, and the logs show no startup errors.
Step 5: Access the Application
Open the Control Plane at https://codemie.<domain>/control-plane and sign in with the CodeMie
account. The first start opens an empty installation: add a client, its projects, streams and
members, and their sources in Settings → Clients.